SAFE START ELECTRIC SCOOTER OWNER’S MANUAL FOR USE WITH THE FOLLOWING PULSE PERFORMANCE PRODUCTS™ SCOOTERS • SAFE START ELECTRIC SCOOTER DO NOT RETURN TO STORE! QUESTIONS OR COMMENTS? CALL (866)-434-6067 NOTE: Manual illustrations are for reference purposes only. Illustrations may not reflect the exact appearance of the actual product. Specifications are subject to change without notice. 06.12.
Table of Contents Safety and Warnings 2-3 Before You Start 4 Assembly 5-6 Before You Ride 7 Riding 7 Hardware Maintenance 7 Repair and Maintenance 8-9 Troubleshooting 10 Scooter Components 11 Warranty 12 on the child’s maturity, skill and their ability to follow rules. This scooter is intended for use only by persons who are, at a minimum, completely competent and comfortable while operating this product.
Safety and Warnings User weight more than 50lbs may damage the scooter. Be sure the rider keeps both hands on the handlebars and stand on the center of the deck at all times while riding. Only use the battery specified by the manufacturer. Only use the charger specified by the manufacturer. Check and obey any local laws or regulations which may affect the locations where the electric scooter may be used.
Before You Start WARNING: This scooter must be assembled by an adult! Remove all packing and items from the display box. Estimated Assembly Time • Allow up to 20 minutes for assembly, not including initial charge time. • Allow up to 10 hours for the initial charge (see page 6 for charging information).
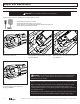
Assembly Handlebar Steer Tube Assembly Tools required: 5mm hex wrench, 10mm wrench B A A D C 1. Remove deck cap cover (A) by squeezing sides together and removing tabs from deck slots. BRAVO SPORTS 12801 CARMENITA ROAD SANTA FE SPRINGS, CA, 90670 USA 2. Slide deck cap cover (A) onto stem tube (B). Insert stem tube (B) into steer tube (C) and align holes (D). UNLESS OTHERWISE SPECIFIED: BRAVO SPORTS METRIC 1. DIMENSIONS APPLY BEFORE PLATING OR COATING. 2. REMOVE ALL BURRS, BREAK SHARP EDGES. 3.
Assembly Battery and Charging WARNING: Batteries must be fully charged before you ride your electric scooter. Required components: Battery charger • Initial battery charge time- 10 hours • Recharges after initial charge- Up to 8 hours • When scooter is not in regular use batteries need to be charged on a monthly basis to maximize performance. B A C 1. To connect battery insert plug A into plug B . 2. Tuck plugs and wires under frame and into battery box. 3.
Before You Ride Before you ride always check and for the following: Safety Gear Always wear proper protective gear such as: • Approved safety helmet. (Helmet may be legally required by local law or regulation in your area.) • Elbow pads and knees pads • Long sleeved shirt, long pants • Gloves • Lace up shoes with rubber soles.
TS Repair and Maintenance Battery Replacement WARNING: Only use battery specified by the manufacturer Required tools/components: Philips head screwdriver, Battery charger • Initial battery charge time - 10 hours • Recharges after initial charge - Up to 8 hours • When scooter is not in regular use batteries need to be charged on a monthly basis to maximize performance. B A 1. Remove the 3 battery door screws with a Philips head screwdriver. 2.
Battery Care and Disposal Do not store the battery in temperatures above 70°F (21°C) or below 32°F (0°C). THIS SCOOTER CONTAINS SEALED LEAD ACID BATTERIES WHICH MUST BE RECYCLED IN ACCORDANCE TO YOUR LOCAL AND STATE LAWS. PLEASE CAREFULLY READ AND UNDERSTAND THE FOLLOWING DISPOSAL INSTRUCTIONS: Disposal: This product contains sealed lead acid batteries which must be disposed or recycled in an environmentally safe manner. Do not dispose of the batteries in your household trash.
Troubleshooting Problem Possible Cause Solution Scooter will not run. Battery is not charged. Fully charge the battery. First charge should be 10 hours and up to 8 hours for recharges. Wires or connectors are loose or unplugged. Check to ensure that charger is tightly plugged into both the wall and the scooter. Check all scooter plugs and connections are correctly attached. Battery requires charging. Fully charge the battery. First charge should be 10 hours and up to 8 hours for recharges.
Scooter Components part 2 6 4 3 5 19 description 1 Frame 2 Right Grip 3 Left Grip 4 Go Button 5 Stem Tube Grommet 6 Handlebar Stem Tube 7 Deck Cap 8 Frame Upper Cap 9 Frame Lower Cap 10 Front Wheel 11 Steer Tube 12 Front Axle 13 Axle Cap 14 Battery Box Door 15 Battery 16 Battery Box 17 Controller 18 Frame Grommet 19 Deck 20 Gear Box 21 Rear Wheel 22 Rear Axle 23 Rear Axle Spacer 20 7 21 18 17 10 8 16 9 22 1 15 23 14 11 12 13 Questions or concerns?
Warranty Pulse Performance Products™ Limited Warranty The manufacturer warranties this product to be free of manufacturing defects for a period of 90 days from the date of purchase. This Limited Warranty does not cover normal wear and tear, tires, cables, or any damage, failure or loss caused by improper assembly, maintenance, storage or use of this Pulse Performance Products™ electric scooter.