NOTE: CAN BE USED AS A KICK SCOOTER OR, BY PRESSING THE THUMB THROTTLE, ELECTRIC POWER WILL ENGAGE THE MOTOR FOR ADDED POWER AND ACCELERATION. YOUR RIDE TIME WILL VARY GREATLY DEPENDING ON THE AMOUNT OF POWER-ASSISTED RIDING PERFORMED. ELECTRIC SCOOTER OWNER’S MANUAL FOR USE WITH THE FOLLOWING PULSE PERFORMANCE PRODUCTS™ SCOOTERS • REVSTER 200 DO NOT RETURN TO STORE! QUESTIONS OR COMMENTS? CALL (866)-434-6067 04.24.
Table of Contents Safety and Warnings Before You Start Assembly Hardware Maintenance Before You Ride Repair and Maintenance Troubleshooting Scooter Components Warranty 2-3 4 5-6 7 7 8-10 11 12 13 Safety and Warnings WARNING: Riding an electric scooter can be a dangerous activity. Certain conditions may cause components to fail without fault of the manufacturer.
Safety and Warnings WARNING: FAILURE TO HEED TO THE WARNINGS LISTED BELOW INCREASES RISK OF POTENTIAL SERIOUS INJURY. USE THE APPROPRIATE CAUTION WHEN RIDING AND ALWAYS WEAR PROTECTIVE GEAR. Maintain a hold with both hands on the handlebars at all times. Never allow more than one person at a time to ride the scooter. Never use on roadways, near motor vehicles, on or near steep inclines or steps, swimming pools or other bodies of water.
Before You Start WARNING: Remove all packing and items from the display box. Make sure that the power switch is turned “OFF” before assembling the scooter. Estimated Assembly Time • Allow up to 25 minutes for assembly, not including initial charge time. • Allow up to 12 hours for the initial charge (see page 6 for charging information). thumb switch throttle NOTE: This scooter does not have a manual reset button or fuse. It is integrated into the controller and is self-resetting.
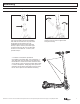
Assembly Handlebar Steer Tube Assembly Tools required: 5 mm hex wrench, 10 mm wrench Locator Hole 1. Depress the push button located on the rear of the fork tube and insert the handlebar steer tube onto the fork tube. The push button should align with the locator hole in the handlebar steer tube and lock the steer tube securely in place. Once the push button pops out of the locator hole, lift up on the steer tube to ensure it cannot slide off. If it cannot, then proceed to step 2. 2.
Assembly Charging the Battery WARNING: Battery must be fully charged before you ride your electric scooter . Required components: battery charger • Initial battery charge time - 12 hours • Recharges after initial charge - up to 10 hours • When scooter is not in regular use batteries need to be charged on a monthly basis to maximize performance 1. Make sure power switch is in the OFF position before plugging in the charger. Insert charger into charging port on the left side of the battery box. 2.
Hardware Maintenance Brake Check the brakes for proper function. When you step on the brake it should provide positive braking action. When you apply the brake with the speed control on, the brake cut off switch should stop the motor. Frame, Fork, Handlebars & Hardware Check for cracks or broken connections. Although broken frames are rare, it is possible for aggressive rider to accidentally run into a curb or wall and bend or break a frame.
Repair and Maintenance Rear Wheel-Transmission-Motor Assembly Replacement Tools required: two [2] 13 mm wrenches, phillips screwdriver 1. Using a #2 phillips screwdriver, remove the 5 deck screws and lift the deck away by shifting it up and towards the rear of the scooter, allowing the deck to slip off of the brake pedal. The brake pedal will not come off with the deck. 2. Using a #2 phillips screwdriver, remove the 2 side-transmission mounting screws from the frame.
Repair and Maintenance Front Wheel Replacement Tools required: Two 5mm hex wrenches 1. Using two 5 mm hex wrenches loosen and remove the front axle by turning the wrenches counter clockwise. 2. Reinstall new replacement wheel ensuring to note the order and location of all components. 3. Reinstall hardware and tighten clockwise with a 5 mm hex wrench. Battery Care and Disposal Do not store the battery in temperatures above 70°F (21°C) or below 32°F (0°C).
Repair and Maintenance Battery Charger Only use the supplied battery charger. If battery charger is damaged discontinue use immediately and replace with a Pulse Performance Products™ recommended battery charger. Wheels Wheels and drive system components are subject to normal wear and tear. It is the responsibility of the user to regularly inspect wheels for excess wear and adjust and replace drive train components as required.
Troubleshooting Problem Possible Cause Solution Scooter will not run. Battery is not charged. Fully charge the battery. First charge should be 12 hours and up to 10 hours for recharges. Wires or connectors are loose or unplugged. Check to ensure that charger is tightly plugged into both the wall and the scooter. Battery requires charging. Fully charge the battery. First charge should be 12 hours and up to 10 hours for recharges. Scooter run time is short.
Scooter Components 15 PART DESCRIPTION 18 14 14 15 13 8 26 5 16 4 25 17 1 24 4 20 3 6 2 7 10 12 19 23 1. Frame 2. Motor 3. Front Fork & Rotation Limit Screw 4. Headset (Upper & Lower) 5. Clamp 6. Kickstand 7. Battery Box 8. Deck 9. Rear Wheel 12 10. Front Wheel 11 11. Spring Plate 12. Foot Brake 21 13. Thumb Throttle 14. Grip 22 15. Grip End Plug 16. Controller 9 17. Batteries 18. Handlebar & Clamp 19. Charger Port & Dust Cover 20. On/Off Switch 21. Brake Cut-Off Switch 22. Transmission 23.
Warranty Limited Warranty The manufacturer warranties this product to be free of manufacturing defects for a period of 90 days from the date of purchase. This Limited Warranty does not cover normal wear and tear, tires, cables, or any damage, failure or loss caused by improper assembly, maintenance, storage or use of this Pulse Performance Products™ electric scooter.This . warranty is limited to the replacement of defective parts only.
facebook.com/pulseperfprod twitter.com/pulseperfprod Pulse Performance Products™ A Division of Bravo Sports™ 12801 Carmenita Rd.