Lahaina ShowerSpa Model #1030 PW-91030-5425SF Owner's Manual
Lahaina ShowerSpa/PW-91030-5425SF Please Read The Following Instructions COMPLETELY Before Beginning! Our goal is to ensure your installation goes smoothly and safely. Please read these instructions carefully and follow recommendations for plumbing and mounting. After reading instructions, if you determine you do not have the necessary skills and/or tools, we recommend that a licensed plumbing contractor complete the installation.
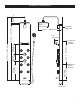
5.5 in. 139.7 mm Product Dimensions Finished Wall Line 23.5 in. - 596.9 mm 4 in. 101.6 mm Holes For Mount Bracket 14.375 in. 365.125 mm 17.75 in. 450.85 mm 23.25 in. - 590.55 mm 5.75 in. 9.25 in. 146.05 mm 234.95 mm 57.75 in. - 1466.85 mm 51.25 in. - 1301.75 mm 9.5 in. 241.3 mm 10.5 in. 266.7 mm Holes For Mount Bracket 2.5 in. 63.
Parts Legend 1. ShowerSpa 5. Handheld Shower 2. Shower Head 6. Handheld Holder 10. Mount Bracket................ (2) 9. Nylon Anchor.................. (6) 3. Shower Arm 7. Handheld Hose 11. Rubber Washer............... (3) 4. Shower Arm Bracket 8. Mounting Screw............. (6) 12. Body Jets Tapered End Turn body jets for on/off function on bottom six body jets.
Assembly After installing your ShowerSpa, some assembly is required prior to use. Attaching The Accessories 1. Locate the desired mounting location of the handheld holder (6) and mark the holes (we recommend placing it near the height of the glass shelf). Drill ¼" holes through wall surface using a masonry bit. Drill slowly through wall surface to avoid cracking and chipping. Insert anchors and securely screw mount to wall.
Installation – Retrofit Existing Shower Replacement NOTE—In a re-model in which you are not replacing the finished wall surface (tile, or backing material) it is advisable to purchase a PULSE ShowerSpa model that covers the location of existing valve assembly—either single handle or two-handle type. If your PULSE ShowerSpa model does not cover this area, you will need to either choose another PULSE ShowerSpa model that does or make necessary repairs with appropriate materials (i.e.
Care and Maintenance Always blot dry any water from the surface of your ShowerSpa. To help protect your ShowerSpa from hard water stains and mineral deposits, use an auto spray wax periodically and wipe down your ShowerSpa after each use. Allowing water to evaporate on the surface can lead to a buildup of mineral deposits. Cleaning with a damp, nonabrasive sponge and drying with a clean soft cloth should help keep your ShowerSpa looking beautiful.
Manufacturer’s Lifetime Limited Warranty 1. Defects Covered; Warranty Period. Pulse Shower Spas, Inc. (“Pulse”) warrants to the original consumer purchaser who purchases this shower spa (the “Product”) for use in his or her own home, that the Product will be free from defects in material and manufacturing workmanship for as long as the original consumer purchaser owns that same home.