TRU-TEMP VALVE WITH LED TRIM Tru-Temp Pressure Balance 1/2" Rough-In Valve Owner's Manual Model #3002-RIV-PB-CH, 3002-RIV-PB-BN & 3002-RIV-PB-ORB Model #3004-RIV-PB-CH, 3004-RIV-PB-BN & 3004-RIV-PB-ORB
Rough-In Valve Model #3002-RIV-PB & #3004-RIV-PB Please Read The Following Instructions COMPLETELY Before Beginning! Our goal is to ensure your installation goes smoothly and safely. Please read these instructions carefully and follow recommendations for plumbing and mounting. After reading instructions, if you determine you do not have the necessary skills and/or tools, we recommend that a licensed plumbing contractor complete the installation.
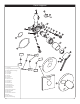
7¼" 4½" Product Dimensions 7¼" 4½" 4½" 4½" 7¼" 7¼" 5" 4½" 7¼" 2"
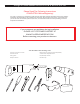
Parts Legend 000 1. Valve Body 2-8. Integral Stop/Shutoff Assembly 9. Pressure Balanced Cartridge 10. Limit Stop 11. Valve Sleeve 12. Trim Sleeve 13. Trim Nut 14. Valve Handle 15. Set Screw 16. Set Screw Cover 17. Friction Ring 18. Trim Plate 19. Plaster Guard 20. Tub Spout Cap 21. Wall Gasket/ Sealer 22. Hot Water Inlet 23. Cold Water Inlet 24. Water Power Generator 25. Tub Spout Outlet 26. LED Display 27. Water Power Generator 28. Gasket 29. LED Connector 30.
Installation Valve Installation/Replacing Existing Valve 1. TURN OFF WATER SUPPLY TO SHOWER. Typically there is a gate valve where the water main enters the house. Turning the water valve off at hot water tank does not turn off cold water supply line. 2. Make certain water is completely turned off to both hot & cold supply lines of shower. Turn shower valve on, both hot and cold, to VERIFY WATER SUPPLY IS OFF.
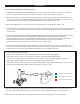
Installation Setting Maximum Water Temperature Preset NOTE— This valve includes a factory maximum water temperature preset known as a limit stop. WARNING: Failure to adjust the limit stop properly may result in serious scalding. This shower may not protect the user from scalding where there is a failure of other temperature controlling devices elsewhere in the system. 1. Loosen set screw (15) with an allen wrench and remove valve handle (14). 2. Remove cartridge trim nut (13) and trim sleeve (12) by hand.
Usage Tru-Temp Pressure Balance Mixing Valve This valve is equipped with a cUPC® Tru-Temp pressure balance mixing cartridge to adjust water flow and temperature. The valve automatically adjusts to changes in water pressure (i.e. someone flushes a toilet), keeping your temperature constant preventing accidental scalding. To turn on the water simply raise the handle until the desired flow rate is achieved. Rotate handle right to decrease temperature and rotate left to increase temperature.
Manufacturer’s Lifetime Limited Warranty 1. Defects Covered; Warranty Period. Pulse Shower Spas, Inc. (“Pulse”) warrants to the original consumer purchaser who purchases this shower valve (the “Product”) for use in his or her own home, that the Product will be free from defects in material and manufacturing workmanship for as long as the original consumer purchaser owns that same home.