VAQUERO Vaquero Showerspa Model #1027 Owner's Manual
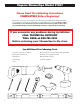
Vaquero ShowerSpa Model #1027 Please Read The Following Instructions COMPLETELY Before Beginning! Our goal is to ensure your installation goes smoothly and safely. Please read these instructions carefully and follow recommendations for plumbing and mounting. After reading instructions, if you determine you do not have the necessary skills and/or tools, we recommend that a licensed plumbing contractor complete the installation.
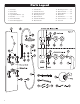
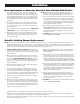
Mounting Bracket & Stub-out Location 8" 25" Estimated Mounting Height And Stub-out Location For Individuals 5'8"– 6'2" 90˚ Fittings Not Included 56" 4" Mark Bottom Of ShowerSpa Where It Contacts The Wall 31" 24" Floor 3
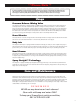
Parts Legend 4 1. ShowerSpa 8. Hand Shower 15. Mounting Screw B.......... (2) 2. Shower Arm 9. Hand Shower Hose 16. Nylon Anchor B.............. (2) 3. Shower Head 10. Hand Shower Holder 17. Rubber Washer............... (4) 4. Large Rubber Washer.... (2) 11. Mounting Screw A 18. Glass Shelf 5. Brass Nut......................... (2) 12. Nylon Anchor A 19. Shelf Mount.................... (2) 6. Shower Arm Outlet 13. Hand Shower Outlet 20. Shelf Set Screw............... (2) 7.
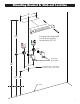
Assembly Some Assembly Is Required Prior To Installation Shower Arm Assembly Figure A 1. Before installing the shower arm (2) you need to align the mounts to the shower arm outlets (6). Loosen set screw (21) inside the top mount of the shower arm (2) with a 4mm allen wrench. Position so both mounts line up with the two shower arm outlets (6) on the front of the ShowerSpa. Gently tighten the set screw (21) inside the top mount—DO NOT OVERTIGHTEN. 2.
Installation New Construction or Extensive Remodel – New Finished Wall Surface 1. Prior to sheetrock, stub-out ½" hot and cold supply lines beyond finished wall surface, 4" on center. For best results, attach 90° brass fittings (available at most hardware stores) to the stub-outs maintaining ¼"– ½" of space between the fitting and finished wall. The open end of the 90° brass fittings should point down so the supply lines attach parallel to the wall.1 2.
* * Please Note * * If, after installing your ShowerSpa, you experience a knocking sound inside the wall when the unit is turned on, you may need a Check Valve to further balance your water pressure. Call our Tech Support Team at (888) 785-7320 and we will send you a Check Valve at no charge. Usage Pressure Balance Mixing Valve The Vaquero ShowerSpa is eqiuipped with a cUPC® pressure balance mixing valve to adjust water flow and temperature. The valve automatically adjusts to changes in water pressure (i.
Manufacturer’s Limited Warranty PULSE Shower Spas, Inc. warrants that all ShowerSpas are free from defect in workmanship and/or materials for a period of three years from the date of purchase. This warranty extends to the original purchaser only and is non-transferable.