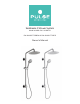
SeaBreeze II Shower System Model #1088-CN & 1088-CH PW-91088-7725BRN & PW-91088-7725CP Owner's Manual
SeaBreeze II Model #1088-BN/1088-CH/PW-91088-7725BRN/PW-91088-7725CP Please Read The Following Instructions COMPLETELY Before Beginning! Our goal is to ensure your installation goes smoothly and safely. Please read these instructions carefully and follow recommendations for plumbing and mounting. After reading instructions, if you determine you do not have the necessary skills and/or tools, we recommend that a licensed plumbing contractor complete the installation.
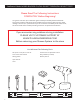
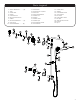
Parts Legend 1. 2. 3. 4. 5. 6. 7. 8. 9. 10. Anchor M4*30mm..............(8) Tape Check Valve Nipple Flow Restrictor Big Hex Wrench 8mm Gasket Set Screw M6x8mm...........(2) Inlet Fitting Screw M4x25mm.............(8) 11. 12. 13. 14. 15. 16. 17. 18. 19. 20. Escutcheon Allen Wrench 2.5/3mm Set Screw Set Screw M5x5mm Shower Arm Washer Shower Head Shower Pipe Hand Shower Holder Hand Shower 21. Check Valve 22. Washer 23. Hand Shower Hose 24. Cover Mount 25. Set Screw 26. Lower Mount Plate 27. 3M Tape 28.
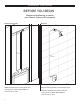
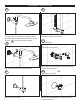
Installation Instructions BEFORE YOU BEGIN Measure the following to ensure your Shower System will fit properly. New Construction Retrofit 28” minimum 28” minimum Make sure distance from water outlet and mixing valve trim (NOT INCLUDED) is a minimum 28" or more. 4 Remove existing shower arm and shower head. Make sure distance from water outlet and mixing valve trim (NOT INCLUDED) is a minimum 28" or more.
Installation Instructions 1 2 Step 1 Step 3 Step 2 lube OR 2.1 Mixing valve (NOT INCLUDED) [Step 1] Apply a generous amount of PTFE (plumber's) tape to end of end of nipple (4). [Step 2]Screw nipple into fitting which old shower arm was screwed into. Use allen wrench provided to secure. DO NOT OVERTIGHTEN. [Step 3] Screw flow restrictor into nipple(4). DO NOT OVERTIGHTEN. CAUTION: Live Plumbing Remove set screws (2x) from Top-T (30) and remove inlet fitting. 2.
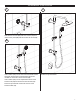
Installation Instructions 3 Remove plastic cover and slide Shower Arm (15) onto Top-T (30). Connect Shower Head (17). Slide in escutcheon (11). Screw shower head (17) onto shower arm (15). Allen wrench with 2 size ends 4 6 Use level to assure shower pipe is straight and mark lower diverter (29) mount location. 6.1 Drill Option CAUTION: Live Plumbing Slide in Top-T and secure with set screw (14). 5 Slide in cover mount (24).
Installation Instructions 7 9 Slide bottom diverter (29) and cover mount (24) onto lower mount plate (26) and secure with set screw (25). 8 Insert washer (22) into the hex end of the hand shower hose (23). Attach hose to hand shower (20) outlet located on the bottom of the diverter (29). Insert washer (22) into the tapered end of the hand shower hose (23) and attach the hand shower (20). Place the tapered end of the hose into the hand shower holder (19).
Usage Diverter valve controls the showerhead and handshower function. Turn diverter clockwise for hand shower, counterclockwise for shower head. Position between for both functions. Turn face of hand shower to switch settings. Adjust the hand shower position by depressing the button on the hanger and sliding up or down. Always turn cold water on first to help prevent any accidental burning or scalding; especially for children and elderly.