
Use and Care Manual


3
Installation Instructions:
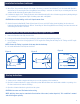
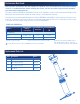
Installing the Filter (See Figure 1):
Remove the Cold Water Line (See Figure 2):
Installing the System (See Figure 3):
Figure 1
Figure 2
Figure 3
1. Insert Filter Cartridge (C) over the standpipe in the bottom of
Filter Sump (B).
2. Screw the sump to Head Assembly (A) and hand-tighten. Use
Sump Wrench (K) to tighten fully, make sure the seal marks
on the head and sump are aligned.
1. Turn off cold water supply valve, and open sink faucet to relieve
pressure from the sink’s cold water supply line.
2. Place a tray or towel under cold water line to catch excess
water.
3. Remove existing hose or tubing from cold water line between
the shank of the faucet and the supply valve.
1. Place Pre-Assembled Head Assembly (A) on the solid wall of the
cabinet in proper position. Fix the bracket on the wall with two
Mounting Screws (E).
CAUTION: There must be a 2” minimum clearance between
the bottom of filter sump (B) and the floor of cabinet to
facilitate easy replacement of the filter cartridge.
2. Determine the length of 3/8” Tubing (D) from the outlet of Head
Assembly (A) to the shank of the faucet by holding tubing in place
ensuring it’s of appropriate length. Cut tubing square with a utility
knife.
CAUTION: Do not kink tubing as this will impede water flow.
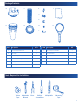
A
Seal marks
line up
Tighten
Standpipe
B
C
Remove
the hose
Cold water
supply valve
Water
Outlet
Water
Inlet
F
D
D
D
D
B
A
G
H
I
Faucet Shank
Minimum 2" Clearance
Hot water
supply valve
Tray
E