Pure Fitness Multi Purpose Bench Model No. 8638MB Owner’s Manual Please read all the instructions before using this product. Consult a physician before beginning any exercise program or strenuous activity The contents of this package are not suitable for children under 3 years. Contains small parts which may cause choking. Pure Fitness is a Trademark of Pure Global Brands, Inc. Do not allow more than one person on the trainer at any time. ADULT ASSEMBLY REQUIRED.
OWNERS MANUAL CUSTOMER SERVICE INFORMATION Thank you for purchasing our Pure Fitness™ Mid-With Multi Purpose Bench At Pure Global Brands, we want all of our customers to be completely satisfied with their purchase. Please take time to review the contents of the product you just received to make sure that all of the parts are included. If you find that any parts are missing or damaged, we will happily provide replacement parts at no charge within 30 days of purchase.
LIMITED WARRANTY Pure Global Brands, Inc. warrants this product to be free from defects in workmanship and materials under normal use and conditions for the duration of the period outlined below FROM THE DATE OF ORIGINAL PURCHASE. This Limited Warranty is not transferable and is available only for the original purchaser of the Product. The various components of this equipment are warranted against defects and workmanship for the following time period(s): • • Steel Frame 1-year.
WARNING CHOKING HAZARD – Small parts NOT for children under 3 years. Warning While every attempt is made to ensure the highest degree of protection in all equipment, we cannot guarantee freedom from injury. The user assumes all risks of injury due to use. All merchandise is sold on this condition, which no representative of the company can waive or change.
WARNING IMPORTANT – PLEASE READ! PRIOR TO ASSEMBLING: Please visit: www.pureglobalbrands.com for any important product information updates and/or additional safety warnings before assembling or using this product. Use search term: 8638MB WARNINGS – GENERAL SAFETY ADVICE Please read these instructions in their entirety before use and retain for future reference. ● Ensure that this product has been assembled correctly, per the instructions in the manual.
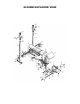
8638MB EXPLODED VIEW
8638MB PARTS LIST No.
NOTE: These instructions use the following tools (not included): 2x Pliers STEP 1: ASSEMBLE UPRIGHT POSTS AND COLLARS WITH ANTI-TIP HOOKS Locate: 2x Upright Frame Posts (1), Support Tube (4), Backrest Support Bar (5), 4x M10*80 BOLTS (31), 8x M10 Washers (37), 2x Round Plates (14), 4x M10 Nuts (39), 2x Weight Support Collars (3), Anti-Tip Hooks (17), 4x End Caps (24), 2x Round Plugs (23), 2x Post Caps (28) and 4x Collar Sleeves (30) A. Position the Support Tube (4) between the Upright Posts (1).
STEP 2: ASSEMBLE CENTER SUPPORT FRAME Locate: Control Brace (8), Front Leg (2), Support Plate (18), Flat Plate (13), 2x M10*60 Bolts (32), 1x M8*55 Bolt (34), 4x M8*16 Bolts (35), 4x M10 Washers (37), 6x M8 Washers (38), 2x M10 Nuts (39), 1x M8 Nut (40), 1x Preacher Curl Sleeve (29), 3x Rectangular End Caps (24), 4x Square End Caps 2 (26) A. Thread one M10 Washer (37) on each of the two M10*60 Bolts (32). Thread these bolts through the Flat Plate (13).
STEP 3: ATTACH CUSHIONS AND LEG LIFT BAR Locate: 2x Backrest Tubes (15), Backrest Cushion (10), Seat Cushion (11), 2x Leg Lift Cross Bars (12), Leg Lift (7), 4x Foam Rollers (19), 8x M8*40 Bolts (36), 8x M8 Washers (38), 1x M10*85 Bolt (33), 2x M10 Washers (37), 1x M10 Nut (39), Butterfly Weight Lock (20), 4x Round Plugs (23), 4x Square End Caps 1 (25), 2x Large Round Plugs (27) and 1x Rubber Bumper (22). A. Place the Leg Lift so the hold in the center is lined up to the brackets on the Front Leg (2).
STEP 4: ATTACH PREACHER CURL Locate: Preacher Cushion (9), Preacher Frame (6), Lock Knob (21), 2x M8*15 Bolts (35) and 2x M8 Washers (38). A. Place the Preacher Cushion (9) against the Preacher Frame (6). Attach the cushion to the Frame using 2x M8 Washers (38) and 2x M8*15 Bolts (35). B. Insert the completed Preacher Curl assembly into the top of the Front Leg (2). Secure with the Lock Knob (21).
USING YOUR MID-WITH MULTI PURPOSE BENCH: WARM UP/COOL DOWN EXERCISES WARM UP EXERCISES A successful exercise program consists of a warm-up, aerobic exercise, and a cooldown. Do the entire program at least two and preferably three times a week, resting for a day between workouts. After several months, you can increase your workouts to four or five times per week. Warming up is an important part of your workout, and should begin every session.
WARM UP/COOL DOWN EXERCISES (CONT.) WARM UP EXERCISES CONTINUED Calf-Achilles Stretch Lean against a wall with your left leg in front of the right and your arms forward. Keep your right leg straight and the left foot on the floor; then bend the left leg and lean forward by moving your hips toward the wall. Hold, then repeat on the other side for 15 counts Toe Touch Slowly bend forward from your waist, letting your back and shoulders relax as you stretch toward your toes.
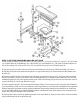
PINCH POINT AND WARNING LABEL LOCATIONS
USING YOUR MID-WITH MULTI PURPOSE BENCH ALWAYS consult a physician before beginning any exercise program. Ask your doctor to evaluate your present fitness level and determine the exercise program that is most appropriate for your particular age and/or physical condition. ALWAYS make sure that all adjustable components of this bench are fully engaged and securely locked in place. Using this bench without checking these components can result in serious injury and/or death.
FREQUENTLY ASKED QUESTIONS Question: “How should I clean my Bench?” Answer: YOU SHOULD CLEAN THIS EQUIPMENT WITH A SOLUTION OF WARM WATER AND NON-CORROSIVE AND/OR NON-ABRASIVE SOAP. DAMPEN A RAG WITH THIS SOLUTION AND WIPE COMPLETELY DRY BEFORE USING.