40” MINI TRAMPOLINE WITH HANDRAIL MODEL# 9005MTH PRODUCT MANUAL - VERSION 01.18.06 FOR AGES: 13+ WEIGHT LIMIT: 250 Lbs 114 Kgs ADULT(S) NEEDED: TOOLS NEEDED: WARNING/ADVERTENCIA • Consult a physician before beginning any exercise program or strenuous activity. • Do not allow more than one person on this product at any time. • Not recommended for children under 13 years of age. CUSTOMER SERVICE • The contents of this package are not suitable for children under 3 years of age.
CUSTOMER SERVICE INFORMATION Thank you for purchasing: 40” MINI TRAMPOLINE WITH HANDRAIL MODEL# 9005MTH At Global Quality Brands®, we want all of our customers to be completely satisfied with their purchase. Please take time to review the contents of the product you have just received to make sure that all of the parts are included. If you find that any parts are missing or damaged, we will happily provide replacement parts at no charge within 30 days of purchase.
LIMITED WARRANTY Global Quality Brands® warrants this product to be free from defects in workmanship and materials under normal use and conditions for a period of 90 DAYS FROM THE DATE OF ORIGINAL PURCHASE. This Limited Warranty is not transferable and is available only for the original purchaser of the Product. The Company’s obligation under this warranty is limited to replacing or repairing the Product, at the discretion of the company.
WARNINGS IMPORTANT MESSAGE WARNING - PLEASE READ ADULT ASSEMBLY REQUIRED CHOKING HAZARD - Small Parts NOT for children under 3 years of age. WARNING: While every attempt is made to ensure the highest degree of protection in all equipment, we cannot guarantee freedom from injury. The user assumes all risks of injury due to use. All merchandise is sold on this condition, which no representative of the company can waive or change. 4 GQBrands.com CustomerService@GQBrands.
WARNINGS Please read these warnings and the information in this manual in its entirety. Failure to comply with the following instructions may increase the risk of serious injury and/or death: • This unit is designed only for jogging in place and similar bounding exercises. • Not recommended for children under: 13 years of age. • Maximum weight limit: 250lbs. (114kgs) • Children MUST NEVER use the trampoline unless supervised by a responsible adult with knowledge of trampoline use.
PARTS LIST 2 - Frame Pad 3 - Jump Mat x1 x1 4A - Top Rail Cap 4 - Top Rail 5 - Spring x1 x36 x4 6 - Leg Tube 7A - 7 - Handrail Support Left 8 - Handrail Support Right Handrail Cap x2 x4 7B- Handrail Foam x1 x2 x1 6A - Leg Cap x6 6 GQBrands.com CustomerService@GQBrands.
PARTS LIST 9- 10 - Top Handrail Male Top Handrail Female x1 9A - Top Handrail Foam x1 11 - M5 x 45mm Bolt 12 - Nut 13 - Nut Cap x6 14 - x6 x4 x2 15 - T-Section Leg Tube M5 x 65mm Bolt 16 - Wrench X1- Washer x6 x2 MODEL# 9005MTH x2 x1 7
ASSEMBLY INSTRUCTIONS STEP 1: Parts: Part 2 (x1) - Frame Pad Part 3 (x1) - Jump Mat Part 4 (x1) - Top Rail Part 4A (x4) - Top Rail Cap Part 5 (x36) - Spring (4A) NOTE: Parts 2, 3, 4, 4A, and 5 might come pre-assembled for your convenience. Flip The Jump Mat so the logo is facing the floor, and the leg openings are facing up. STEP 2: (4A) (4A) (4A) Parts: Part 4A (x4) - Top Rail Cap Remove all 4x Top Rail Caps (Part 4A) from the Top Rail. Store in a safe place.
ASSEMBLY INSTRUCTIONS STEP 4: Parts: Part 14 (x2) - T-Section Leg Tube Insert the T-Section Leg Tube through the bigger opening in the frame pad, it will be the closest to the Top Rail Opening. (14) Flip the tube 180 degrees so the open area of the T-Section aligns to the opening of the top rail.
ASSEMBLY INSTRUCTIONS STEP 5: (13) (12) (X1) (13) (12) (X1) Parts: Part 11 Part 12 Part 13 Part X1 (x4) - M5 x 45mm Bolt (x4) - Nut (x4) - Nut Cap (X4) - Washer Before you place the Frame Pad back on top of the Top Rail, Secure both T-Section Leg Tubes by using 4x M5x45mm Bolts (Part 11) by sliding from the top of the T-Section. Secure with 4x Washers (Part X1), 4x Nuts (Part 12), and 4x Nut Caps (Part 13). Make sure both T-Section Legs are secure and all Legs are facing the same direction.
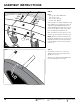
ASSEMBLY INSTRUCTIONS STEP 7: (7A) (8) (7A) (7B) (7) (7B) Parts: Part 7 Part 8 Part 7A Part 7B (x1) - Handrail Support Left (x1) - Handrail Support Right (x2) - Handrail Cap (X2) - Hand Rail Foam NOTE: Parts 7, 7A, 7B, and 8, might come pre-assembled for your convenience. If not, attach the Handrail Foam (Part 7B) to the edge of the Handrail Support tubes without covering the 3 openings. At the bottom of the Handrail Support place a Hand Rail Cap (Part 7A).
ASSEMBLY INSTRUCTIONS STEP 8: (15) Parts: Part 15 Part 12 Part 13 Part X1 (x1) - M5 x 65mm (x1) - Nut (x1) - Nut Cap (X1) - Washer Locate the smaller opening on the Frame Pad, and align with the bottom opening of the Handrail Support Left (Part 7). Insert 1x M5x65mm Bolt (Part 15) from the outside of the trampoline, and secure with 1x Washer (Part X1), 1x Nut (Part 12), and 1x Nut Cap (Part 13).
ASSEMBLY INSTRUCTIONS STEP 10: (9) (9A) (10) Parts: Part 9 (x1) - Top Handrail Female Part 10 (x1) - Top Handrail Male Part 9A (x2) - Top Handrail Foam (9A) NOTE: Parts 9, 10, and 9A might come pre-assembled for your convenience. If not, Slide the Top Handrail Foam (Part 9A) through the upper opening of the Top Handrail Female (Part 9) and Top Handrail Male (Part 10) STEP 11: Align the Top Handrail Female (Part 9) to the Handrail Support Left and slide.
ASSEMBLY INSTRUCTIONS STEP 12: In order to choose a height in the Trampoline, push the Snap Click button on the bottom of Top Handrail and slide into the Handrail Support. Choose from the three available openings and guide the button to surface on the opening that your prefer for your height. NOTE: Both buttons on the Top Handrails must be inserted in the same parallel openings from both Handrail Supports. Failure to do this might result in breakage of the product or injury when the trampoline is in use.
ASSEMBLY INSTRUCTIONS STEP 13: Guide the Snap Button from the Top Handrail Male (Part 10) into the opening of Top Handrail Female (Part 9) Once the Snap Button is secure, slide the Handrail foams to each other to avoid pinching when using and holding out the Handrail.
FREQUENTLY ASKED QUESTIONS • Question: “One of my trampoline legs has broken” or “The trampoline padding or mat is damaged, how do I replace it?” Answer: If you are still within your warranty period (90-Days from Initial purchase) You should contact customer service. You can also purchase select replacement minitrampoline parts at: PureFun.