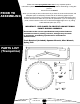
Pure Fun Race Car Jumper Trampoline simply good products for real life TM USER MANUAL Model No. 9020CT Age Recommendation: 4 - 10 Do not allow more than one person on this product at any time. Adult supervision is required. ADULT ASSEMBLY REQUIRED. Please visit www.pureglobalbrands.com to register your product to ensure warranty coverage. Please read all the instructions before using this product. Consult a physician before beginning any exercise program or strenuous activity.
IMPORTANT MESSAGE PLEASE READ WARNING CHOKING HAZARD - Small Parts NOT for children under 3 year of age. ADULT ASSEMBLY REQUIRED WARNING While every attempt is made to ensure the highest degree of protection in all equipment, we cannot guarantee freedom from injury. The user assumes all risks of injury due to use. All merchandise is sold on this condition, which no representative of the company can waive or change. Customer Service 1 866 498 5269 customerservice@puregbi.com MODEL NO.
USER MANUAL CUSTOMER SERVICE INFORMATION Thank you for purchasing our Pure Fun™ Race Car Jumper Trampoline At Pure Global Brands, we want all of our customers to be completely satisfied with their purchase. Please take time to review the contents of the product you have just received to make sure that all of the parts are included. If you find that any parts are missing or damaged, we will happily provide replacement parts at no charge within 30 days of purchase.
LIMITED WARRANTY Pure Global Brands, Inc. warrants this product to be free from defects in workmanship and materials under normal use and conditions for the duration of the period outlined below FROM THE DATE OF ORIGINAL PURCHASE. This Limited Warranty is not transferable and is available only for the original purchaser of the Product.
WARNINGS IMPORTANT PLEASE READ! Please read these warnings and the information in this manual in its entirety. Failure to comply with the following instructions may increase the risk of serious injury and/or death: ● DO NOT allow children to wear loose fitting clothing, clothing with straps/loops, backpacks or wear and/or hold accessories with straps or loops, or any article of clothing or accessory with sharp edges which may present a hazard or become snagged or caught on the Trampoline during use.
PRIOR TO ASSEMBLING Please visit: www.pureglobalbrands.com for any important product information updates and/or additional safety warnings before assembling or using this product. Use search word: 9020CT When you are ready to start, make sure that you have the correct tools at hand, and adequate space for assembly. Please refer to the following pages for part descriptions and numbers. The assembly instruction uses these descriptions and numbers as reference. Make sure you have all parts listed.
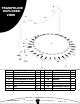
3 TRAMPOLINE EXPLODED VIEW 2 4 7 1 8 9 14 15 Part No. 1 2 3 4 5 6 7 8 10 5 6 16 Description Trampoline Mat Left Handle w/ Foam Right Handle w/ Foam Center Handle w/ Foam Qty 1 1 1 1 Frame Leg Leg Cap Bolt Washer 6 6 12 12 Customer Service 1 866 498 5269 Part No. 9 10 11 12 13 14 15 16 Description Hex Nut Spring Spring Tool Wrench Qty 12 30 1 1 Allen Key End Cap Handle Base Insert Frame Section 1 2 4 6 customerservice@puregbi.com MODEL NOS.
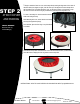
STEP 1 ASSEMBLE FRAME PARTS NEEDED: Frame Legs (6 PC) Frame Pieces (6 PC) Bolt (12 PC) Nut (12 PC) Washer (12 PC) Mat (1 PC) Springs (30 PC) 1. Place a Frame Leg (5) against a Frame Section (16). Ensure that the grooved side of the frame section is facing inwards, parallel with the open end of the Frame Leg (see below for clarification). Line up one of the Bolt holes in the Frame Leg to the corresponding hole in the Frame Piece.
3. Begin to attach the Race Car cover to the trampoline by locating the large seam in the center of STEP 2 ATTACH COVER AND PADDING PARTS NEEDED: Race Car Cover (1) Inner Padding (1) the black fabric (see diagram on right). Line this seam up to the leg that is located directly above the Trampoline logo. This will be where the “nose” on the head is located. It is important to keep this seam as close to the chosen leg as possible during assembly of the trampoline cover.
STEP 3 ASSEMBLE SIDE SKIRT AND HANDLES 4. Fold the Side Skirt (sewn to the top cover) down so it covers the frame of the trampoline. Begin to tuck the white side skirt padding on the inside of the Side Skirt fabric between it and the trampoline legs. Carefully tuck the top of the padding up into the sewn seam of the top skirt fabric and the top padding. Do not tie the Skirt ends yet. Leaving these ties free, tie the inner strings on the padding to the strings on the inside of the cover skirt fabric.
STEP 4 ASSEMBLE HEAD and ACCESSORIES 6. To attach the head of the Race Car to the trampoline, first slide the remaining leg through the loop sewn into the center of the back of the head. Next, tie the bottom side panel of the head to the Handrail Bases. Next, attach the sides of the head using the velcro straps. Lastly, secure this assembly using the ties at the top of the side panels. PARTS NEEDED: Race Car Head (1) Race Car Wheels (4) License Plate Insert (1) 6.
CARE AND MAINTENANCE Your kids’ trampoline is designed to be very low maintenance. ● If any part of the trampoline frame requires cleaning, simply wipe with a damp cloth. (Do not jump on the trampoline after cleaning until completely dry) ● If the paint is chipped, we recommend you lightly rub the damaged area and cover using a non-toxic enamel paint. ● If the cover becomes dirty or needs washing, remove the foam insert (top foam and side skirt foam). If possible, spot wash the cover.