
Instructions / Assembly


ASSEMBLE FRAME
PARTS NEEDED:
Frame Legs (6 PC)
Frame Pieces (6 PC)
Bolt (12 PC)
Nut (12 PC)
Washer (12 PC)
Mat (1 PC)
Springs (30 PC)
STEP 1
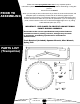
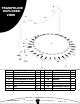
1. Place a Frame Leg (5) against a Frame Section (16). Ensure that the grooved side of the
frame section is facing inwards, parallel with the open end of the Frame Leg (see below for
clarication). Line up one of the Bolt holes in the Frame Leg to the corresponding hole in the
Frame Piece.
Thread 1x Bolt (7) through the Frame Leg and Frame Section so that the threaded end points
down towards the plastic Leg Cap. Place a Washer (8) on the Bolt End and loosely secure with
a Hex Nut (9). Take another Frame Section and secure it to the remaining hole in the Frame Leg
using the above instructions. Continue assembling the frame as described above.
DO NOT FULLY TIGHTEN NUT/BOLT COMBINATIONS UNTIL THE ENTIRE FRAME IS
ASSEMBLED. ALSO NOTE THAT BEFORE THE SPRINGS AND MAT ARE ATTACHED, THE
FRAME MAY NOT BE COMPLETELY CIRCULAR. ONCE THE SPRINGS ARE ATTACHED TO
THE MAT, THIS WILL CAUSE THE FRAME TO CONFORM TO ITS PROPER CIRCLE SHAPE.
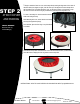
2. Once the Trampoline frame is complete and you have tightened all the bolts securely, ip the trampoline over and install the mat.
Center the Logo on the mat so it is perpendicular to any one of the legs, and begin to attach the springs using the Spring Tool.
Using the Spring Tool: Place the end of the spring which is more “closed” onto the V-Ring sewn into the Trampoline Mat. Next,
Hook the end of the spring which is more “open” with the spring tool, and pull the tool towards you until the spring extends to the
corresponding hole. Push the spring down into the hole with your palm, making sure you do not pinch your other ngers in the spring
or against the frame.
Installing the Springs: Using compass points as a general reference, install two springs at N and S, and then an additional two
at E and W. Once installed, count the holes in the top rail and ensure these match up to the available V-Rings sewn into the mat.
Note: You may have to move a spring over a space or two to ensure that it is properly matched to its V-Ring. Continue installing the springs
by placing 2 on either side of the N spring, and then 2 on either side of the S spring, followed by two on either side of the E and W
springs. Installing the springs in this fashion will ensure that the mat
is kept evenly centered, and will greatly assist in ease of attaching
the springs.
Once complete, fold the mesh safety skirt down so it is covering
the springs. You may need to place a few weights (such as several
books) on this skirt for a few minutes while it attens against the
frame.
INSTRUCTIONAL “HOW-TO” QUICK VIDEOS ALSO AVAILABLE
ON LINE AT: pureglobalbrands.com
1 866 498 5269
Customer Service
customerservice@puregbi.com
MODEL NOS. 9020CT
NUT ON THIS
SIDE