KIDS ROCKER SEESAW MODEL# 9306RS PRODUCT MANUAL - VERSION 05.18.07 FOR AGES: 3-7 WEIGHT LIMIT: 150 Lbs 68 Kgs TO BUILD: X TOOLS NEEDED: 1 WARNING/ADVERTENCIA CUSTOMER SERVICE • Please read all the instructions before using this product. • Do not allow more than one person on this product at any time. GQBrands.com • Consult a physician before beginning any exercise program or strenuous activity. • Adult supervision is required. CustomerService@GQBrands.
CUSTOMER SERVICE INFORMATION Thank you for purchasing: KIDS ROCKER SEESAW MODEL# 9306RS At Global Quality Brands®, we want all of our customers to be completely satisfied with their purchase. Please take time to review the contents of the product you have just received to make sure that all of the parts are included. If you find that any parts are missing or damaged, we will happily provide replacement parts at no charge within 30 days of purchase.
LIMITED WARRANTY Global Quality Brands® warrants this product to be free from defects in workmanship and materials under normal use and conditions for a period of 90 DAYS FROM THE DATE OF ORIGINAL PURCHASE. This Limited Warranty is not transferable and is available only for the original purchaser of the Product. The Company’s obligation under this warranty is limited to replacing or repairing the Product, at the discretion of the company.
WARNINGS IMPORTANT MESSAGE WARNING - PLEASE READ ADULT ASSEMBLY REQUIRED CHOKING HAZARD - Small Parts NOT for children under 3 years of age. WARNING: While every attempt is made to ensure the highest degree of protection in all equipment, we cannot guarantee freedom from injury. The user assumes all risks of injury due to use. All merchandise is sold on this condition, which no representative of the company can waive or change. 4 GQBrands.com CustomerService@GQBrands.
WARNINGS Please read these warnings and the information in this manual in its entirety. Failure to comply with the following instructions may increase the risk of serious injury and/or death: • Please read these warnings and the information in this manual in its entirety. Failure to comply with the following instructions may increase the risk of serious injury and/or death: • This unit must be assembled and disassembled by ADULTS ONLY.
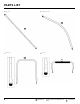
PARTS LIST 1- 2- Base Rails Foam Rocker Bar x2 x2 3 - Handle Tube 4 - Backrest x2 x2 6 GQBrands.com CustomerService@GQBrands.
PARTS LIST 5 - Footrest Tube 6- Seats x5 x2 7 - M6 45mm Bolt 8 - M6 40mm Bolt x20 x16 10 - Square Nuts 9 - M6 50mm Bolt 11 - Hex Nut x20 x20 14 - Flat Cap (Large) 15 - Flat Cap (Small) x4 13 - Safety Caps 12 - Washer x20 x20 16 - Round Cap x4 MODEL# 9306RS 7
ASSEMBLY INSTRUCTIONS STEP 1: Parts: Part 1 (x2) - Base Rails Part 6 (x1) - Seat Place both Base Rails (Part 1) in a flat surface free of obstructions. Place 1x Seat (Part 6) with the flat surface facing the floor and align the side openings to the middle openings of the Base Rails.
STEP 3: 6 6 Parts: Part 6 (x4) - Seats Part 10 (x12) - Square Nuts Part 8 (x12) - M6 40mm Bolt Place the remainder of the Seats at the end of the Base Rails with the flat surface of the Seats facing the floor. Place 2x on each side as shown. Align the side openings to the corresponding Base Rails opening. 6 6 Place the Square Nuts (Part 10) at the end gaps of the Seat openings, and secure with a M6 40mm Bolt (Part 8) aligned by the Base Rail and Seat openings.
ASSEMBLY INSTRUCTIONS STEP 4: Parts: Part 2 (x2) - Foam Rocker Bar Part 7 (x4) - M6 45mm Bolt Part 11 (x4) - Hex nut Part 12 (x4) - Washer 2 2 NOTE: Round Cap (Part 16) is already installed on the Foam Rocker Bar (Part 12). If not, slide to both ends and make sure the tub ends are covered 11 Place the Foam Rocker Bars (Part 2) on the outside of the Base Rails facing away from the Seats. 12 Align the opening of the tip of the Base Rails to the opening under the Round Cap of the Foam Rocker Bars.
ASSEMBLY INSTRUCTIONS STEP 6: 5 3 Parts: Part 3 (x2) - Handle Tube Part 5 (x2) - Footrest Tube Part 8 (x4) - M6 40mm Bolt Part 11 (x4) - Hex Nut Part 12 (x4) - Washer Locate the middle openings in the Handle Tube (Part 3), and align to the openings at the tips of the Footrest Tube (Part 5). Tighten with a M6 40mm Bolt (Part 8), Hex Nut (Part 11), and Washer (Part 12). Repeat until you have 2x completed Handle Tubes with the Footrest Tubes installed.
ASSEMBLY INSTRUCTIONS STEP 7: Insert the Assembled Handles on the inside of the Seesaw. Align the upper openings of the Handle Tubes to the Base Rails, and bottom openings to the Foam Rocker Bars STEP 8: Parts: Part 9 (x4) - M6 50mm Bolt Part 11 (x4) - Hex nut Part 12 (x4) - Washer Locate the aligned middle openings in the Handle Bar. Tighten with a M6 50mm Bolt (Part 9), Hex Nut (Part 11), and Washer (Part 12).
STEP 9: Parts: Part 7 (x4) - M6 45mm Bolt Part 11 (x4) - Hex nut Part 12 (x4) - Washer Locate the aligned bottom openings in the Handle Bar. Tighten with a M6 45mm Bolt (Part 7), Hex Nut (Part 11), and Washer (Part 12). Hide the head of the Bolt under the foam of the Foam Rock Bars. NOTE: Make sure the head of the Bolts are facing the outside of the Seesaw to avoid scratches or scrapes when in use.
STEP 10: Parts: Part 4 (x2) - Backrest 4 Insert the Backrest (Part 4) from the outside of the Base Rails and slide the tips on the inside of the Rocker Seesaw. Align the openings of the tips to the Foam Rocker Bars to the Backrest to install the hardware in Step 11. 4 STEP 11: Parts: Part 7 (x4) - M6 45mm Bolt Part 11 (x4) - Hex nut Part 12 (x4) - Washer 7 12 Tighten the tips to the foam rocker. Hide the head of the Bolt under the foam of the Foam Rock Bars once installed.
STEP 12: 7 Parts: Part 7 (x4) - M6 45mm Bolt Part 10 (x4) - Square Nuts Flip the Rocker Seesaw over to install the Seats into the Base Rail and Backrests. 10 Place the Square Nuts (Part 10) at the end gaps of the Seat openings, and secure with a M6 38mm Bolt (Part 8A) aligned by the Base Rail, Backrest, and Seat openings. STEP 13: x20 Parts: Part 13 (x20) - Safety Caps Use the Safety Caps (Part 13) to hide any excess from the Bolts.
FREQUENTLY ASKED QUESTIONS • Question: “How should I clean my seesaw?” Answer: you should clean the Seesaw with a solution of warm water and NonCorrosive/Abrasive soap. Dampen a rag with this solution and wipe completely dry before using. • Question: “Is there any maintenance I need to do for my seesaw?” Answer: you should always double check to make sure all your bolts are tight and secure, and that seats are securely in place before use.