DURA-BOUNCE 14FT TRAMPOLINE MODEL# 9314TS - TRAMPOLINE PRODUCT MANUAL - VERSION 03.16.03 FOR AGES: 6+ WEIGHT LIMIT: 350 Lbs 158 Kgs ADULT(S) NEEDED: TOOLS NEEDED: WARNING/ADVERTENCIA • Do not allow more than one person on the trampoline at any time. • Do not allow small children to use unless supervised by an adult. • ADULT ASSEMBLY REQUIRED. • The contents of this package are not suitable for children under 3 years of age. Contains small parts which may cause choking.
CUSTOMER SERVICE INFORMATION Thank you for purchasing: DURA-BOUNCE 14FT TRAMPOLINE MODEL# 9314T At Global Quality Brands®, we want all of our customers to be completely satisfied with their purchase. Please take time to review the contents of the product you have just received to make sure that all of the parts are included. If you find that any parts are missing or damaged, we will happily provide replacement parts at no charge within 30 days of purchase.
LIMITED WARRANTY Global Quality Brands® warrants this product to be free from defects in workmanship and materials under normal use and conditions for a period of ONE YEAR FROM THE DATE OF ORIGINAL PURCHASE. This Limited Warranty is not transferable and is available only for the original purchaser of the Product. The Company’s obligation under this warranty is limited to replacing or repairing the Product, at the discretion of the company.
WARNINGS IMPORTANT MESSAGE WARNING - PLEASE READ ADULT ASSEMBLY REQUIRED CHOKING HAZARD - Small Parts NOT for children under 3 years of age. WARNING: While every attempt is made to ensure the highest degree of protection in all equipment, we cannot guarantee freedom from injury. The user assumes all risks of injury due to use. All merchandise is sold on this condition, which no representative of the company can waive or change. 4 GQBrands.com CustomerService@GQBrands.
WARNINGS Please read these warnings and the information in this manual in its entirety. Failure to comply with the following instructions may increase the risk of serious injury and/or death: • Ensure the trampoline has been assembled correctly, per the instructions in the manual. • It is essential that the intended site for this trampoline is completely flat and level. If the ground is not level this will cause movement in the frame and could cause stress on the joined sections.
CARE AND USE • This trampoline must be assembled by adults. It must be erected exactly as detailed in the assembly instructions. Two adults are required to assemble this trampoline. This product should only be used by children over the age of 6. Please ensure children under the age of 3 years old do not play with or are given any part of this trampoline when being assembled or when complete as it contains small parts which may pose a choking hazard.
SAFETY INFORMATION • Safety Information: This trampoline is designed and manufactured to provide you and your family with many years of fun and exercise, but for your benefit and safety, please read this manual carefully and in full before assembling and using your trampoline. • DO NOT allow more than one (1) person on the trampoline at a time. Multiple jumpers increase the chance of someone becoming injured.
ASSEMBLY WARNINGS • The minimum overhead clearance required is 26 feet (8 meters). Ensure that no hazards or obstructions are near the trampoline such as tree branches, swing sets, swimming pools, electrical power wires, walls, fences, roof overhangs etc. • Please be aware of the following when selecting a place for your trampoline: • Trampoline must be placed on a level surface. • All obstructions from overhead, underneath or around the trampoline must be removed. • Do not use this trampoline indoors.
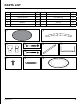
PARTS LIST Part # Description QTY Part# Description QTY 1 Jumping Mat x1 6 Leg Extension x12 2 Curved Top Rail x12 7 U Shaped Leg x6 3 T-Section x12 8 Screw x12 4 M8 Bolt x12 9 Spring x96 5 M6 Bolt x12 10 Frame Pad x1 1 3 2 4 6 7 M8 5 M6 8 MODEL# 9314T 9 10 9
ASSEMBLY INSTRUCTIONS STEP 1: Gather all 12 Curved Top Rails (Part 2), flip them over so the spring holes are touching the floor. Separate them into 3 groups of 4 Top Rails. Make sure to place them all on a flat and secure surface before you begin. NOTE: The Curved Top Rail has 8 sping holes in the top section. The bottom should be smooth.
ASSEMBLY INSTRUCTIONS A B STEP 4: A. Gather all Leg Extensions (Part 6) and begin inserting them into the T-Sections NOTE: The Leg Extension will have 3 openings. The 2 square openings closest to each other, will go inside the T-Section. Make sure that wider section is facing the center of the trampoline. B.
ASSEMBLY INSTRUCTIONS STEP 6: Use the Screw (Part 8) with a Phillips screwdriver to secure the Leg Extension to the U Shaped Leg. NOTE: It is recommended to use a powered screwdriver to accomplish this task safely. 1 STEP 7: Once all 3 groups have been successfully completed, flip them over so they may stand. You may start connecting all ends to one another in order to complete the frame. NOTE: It is recommended that you use the help of 2 more adults in order to attach all groups together.
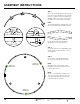
ASSEMBLY INSTRUCTIONS 10 STEP 8: Place the Jumping Mat (Part 1) in the middle of the frame and unfold it completely. 1 11 NOTE: Make sure the stitching of the Jumping mat is facing the floor 5 7 In order to avoid ripping and to distribute tension when attaching springs to the frame, follow the numbered order shown. 14 16 Once a spring is attached to the Jumping mat, you must attach the other in the opposite direction of the mat.
ASSEMBLY INSTRUCTIONS STEP 9: Unfold the Frame Pad (Part 10) and place it on top of theTop Rail and springs. The skirt of the Frame Pad must cover the Top Rails completely to avoid injury. NOTE: Make sure the connecting straps are facing the Top Rails in order to secure the Frame Pad to them in Step 10. 14 GQBrands.com CustomerService@GQBrands.
ASSEMBLY INSTRUCTIONS STEP 10: Find all the bottom connecting straps of the trampoline frame pad and secure them by tying them in a not on to the top rails to avoid moving or shuffling when jumping on the trampoline.
FREQUENTLY ASKED QUESTIONS • Question: “I need to mow the grass under my trampoline” or “I need to move my trampoline across the yard. What is the best way to do this?” Answer: Once your trampoline is assembled, to avoid damage to the unit moving the trampoline requires that you tape the top rail frame joints to prevent slippage Moving it over distanced requires that you use at least 4 adults places equidistant around the trampoline. Never drag or roll your trampoline in order to move it.