English Deutsch Nederlands Français CF 8.
CF 8.
5 8 3 4 3 4 10 9 1 6 2 7 6 A CF 8.
B 4 CF 8.
11 (10x) 12 (26x) M5*12 17 (12x) M8*20 C 13 (22x) 14 (2x) 15 (6x) 16 (6x) M8*16*1.2 M8 27*20*0.4 M8*56 M8 18 (4x) 19 (2x) 20 (2x) 21 (4x) M8*15 M5*15 M8*25 M8*25 23 (8x) 24 (8x) 25 (2x) M5*1.5 M5 M8*28*2.0 100 CM 22 (2x) M8*38*2.0 26 (2x) 27 (4x) M8*41.7*5 M4*10 100 CM 100 CM 100 CM D0 CF 8.
12 (4x) 13 (4x) 11 17 (4x) D1 12 (4x) 11 D2 6 13 (4x) 17 (4x) CF 8.
16 (4x) 12 (8x) 15 (4x) D3 D4 CF 8.
12 (4x) 13 (4x) 18 (4x) D5 D6 8 27 (4x) CF 8.
14 (2x) 26 (2x) 20 (2x) 19 (2x) D7 D8 CF 8.
12 (4x) 13 (6x) 17 (4x) 21 (2x) 25 (2x) D9 D9 22 (2x) 13 (2x) 21 (2x) 12 (4x) 13 (6x) 17 (4x) 22 (2x) 13 (2x) 21 (2x) D10 10 21 (2x) 25 (2x) 23 (8x) 24 (8x) 11 (8x) CF 8.
16 13 12 23 (8x) 24 (8x) 15 11 (8x) D11 16 (2x) 12 16 13 15 15 (2x) 13 (2x) 12 (2x) D12 D12 CF 8.
EN Content CROSSTRAINER Welcome to the world of Tunturi Fitness! Thank you for purchasing this piece of Tunturi equipment. Tunturi offers a wide range of professional fitness equipment, including crosstrainers, treadmills, exercise bikes, rowers and vibration plates. The Tunturi equipment is suitable for the entire family, no matter what fitness level. For more information, please visit our website www.tunturi.com Safety warnings WARNING – Read the safety warnings and the instructions.
EN ▪ ▪ ▪ ▪ ▪ ▪ ▪ ▪ ▪ ▪ ▪ Only use the equipment in environments with adequate ventilation. Do not use the equipment in draughty environments in order not to catch a cold. Only use the equipment in environments with ambient temperatures between 10 °C and 35 °C. Only store the equipment in environments with ambient temperatures between 5 °C and 45 °C. Do not use or store the equipment in humid surroundings. The air humidity must never be more than 80%. Only use the equipment for its intended purpose.
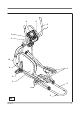
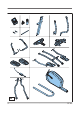
EN ▪ Remove the mains plug from the wall socket when the equipment is not in use, before assembly or disassembly and before cleaning and maintenance. Package contents (fig. B & C) ▪ ▪ The package contains the parts as shown in fig. B. The package contains the fasteners as shown in fig. C. Refer to the section “Description”. NOTE – If a part is missing, contact your dealer. Description (fig.
EN Fasteners (fig. C) 11 Screw (M5*12) 20 Screw (M8*25) 12 Ring (M8) 21 Screw (M8*25) 13 Ring (M8) 22 Ring (M8) 14 Ring (ø 27) 23 Ring (M5) 15 Screw (M8*56) 24 Ring (M5) 16 Nut (M8) 25 Ring (M8) 17 Screw (M8*20) 26 Ring (M8) 18 Screw (M8*15) 27 Screw (M4*10) 19 Screw (M5*15) Assembly (fig. D) WARNING – Assemble the equipment in the given order. – Carry and move the equipment with at least two persons. CAUTION – Place the equipment on a firm, level surface.
EN To reach and maintain a basic fitness level, exercise at least three times a week, 30 minutes at a time. Increase the number of exercise sessions to improve your fitness level. It is worthwhile to combine regular exercise with a healthy diet. A person committed to dieting should exercise daily, at first 30 minutes or less at a time, gradually increasing the daily workout time to one hour.
EN WARNING – If you have a pacemaker, consult a physician before using a heart rate chest belt. CAUTION – If there are several heart rate measurement devices next to each other, make sure that the distance between them is at least 2 meter. – If there is only one heart rate receiver and several heart rate transmitters, make sure that only one person with a transmitter is within transmission range. NOTE – Do not use a heart rate chest belt in combination with the hand pulse sensors.
EN WARNING – Make sure that you do not exceed your maximum heart rate during your workout. If you belong to a risk group, consult a physician. Category Heart rate zone Explanation Beginner 50-60% of maximum heart Suitable for beginners, weight-watchers, rate convalescents and persons who have not exercised for a long time. Exercise at least three times a week, 30 minutes at a time. Advanced 60-70% of maximum heart Suitable for persons who want to rate improve and maintain fitness.
EN Console (fig. E) Quick Start 1 Quick Start 3 5 4 6 E1 2 1 Display 4 ZOOM button 2 SELECTION dial 5 TRAINING button 3 BACK/STOP button 6 USER button CF 8.
EN 6 7 8 9 10 Quick Start 14 Quick Start 13 E2 12 11 6 Display 10 Menu item: WATT CONTROL 7 Menu item: QUICK START 11 Menu item: T-RIDE 8 Menu item: TARGET HR 12 Menu item: PROGRAMS 9 Menu item: MANUAL 13 Menu item: OWN TRAININGS 14 Menu item: FITNESS TEST 20 CF 8.
EN CAUTION – Keep the console away from direct sunlight. – Dry the surface of the console when it is covered with drops of sweat. – Do not lean on the console. NOTE – The console switches to standby mode when the equipment is not used for 5 minutes. Explanation of buttons Button Explanation BACK/STOP Before use: Press the button to return to the main menu. During use: Press the button again to pause the training (max. 4 minutes). Press the button again to continue the training.
EN Explanation of menu items Refer to the section "Training menu". Before use 1. 2. 3. 4. Turn the SELECTION dial to select a menu item. Press the SELECTION dial to confirm. Turn the SELECTION dial to change the value for the selected menu item. Press the SELECTION dial to confirm. During use The menu constantly shows the values for the menu items. The different values flash on the display one after another every 6 seconds. 1.
EN 9. Turn the SELECTION dial to set your weight. Press the SELECTION dial to confirm. 10. Turn the SELECTION dial to set the heart rate limit. Press the SELECTION dial to confirm. 11. Turn the SELECTION dial to set the anaerobic heart rate. Press the SELECTION dial to confirm. 12. Turn the SELECTION dial to set the aerobic heart rate. Press the SELECTION dial to confirm. Selecting a user 1. 2. 3. Press the USER button to go to the user menu. Turn the SELECTION dial to select CHANGE USER.
EN 4. 5. Press the SELECTION dial. The display shows the data of all training sessions of all users. Press the BACK/STOP button to return to the user menu. Settings 1. 2. 3. 4. 5. 6. Press the USER button to go to the user menu. Select the user. Refer to the section "Selecting a user". Turn the SELECTION dial to select SETTINGS. Press the SELECTION dial to confirm. Turn the SELECTION dial to set the display contrast. Press the SELECTION dial to confirm.
EN 5. 6. 7. 8. 9. Set the equipment in motion to start the workout. If you have set target values, the values start to count up or count down. Manually change the resistance (1-42 Nm) during the workout: Turn the SELECTION dial to set the resistance. When you have reached the target values, an alarm will sound. You can continue with your workout. Press the BACK/STOP button to stop the workout. Turn the SELECTION dial to EXIT to stop the workout.
EN 2. Turn the SELECTION dial to select WATT CONTROL. Press the SELECTION dial to confirm. 3. Turn the SELECTION dial to set the resistance. Press the SELECTION dial to confirm. 4. Turn the SELECTION dial to change the value for the selected menu item. Press the SELECTION dial to confirm. 5. Turn the SELECTION dial to set the time, the distance or the energy consumption. Press the SELECTION dial to confirm. 6. Turn the SELECTION dial to change the value for the selected menu item.
EN P1 Rolling Hills P2 Hill Climb 225 225 200 200 175 150 Watt Watt 175 125 100 75 150 125 100 75 50 50 25 25 0 0 Duration Duration P4 Stamina 225 200 200 175 175 150 150 Watt Watt P3 Cross Country 225 125 100 125 100 75 75 50 50 25 25 0 0 Duration Duration P6 Fatburner 1 225 200 200 175 175 150 150 Watt Watt P5 Power Interval 225 125 100 125 100 75 75 50 50 25 25 0 0 Duration CF 8.
EN P8 Cardio Climb 225 200 200 175 175 150 150 Watt Watt P7 Fatburner 2 225 125 100 125 100 75 75 50 50 25 25 0 0 Duration Duration P9 Cardio Climb P10 Cardio Interval 225 225 200 200 175 150 125 Watt Watt 175 100 75 125 100 75 50 50 25 25 0 Duration 1. 2. 150 0 Duration 9. Press the TRAINING button to go to the training menu. Turn the SELECTION dial to select PRESET PROGRAMS. Press the SELECTION dial to confirm.
EN 10. Turn the SELECTION dial to EXIT to stop the workout. Turn the SELECTION dial to SAVE AND EXIT to save and stop the workout. Press the SELECTION dial to confirm. T-RIDE 1. 2. Press the TRAINING button to go to the training menu. Turn the SELECTION dial to select T-RIDE. Press the SELECTION dial to confirm. 3. Turn the SELECTION dial to select the terrain. Press the SELECTION dial to confirm. 4. Turn the SELECTION dial to set the starting point for your workout. Press the SELECTION dial to confirm.
EN 5. Turn the SELECTION dial to select OWN TRAINING. Press the SELECTION dial to confirm. 6. Turn the SELECTION dial to select the workout. Press the SELECTION dial to confirm. 7. Turn the SELECTION dial to select REPLAY or EDIT. Press the SELECTION dial to confirm. 8. If you select EDIT, turn the SELECTION dial to set the time. Press the SELECTION dial to confirm. 9. Set the equipment in motion to start the workout. 10.
EN 6. 7. 8. Manually change the target heart rate during the workout: Turn the SELECTION dial to set the target heart rate. When you have reached the target heart rate, an alarm will sound. It is recommended to stop your workout. Press the BACK/STOP button to stop the workout. The display shows the test results. PREPARING FOR THE TEST 1. Make sure that the data associated with your username is updated – the meter uses the user data as a basis for the fitness test. 2. Select FITNESS TEST. 3.
EN 3. 3. To stop the test once you reach the target heart rate level, press the BACK/ STOP button or stop pedalling. The meter will now switch to the test result display: – A) Aerobic fitness = an estimate of your fitness level in your regular effort zone, which gives the best indication of the state of your health related fitness. – B) MET value = a reading that shows the multiple of your maximum oxygen uptake at complete rest.
EN This monitor supports 2 USB ports (FAT/FAT32 format), for playing media files, only MP3 files stored in the Music directory. Cleaning and maintenance Defects and malfunctions Despite continuous quality control, defects and malfunctions caused by individual parts can occur in the equipment. In most cases, it will be sufficient to replace the defective part. 1. If the equipment does not function properly, immediately contact the dealer. 2.
EN Technical data Parameter Unit of measurement Value Flywheel/Rotating mass 9kg/37kg Power Output 350W/60RPM Length cm inch 179 71 Width cm inch 71 28 Height cm inch 166 66 Weight kg lbs 80 176 Max. user weight kg lbs 150 330 Adapter 26V/2.3A Warranty The product has a warranty from the date of delivery (to be documented by invoice or delivery note). Further information on warranty terms can be obtained from your local dealer.
EN 10-2012 Tunturi Fitness BV P.O. Box 60001 1320 AA Almere The Netherlands Disclaimer © 2012 Tunturi Fitness BV All rights reserved. The product and the manual are subject to change. Specifications can be changed without further notice. CF 8.
Tunturi Fitness BV PO Box 60001 1320 AA Almere The Netherlands Tel: +31 36 5397102 Fax:+31 36 5460055 E-mail: Info@tunturi-fitness.com For contact information and manuals in other languages, check our website: www.tunturi.