Copyright Copyright 2013 by Imagination Technologies Limited. All rights reserved. No part of this publication may be copied or distributed, transmitted, transcribed, stored in a retrieval system, or translated into any human or computer language, in any form or by any means, electronic, mechanical, magnetic, manual or otherwise, or disclosed to third parties without the express written permission of Imagination Technologies Limited.
Thank you for choosing Contour 200i Air. This manual will get you up and running in no time, and explains how to make the most of your Contour 200i Air. We’re constantly improving and adding new features to our products. To take advantage of any enhancements made since your product was shipped, please visit www.pure.com where you can download the latest version of this user guide in PDF format.
Safety Instructions 1. 2. 3. 4. 5. 6. 7. 8. 9. 10. 11. 12. 13. 14. 15. 16. 17. 18. 19. 2 Read these instructions – All the safety and operating instructions should be read before this product is operated. Keep these instructions – The safety and operating instructions should be retained for future reference. Heed all warnings – All warnings on the appliance and in the operating instructions should be adhered to. Follow all instructions – All operating and use instructions should be followed.
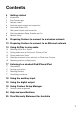
Contents 4 Getting started 4 4 5 6 6 7 8 8 Introduction Pure Connect app Remote control Front/top panel controls and connectors Front panel Status LED Rear panel controls and connectors Switching between Sleep, Standby and On Network setup 9 Preparing Contour to connect to a wireless network 13 Preparing Contour to connect to an Ethernet network 14 Using AirPlay to play audio 14 14 15 15 16 Selecting AirPlay as a source Playing audio from an iPod touch, iPhone or iPad Playing audio from iTunes Allowi
Getting started Introduction Contour 200i Air can be used in a number of different ways: • As an AirPlay device for playing audio from iTunes on your computer or an iPod touch, iPhone or iPad with AirPlay — via your wireless network. See ‘Network setup’ on page 8. • As a docking station for an iPod, iPhone or iPad. See page 17. • As a speaker for an audio device connected via the Aux In connector. See page 18. Note: Contour 200i Air will be referred to as Contour throughout the rest of this user guide.
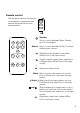
Remote control Pull the plastic tab from the remote control battery compartment and remove the protective film from remote buttons. Standby Press to switch between Sleep, Standby and On. See page 8. Source Press to switch between AirPlay, Dock and Auxiliary input sources. Shuffle the track playback order (when AirPlay/Dock is the input source). + Vol - Toggle to repeat current track, repeat all or no repeat (when AirPlay/Dock is the input source).
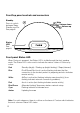
Front/top panel controls and connectors Standby Press to switch between Sleep, Standby and On. See page 8. Mute Volume down Volume up Status LED See page 6. Front panel Status LED When Contour is powered, the Status LED is visible through the front speaker mesh. The Status LED is also used to indicate the various states of Contour, by colour.
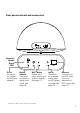
Rear panel controls and connectors Firmware Update Status LED* DC In Connector for supplied mains power adapter. Digital Coaxial Connector for output of digital audio signal. See page 18. Wi-Fi Setup Button used when setting up a wireless network. See page 11. Aux In Connector for analogue stereo input for MP3 player or similar. See page 18. Ethernet Connector for network cable. Use as an alternative to Wi-Fi setup. See page 13. *Diagnostics LED for use by Pure technical support.
Switching between Sleep, Standby and On Contour has three power modes, Standby, Sleep and On. In Standby, Contour uses minimal power (Status LED is bright red). In Sleep mode, Contour remains connected to the wireless network and waits for a source to be selected (Status LED is dimmed red). To enter Sleep mode, press Standby. Contour will automatically enter Sleep mode after 15 minutes if it does not receive any audio from AirPlay or a docked iPod/ iPhone/iPad.
Preparing Contour to connect to a wireless network Introduction Contour can be connected to your wireless network using two different methods. We recommend using Wi-Fi Network Login Sharing, which automatically connects Contour to your wireless network using the Wi‑Fi settings on your iPod, iPhone or iPad*. Alternatively, you can connect Contour to your wireless network manually. Before choosing a wireless connection method you will need to prepare Contour for wireless setup.
Connecting Contour to your wireless network using Wi-Fi Network Login Sharing To connect Contour to your wireless network: 1. Dock your unlocked Apple device (iPod touch, iPhone or iPad) and wait a few seconds while your Apple device authenticates. The Status LED will flash blue and the Apple device will start sharing. 2. When the Status LED has stopped flashing blue, press the Wi-Fi connect button on the back of Contour. 3.
Manually connecting Contour to your wireless network Stage 1: Connecting your setup device to Contour In the first setup stage you need to establish a temporary connection between your setup device and Contour. To do this, you need to create a temporary wireless network to connect Contour to your iPod touch, iPhone, iPad, laptop or Android device. Connecting using a temporary wireless network 1. Ensure that Contour is in Sleep mode or switched On. 2.
Stage 2: Accessing Contour Setup Manager Once you have established the temporary connection between your setup device and Contour, you can access Contour Setup Manager as follows: 1. On your setup device, start your web browser (e.g. Safari, Google Chrome, Microsoft Internet Explorer, Mozilla Firefox). 2. Enter the following address: http://192.168.1.12 3. The Contour Setup Manager will be displayed: 4. Click the Connection tab.
Preparing Contour to connect to an Ethernet network 1. Connect an Ethernet cable from the Ethernet port on the back of Contour to your router. Typical Ethernet setup 2. Insert the connector of the mains power adapter into the DC In socket on the rear of Contour. 18V DC 3. Plug in to the mains supply. 4. A network connection between your router and Contour will be established. When the red Status LED on the front has stopped flashing, Contour is in Sleep mode. 5.
Using AirPlay to play audio Selecting AirPlay as a source Press Source on the remote control until the Status LED is white. If the Status LED is steady white AirPlay has been set up successfully (this can take up to one minute). If the Status LED is still flashing white after one minute, there is a problem with Contour’s network connection. Note: See ‘Hints and tips’ on page 24 for help with troubleshooting Contour network connectivity issues.
Playing audio from iTunes Once you have successfully added Contour to the same network as your iTunes computer, iPod touch, iPhone or iPad, it should be automatically detected. To select Contour as an AirPlay device in iTunes: 1. Open iTunes. 2. Click the AirPlay symbol and select your Contour from the AirPlay list at the bottom of the screen. 3. Select the track you wish to play. If Contour is in Sleep mode, it will wake up and switch the source to Airplay.
Streaming audio to multiple rooms If you have more than one Contour, you can use AirPlay to simultaneously stream the same audio to each Contour. You can set this up by using iTunes on your computer. To enable AirPlay to simultaneously stream the same audio to each Contour, click on the AirPlay icon and select the Multiple Speakers option. You can control any of the functions in iTunes by instaling the Apple Remote app on your iPod, iPhone or iPad.
Listening to a docked iPod/ iPhone/iPad Compatibility The dock on Contour is compatible with most iPod, iPhone and iPad models. For the latest information, check the compatibility table on our website: www.pure.com/products/ipod-compatibility. Docking your device Dock your device onto the connector. Your device will start charging as soon as it is docked and will continue charging whether Contour is playing, in Standby or in Sleep mode. Selecting the dock Press Source until the Status LED is blue.
Using the auxiliary input Connecting an auxiliary device Connect the line out or headphone socket of your auxiliary device to the Aux In socket on your Contour using a suitable cable. Selecting the auxiliary input Press Source until the Status LED is pink. Using the digital output Using an external digital output device You can connect Contour to a digital output device, such as compatible hi-fi system. Any audio playing through Contour will also be sent to the attached device and your AirPlay source.
Using Contour Setup Manager Introduction Contour features a Setup Manager. The Setup Manager allows you to change various Contour settings, such as changing the name of the Contour speaker (see page 21) and view Contour’s status. You can also use Setup Manager to carry out a manual firmware update. You can access Contour Setup Manager by using one of the following methods: • During stage 2 of the manual network setup (page 12). • Via Bonjour in Safari web browser (described below).
Menu structure The Contour Setup Manager menus are accessed by clicking tabs at the top of the window. If accessing Contour Setup Manager using a PC or Mac four tabs are visible. If accessing Contour Setup Manager using a mobile device (Android phone, iPad, iPod, iPhone), three tabs are visible. The available tabs are: Connection The Connection tab is used to configure Contour’s wireless settings. Advanced The Advanced tab opens the Manual Network Setup page.
Connection The Connection tab is divided into two main sections, Product Name and Wireless Network Setup. Product Name Wireless Setup Contour name assignment If you prefer, you can change the name that your network, iTunes and Apple device uses for Contour: 1. Type the name (e.g. ‘Living Room’) that you want to assign Contour in the Product Name box and click Update. 2. Wait for the page to refresh to confirm that the new name has been assigned to Contour.
Advanced The Advanced tab is divided into two main sections, Proxy Server settings and IP address settings. Configuring Proxy Server settings If your network uses a proxy server to connect to the internet, tick the Use Proxy Server checkbox and enter your proxy server details. Click Connect at the bottom of the window to save any changes made. Configuring IP address settings Contour supports both DHCP (default) and static IP address configuration.
Update The Update tab is only visible when you connect to Contour using a PC or Mac. We recommend using automatic firmware updates for your Contour, which are delivered via the Wi-Fi connection when Contour is in Standby or Sleep mode. If the Status LED on Contour is static amber, Contour is checking to see if a new version of firmware is available or is installing a new version of firmware. A firmware update takes between six to eight minutes.
Help and specifications Hints and tips I cannot connect to my wireless network Ensure that your Contour is within range of your wireless router and that you are not located in a dead spot. The Status LED is flashing white Your Contour has AirPlay selected as the source but does not currently have a connection to a network. See ‘Network setup’ on page 8 for more information. The Status LED is flashing cyan If the Status LED is flashing cyan, Contour has a firmware error.
Pure Warranty Statement for Australia This statement replaces any reference to warranty which may be contained elsewhere within this manual What do you need to do now? Option 1: You can register your purchase on-line at https://www.pure.com/au/register/register.asp Option 2: Or you can do nothing other than keep your proof of purchase as evidence of your purchase date. This proof of purchase would need to be presented if warranty service was ever required.
www.pure.com connect.pure.com www.facebook.com/pure Pure UK Headquarters Imagination Technologies Ltd. Home Park Estate Kings Langley Herts, WD4 8LZ United Kingdom www.pure.com http://support.pure.com Pure Australasia Pty Ltd PO Box 5049 Wonga Park Victoria 3115 Australia sales.au@pure.com http://support.pure.