English UB 10.
UB 10.
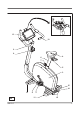
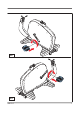
13 10 9 8 4 6 7 5 3 15 14 11 A UB 10.
B 4 UB 10.
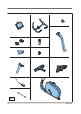
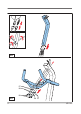
EN 16 (8x) M5*15 17 (12x) M8*16 18 (12x) M8 19 (12x) M8*20 20 (4x) M4*10 C 100 CM 100 CM 100 CM 100 CM D0 UB 10.
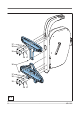
17 18 19 18 17 16 17 18 19 18 17 D1 6 UB 10.
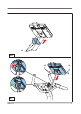
D2 D3 UB 10.
D4 17 18 19 D5 8 18 17 UB 10.
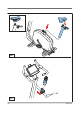
20 D6 16 16 D7 UB 10.
D8 16 D9 10 UB 10.
EN Content UPRIGHT BIKE Welcome to the world of Tunturi Fitness! Thank you for purchasing this piece of Tunturi equipment. Tunturi offers a wide range of professional fitness equipment, including crosstrainers, treadmills, exercise bikes, rowers and vibration plates. The Tunturi equipment is suitable for the entire family, no matter what fitness level. For more information, please visit our website www.tunturi.com Safety warnings WARNING – Read the safety warnings and the instructions.
EN ▪ ▪ ▪ ▪ ▪ ▪ ▪ ▪ ▪ ▪ ▪ Only use the equipment in environments with adequate ventilation. Do not use the equipment in draughty environments in order not to catch a cold. Only use the equipment in environments with ambient temperatures between 10 °C and 35 °C. Only store the equipment in environments with ambient temperatures between 5 °C and 45 °C. Do not use or store the equipment in humid surroundings. The air humidity must never be more than 80%. Only use the equipment for its intended purpose.
EN Remove the mains plug from the wall socket when the equipment is not in use, before assembly or disassembly and before cleaning and maintenance. ▪ Package contents (fig. B & C) The package contains the parts as shown in fig. B. The package contains the fasteners as shown in fig. C. Refer to the section “Description”. ▪ ▪ NOTE – If a part is missing, contact your dealer. Description (fig.
EN Assembly (fig. D) WARNING – Assemble the equipment in the given order. – Carry and move the equipment with at least two persons. CAUTION – Place the equipment on a firm, level surface. – Place the equipment on a protective base to prevent damage to the floor surface. – Allow at least 100 cm of clearance around the equipment. ▪ Refer to the illustrations for the correct assembly of the equipment. Workouts The workout must be suitably light, but of long duration.
EN WARNING – Heart rate monitoring systems may be inaccurate. Over exercise may result in serious injury or death. If you feel faint stop exercising immediately. Most accurate pulse measurement is achieved when the skin is slightly moist and constantly touching the hand pulse sensors. If the skin is too dry or too moist, the pulse rate measurement might become less accurate. NOTE – Do not use the hand pulse sensors in combination with a heart rate chest belt.
EN NOTE – Do not use a heart rate chest belt in combination with the hand pulse sensors. – Always wear the heart rate chest belt under your clothes directly in contact with your skin. Do not wear the heart rate chest belt above your clothes. If you wear the heart rate chest belt above your clothes, there will be no signal. – If you set a heart rate limit for your workout, an alarm will sound when it is exceeded. – The transmitter transmits the heart rate to the console up to a distance of 1,5 meter.
EN Category Heart rate zone Explanation Beginner 50-60% of maximum heart Suitable for beginners, weight-watchers, rate convalescents and persons who have not exercised for a long time. Exercise at least three times a week, 30 minutes at a time. Advanced 60-70% of maximum heart Suitable for persons who want to rate improve and maintain fitness. Exercise at least three times a week, 30 minutes at a time.
EN Adjusting the vertical seat position The vertical seat position can be adjusted by setting the seat tube to the required position. With the leg almost straight, the arch of the foot must touch the pedal at its lowermost point. 1. Loosen the seat tube adjustment knob. 2. Move the seat tube to the required position. 3. Tighten the seat tube adjustment knob. Console (fig.
EN 6 7 8 9 10 11 12 13 14 Programs T-Ride T - Road T-Music Fitness Test E2 6 TRAINING button 11 BACK/STOP button 7 USER button 12 ZOOM button 8 INTERNET button 13 KEYBOARD button 9 E-BOOK READER button 14 MEDIA button 10 WIFI button UB 10.
EN CAUTION – Keep the console away from direct sunlight. – Dry the surface of the console when it is covered with drops of sweat. – Do not lean on the console. – Only touch the display with the tip of your finger. Make sure that your nails or sharp objects do not touch the display. NOTE – The console switches to standby mode when the equipment is not used for 5 minutes. 20 UB 10.
EN Explanation of buttons Button Explanation ON/OFF Press the button to switch on the console. Press the button again to switch off the console. VOLUME +/- Press the left-arrow button to decrease the volume. Press the right-arrow button to increase the volume. BRIGHTNESS +/- Press the left-arrow button to decrease the brightness. Press the right-arrow button to increase the brightness. TRAINING Touch the button to go to the training menu.
EN Button Explanation During use: Touch the button again to pause the training (max. 4 minutes). Touch the button again to continue the training. Touch and hold the button to stop the training. ZOOM Touch the button to increase or decrease the size of the displayed profile image. Zoom options: 1x / 2x / 4x / 8x / 16x. KEYBOARD Press the button to show or hide the keyboard. MEDIA Touch the button to open the media player. The console recognises music and movies which are stored on your USB stick.
EN 12. Move the slider to set the anaerobic heart rate. Touch SELECT to confirm. 13. Move the slider to set the aerobic heart rate. Touch SELECT to confirm. Selecting a user 1. 2. 3. Touch the USER button to go to the user menu. Scroll the list to select CHANGE USER. Touch the menu item to confirm. Scroll the list to select the user. Touch the menu item to confirm. Editing a user 1. 2. 3. 4. Touch the USER button to go to the user menu. Select the user. Refer to the section "Selecting a user".
EN 5. 6. Touch the BACK/STOP button to stop the workout. Touch EXIT to stop the workout. Touch SAVE AND EXIT to save and stop the workout. MANUAL 1. 2. 3. 4. 5. 6. 7. 8. 9. Touch the TRAINING button to go to the training menu. Scroll the list to select MANUAL. Touch the menu item to confirm. Touch the corresponding menu item to set the time, the distance or the energy consumption. Move the slider to change the value for the selected menu item. Touch SELECT to confirm.
EN 10. Touch EXIT to stop the workout. Touch to SAVE AND EXIT to save and stop the workout. WATT CONTROL 1. 2. 3. 4. Touch the TRAINING button to go to the training menu. Scroll the list to select WATT CONTROL. Touch the menu item to confirm. Move the slider to set the resistence. Touch SELECT to confirm. Touch the corresponding menu item to set the time, the distance or the energy consumption. 5. Move the slider to change the value for the selected menu item. Touch SELECT to confirm. 6.
EN P1 Rolling Hills P2 Hill Climb 225 225 200 200 175 150 Watt Watt 175 125 100 75 150 125 100 75 50 50 25 25 0 0 Duration Duration P4 Stamina 225 200 200 175 175 150 150 Watt Watt P3 Cross Country 225 125 100 125 100 75 75 50 50 25 25 0 0 Duration Duration P6 Fatburner 1 225 200 200 175 175 150 150 Watt Watt P5 Power Interval 225 125 100 100 75 75 50 50 25 25 0 0 Duration 26 125 Duration UB 10.
EN P8 Cardio Climb 225 200 200 175 175 150 150 Watt Watt P7 Fatburner 2 225 125 100 125 100 75 75 50 50 25 25 0 0 Duration Duration P9 Cardio Climb P10 Cardio Interval 225 225 200 200 175 150 125 Watt Watt 175 100 75 150 125 100 75 50 50 25 25 0 Duration 0 Duration 1. 2. 3. 4. 5. Touch the TRAINING button to go to the training menu. Scroll the list to select PRESET PROGRAMS. Touch the menu item to confirm. Scroll the list to select a training profile.
EN T-RIDE 1. 2. 3. 4. Touch the TRAINING button to go to the training menu. Scroll the list to select T-RIDE. Touch the menu item to confirm. Scroll the list to select the terrain. Touch the menu item to confirm. Move the red bar on the left side to the required position to set the starting point for your workout. Touch SET START to confirm. 5. Move the red bar on the right side to the required position to set the ending point for your workout. Touch SET END to confirm. 6.
EN 5. To stop the training session, press the BACK/STOP button. You can then stop the session by selecting EXIT, save the session to the memory by selecting SAVE AND EXIT or continue your training session by selecting CONTINUE. OWN TRAINING The console can store a maximum of 100 workouts longer than 10 minutes. You can only save workouts after selecting a user.
EN fitness level. The test continues until the test subject has achieved the individual target heart rate (85% of maximum heart rate). The test requires a heart rate chest belt. The console shows three fitness categories: ▪ ATHLETIC = active training, good or excellent physical condition; ▪ ACTIVE = regular exercise, average or good physical condition; ▪ INACTIVE = no regular exercise, poor physical condition.
EN 7. The display informs you that you can stop the test once you reach the target heart rate for the test. Start the test by pressing the selection dial. PERFORMING THE TEST 1. 1. The display shows the selected test step type. Start pedalling to begin the test. A red diagram that updates as you progress in the test represents your heart rate. A discontinuous line in red indicates your target heart rate. 2. 2.
EN MEN / MAXIMAL OXYGEN UPTAKE (VO2MAX) 1 = VERY POOR - 7 = EXCELLENT AGE 1 2 3 4 5 6 7 18-19 <33 33-38 39-44 45-51 52-57 58-63 > 63 20-24 <32 32-37 38-43 44-50 51-56 57-62 > 62 25-29 <31 31-35 36-42 43-48 49-53 54-59 >59 30-34 <29 29-34 35-40 41-45 46-51 52-56 > 56 35-39 <28 28-32 33-38 39-43 44-48 49-54 > 54 40-44 <26 26-31 32-35 36-41 42-46 47-51 > 51 45-49 <25 25-29 30-34 35-39 40-43 44-48 >48 50-54 <24 24-27 28-32 33-36 37-41 42-46
EN Cleaning and maintenance Defects and malfunctions Despite continuous quality control, defects and malfunctions caused by individual parts can occur in the equipment. In most cases, it will be sufficient to replace the defective part. 1. If the equipment does not function properly, immediately contact the dealer. 2. Provide the model number and the serial number of the equipment to the dealer. State the nature of the problem, conditions of use and purchase date.
EN Technical data Parameter Unit of measurement Value Flywheel/Rotating mass 9kg/16kg Power Output 440W/60RPM Length cm inch 106 42 Width cm inch 56.5 22 Height cm inch 143 57 Weight kg lbs 54 119 Max. user weight kg lbs 150 300 Adapter 26V/3.46A Warranty The product has a warranty from the date of delivery (to be documented by invoice or delivery note). Further information on warranty terms can be obtained from your local dealer.
EN 10-2012 Tunturi Fitness BV P.O. Box 60001 1320 AA Almere The Netherlands Disclaimer © 2012 Tunturi Fitness BV All rights reserved. The product and the manual are subject to change. Specifications can be changed without further notice. UB 10.
Tunturi Fitness BV PO Box 60001 1320 AA Almere The Netherlands Tel: +31 36 5397102 Fax:+31 36 5460055 E-mail: Info@tunturi-fitness.com For contact information and manuals in other languages, check our website: www.tunturi.