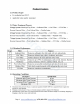
Pure Drop Reverse Osmosis Water Filter Systems INSTALLATION INSTRUCTION & OWNER’S MANUAL vo 22:01 Copyright ©2022 Venus Treasure Stand, LLC. All rights reserved.
Please keep this owners manual for future reference. It includes information on how to properly operate and maintain the system. Contents User Information...
User Information The user must adhere to the installation specifications described in this Product Installation and Operation Manual (hereinafter referred to as the "instruction manual"). Pure Drop is not responsible for damage, loss, or injury resulting from neglect, improper maintenance, or authorized modification of products. This product is designed for residential use only. Contact Pure Drop courser service to inquire about usage in non-residential settings.
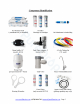
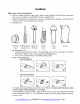
Component Identification oi RO Machine Head * {membrane not vet installed) P re-tilter Housings & Cartridges BO Membrane im Sealed Bag Drain Saddle 1447 Feud Walter Adapter #2 4-Color Tubing Set {model ADS) {deletion: AFW) (5 ft.
Product Features 1} Product Scope » For residential vse ONLY. o Applicable water quality: municipal.
Installation Before you start the installation + Choose a suitable location for the systems. Again, it must be placed on a flat surface, and ensure this system is installed ou an INDOOR cold-water supply ONLY. Check the packing list to confirm all accessories are included in the package. Contact Namedrop customer service if any components are missing. « Required fools: N \y o Plumber's Phillips Head Spanner Utility Flash Towels Tape Screwdriver Wrench Knife: Light * Recommended tools: 3 Variable speed dell
Step 1: Install Feed Water Adapter (AFW43) It is highly recommended that you watch the video "How to Install a Feed Water Adapter for Reverse Osmosis (RO) and Other Applications | i Spring AFW43" on YouTube. Step 1. a. Tum off the Cold Water Supply Valve (CW) under the sink and open the kitchen facet to release pressure. Get a towel or bucket fo catch any water drips. Disconnect the kitchen faucet connector pipe from the CW. Step 1. b.
Step 2a. If yow kitchen sink does not have an existing 1/2" faucet hole, you will have to drill one. (Refer to How fo drill a Hole on Sink or Counteraction. Wipe clean, and dry the area. Step 2. 5. Slip the front plate on the faucet stem, followed by the member washer. Insert the faucet stem info fhe hole on the counter top. Under the sink, slip on the back member washer, and tighten the nut with the plastic wing. Step 2c.
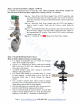
Step 5: Installing Sunk Shut-off Valve (TST) Step 3.0. Screw the Task Shut-off Valve onto the tank and tighten it by hand Do net ever tighten. Step 5. b. Connect the YELLOW tubing info the Quick-Fitting on the TSV. Step 6: Installing the Reverse Osmosis Membrane GUE Oi VENERATE o Pen CET ran RATER HOUSING El Ge oo Step 6. wn. Disconnect the tubing from the quick-fitting connection on the membrane cap. Step 4. 5. Use the wench to open the membrane housing cap.
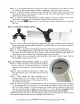
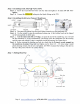
Model: ARTWORK Model: RTW5AK-UV 4 G Note: The sequence of connections for different colors can be adjusted.
tubing: connect source water from the Feed Water Adapter (Point A) to the 1% Stage water inlet elbow fitting (Point B) WHITE tubing: connect wastewater from the Flow Restrict or (Point C) to the Drain Saddle/drain pipe (Point IH} YELLOW wing: install the T-fitting fo the 5% Stage Post Carbon Filter (Point E) and then connect if to the Storage Tank Valve (Point F) busing: connect the 5™ Stage Post Carbon Filter (Point G) and the drinking faucet (Point H} Note: For models with AK/UV filter, the tubing should
Step 9. £0 Shut off the RO Drinking Faucet. Open the Tank Shut-off Valve. Wait for the tank fo full up completely. It will take 1 fo 2 hours depending on your water temperature (0°F -100°F, the wartier, the faster) and source water TDS {up tw 750 ppm, the lower, the faster). Step 9. g. After the tank is fall, open the RO Drinking Faucet to drain the tank completely. Do not use the first tank of water. Let it fain omit the sink unt the stream tums back to a trickle.
When to change the filter? The filters are highly suggested to be replaced when they reach their recommended replacement cycle. However, the actual lifespan of filters may vary depending on the source water quality and daily usage. If you notice a significant decrease in the tap water flow or defect an unpleasant smell, taste, and odor, it would be a good time fo change your filters. How to change the filters? Carefully follow the instructions that come in with the filter package.
Troubleshooting Guide Leaking around filter housing (O-ring too small or not in place} Durst, please check if all filter cartridges ave sitting upping inside the caster. Then, check if the O-ring is properly seated in place. The O-rings may be wo small; please stretch them out and put them back inside the groove. You may over-stretch a lite, so it will shrink aud fit just right when it is back in the canister. Then ser! the cartridge fo the top cap, and screw the canister all the way in.
Tastes and Odors in RO Water Possible Cause Solution "The Post Carbon Filter is exhausted. Replace Filter. {Clean, flush, and sanitize the Holding Tank. Replace tees, ‘There is foreign matter in the Holding Tank. Product water and Drain water lines are . {Correct the binning. reversed, Dissolved gases in feed water, P re-traat fade water to remove gasses, Increase in Product Water TDS, (Refer fo "High TDS level in RO water in page 15.
Warranty This Limited Warranty extends io the original purchaser of the system only. This warranty covers all Mannfachwersupplied items only that prove to be defective in material, workmanship, or factory preparation. This warranty covers pairs only; all labor is excluded from this warranty, nonfading, bar aor Baited to, services related to the removal, replacement, installation, adjustment, maintenance, and for repair of the unit or Bs components terns.
Warranty Registration We provide a 30-day money-back guarantee, a one-year Manufacturer Warranty, and lifetime tech support for all our products. However, we do not have your order information from the vendors other than our website. The easiest way to activate the warranty www clarification com and submit our warranty registration sander "Warranty Hegistration™. You can also e-mail the following information vis e-mail to support@purifiltration com. along with your consonant.