
Installation manual


22
PureFlow
®
Technologies, Inc
AirDog
®
FP-100 & FP-150 Dodge 2005 - 2009
Section 6 Electrical Harness, cont’d
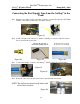
Connecting the Wiring Harness to the AirDog®
6-5. Route the wiring harness to the AirDog
®
and connect the 2 pin Deutsch connector
to the corresponding connector on
the AirDog
®
.
Figure 80
INSTALLING THE OPTIONAL
LOW PRESSURE INDICATOR LIGHT
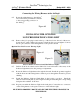
6-6. Remove the 1/8” npt plug located in the top of the base below the end of the motor.
Screw the 45
o
adaptor fitting and pressure switch into this port and tighten. Connect
the two pin connector on the wiring harness to the pressure switch.
Optional Low Fuel Pressure Warning Light!
Figure 81
Figure 82
Select a suitable location to install the Indicator Light!
6-7. Drill an 11/16" hole at that location. Drill a 5/8" hole in firewall to allow entry of the
Indicator Light harness into the passenger compartment.
6-8. Route the Indicator Light harness through the firewall. Install the grommet supplied
with the kit around the wiring harness where it passes through the firewall to prevent
chaffing.
6-9. Install the Indicator Light and Dash Plate in the location you chose. Install the
adhesive backed dash plate by removing the backing and matching the corresponding
dash plate hole with the 11/16" hole.
6-10. Properly assemble the Indicator Light in the dash plate. Connect the two connectors
on the wiring harness to the spade connectors on the indicator light.
BE SURE TO PROPERLY ROUTE AND SECURE THE WIRING HARNESS TO
THE VEHICLE.