
Installation Sheet

Your Purewater Pipeless Whirlpool Bath is designed to be filled
with fresh water then drained after each use. Certification by NSF
International ensures that your Pipeless System can be effectively
cleaned and disinfected by simply following Purewater Baths’s
Disinfection Protocol on Page 12.
COMMAND PAD DESCRIPTION
A detailed description of your system’s command pad operation
can be found on the following pages:
• SignatureandDesigner“Elite”SpaBaths(Pages06)
• Designer“Essential”SpaBaths(Page07)
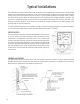
WATER LEVEL
Close the drain and fill the bath until the water level is at least
2” above the jets. Operating the system without water may
damage the jet assemblies. Never attempt to fill above the
bottom of the overflow.
BATH ADDITIVES
Bath additives (including oil based products) can be used in a
Purewater Pipeless Whirlpool Bath, since their residue can be
easily cleaned. CAUTION: Use only low foaming additives, and do
not use products that contain sand or silicates.
CLEANING YOUR Purewater PIPELESS WHIRLPOOL BATH:
WARNING: Unless thoroughly cleaned after each use, bath residue
will buildup within the system and on the surface area of any
whirlpool bath, which can promote the growth of bacteria. To
maintain your Purewater Pipeless Whirlpool Bath at a maximum
level of hygiene, thoroughly clean the tub shell and jets after
each use with a nonabrasive antibacterial cleaner, rinse and
dry. NEVER use abrasive household cleaners on any Purewater
Pipeless Whirlpool Bath. If you use an anti-skid rubber mat in your
whirlpool bath, remove it after every use to properly clean the tub
surface and to avoid harm to the surface finish.
IMPORTANT! TOTAL DISINFECTION REQUIRES TWO DISTINCT STEPS:
Cleaning and Disinfection.
PREPARATION & CLEANING
a. Drain the bathing well of all water.
b. Remove and disassemble the jet assemblies and place
them in the sink or other basin suitable for cleaning.
c. Use a non-abrasive antibacterial cleaner to clean the bathing
vessel, jet cases, drain stopper and overflow mechanism–rinse
with fresh water.
DISINFECTION
a. Spray the surface area of the jet assemblies and bathing vessel
until thoroughly coated with an EPA–registered disinfectant.
b. Allow to set for the required disinfection contact period
(refer to manufacturer’s specifications) then rinse surfaces
with fresh water.
REASSEMBLY
a. Dry the jet assemblies and bathing vessel.
b. Reinstall the jet assemblies by aligning with jet case at
10 o’clock position. Maintain even pressure and rotate jet
assemblies clockwise to lock them in place.
NSF CERTIFICATION: NSF International confirms that Purewater
Baths’s Pipeless system meets NSF Protocol P182 for Pipeless
Hydromassage Jets.
REPAIRS
TUB SURFACE Minor scratches can be easily removed. Immerse
600-gritwet/drysandpaperinwaterandlightlysandthearea.
Repeat sanding with 1000-grit wet/dry sandpaper and water.
To restore the surface gloss, use Gel-Gloss® (found at most
hardware stores). If Gel-Gloss is not available use automotive
rubbing compound followed by an application of automotive
paste wax. Major scratches and gouges will require professional
refinishing. Contact Purewater Baths’s customer service
department for specific instructions.
NOTICE: NO OTHER ITEMS ARE OWNER SERVICEABLE.
SUNLIGHT EXPOSURE: In order to prevent discoloration of the
acrylic finish, limit the exposure of the bath to direct sunlight.
TROUBLESHOOTING
If system will not operate: Check the remote GFCI circuit breaker
to make sure it is in the ON position. Reset the GFCI if necessary.
NOTICE
Abnormal operation of the whirlpool bath functions may be the
result of a power outage or poor quality power service in your
area. The circuit breaker, which supplies electrical power to the
whirlpool bath, should be reset prior to placing a service call.
WATER LEAKAGE
Call a plumber to determine the source of the leak. If the leak
is from the pipeless whirlpool system, contact Purewater Baths’s
customer service department for specific instructions.
Pipeless Whirlpool Bath
Operating Instructions
05