
9 Pyle Pro Mixer Owner's Manual


Pyle Pro Mixer Owner’s Manual – 54 – Pyle Pro Mixer Owner’s Manual
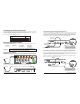
Using the Channel Input Gain Controls
Adjusting the Gain controls for each channel permits you to fine tune the level of each of the audio
inputs, since input levels usually vary. Rotate the Gain controls clockwise to increase levels. After
you preset the gain levels for each input, it is recommended that you do not adjust them further,
as you can cause sound level imbalances during a mix.
Output to an Amplifier
To play the mixer’s output signal through your speaker system (for events such as parties, dances,
conferences, etc.) connect an audio patch cord (not supplied) from the mixers AMP L and R jacks
to your receiver amplifier’s left and right input jacks.
This mixer features two kinds of output jacks for you to choose from: RCA style and 1/4” type. DO
NOT USE BOTH SIMULTANEOUSLY.
Connecting the Mixer Outputs
Output to a Tape or Digital Audio Recorder
To play the mixer’s output signal through your speaker system (for events such as parties, dances,
conferences, etc.) connect an audio patch cord (not supplied) from the mixers REC L and R jacks
to your receiver/amplifier’s left and right input jacks.
Booth Output
To monitor the mixer output to a second set of speakers in the DJ booth (or in a remote location)
connect an audio patch cord (not supplied) from the mixers BOOTH L and R jacks to your secondary
amplifier’s left and right input jacks.
Plug a pair of stereo headphones (not supplied) with a 1/4” jack into the Phones input. Using
headphones not only affords you the opportunity to listen privately, but also enables you to monitor
(”cue”) the incoming audio sources so you can locate an exact passage or section before mixing it
in. It also gives you the opportunity to set up the relative volume level of the upcoming passage
before it joins the mix.
Using Headphones
Do not listen at extremely high volume levels. Extended,
high-volume listening can lead to permanent hearing loss.
Follow these guidelines to protect your hearing, especially
when using headphones.
Always start by setting the volume level to the lowest
possible level before listening.
Put headphones on, and then gradually increase the
volume as necessary.
Once you set the volume level do not increase it. Over
a period of time, your ears adapt to a volume level and there
is a temptation to increase it. Even though such an increase
may not cause discomfort, it might still damage your hearing.
Listen Safely! Please observe the following:
Tape Deck
Amplifier/Receiver
OFF
OFF
FLAT
OUTPUT DEVICE SETTINGCONTROL
POWER
POWER
TONE
CAUTION: In order to avoid sudden unpleasant sound output,
adjust the output devices controls to these settings before you
connect the mixer’s output jacks to these devices’ input jacks.
Stereo Headphones
3
CH
4
CH
10
9
8
7
6
5
4
3
2
1
0
5
CH
10
9
8
7
6
4
3
2
1
0
2
CH
1
CH
10
9
8
7
6
5
4
3
2
1
0
MIC 1
MIN MAX
MIC 1 Volume
High
-10 +10
Low
-10 +10
High
-10 +10
Mid
Low
TALKOVER
ON
OFF
MIN MAX
Gain
MIN MAX
Gain
MIN MAX
Gain
MIN MAX
Gain
MIN MAX
Gain
MIC 2 Line 1
Phono 1
Line 3
Line 2
Phono 2
Line 5
Line 4
Line 7 Line 9
POWER
-10 +10
High
-10 +10
Mid
-10 +10
Low
CROSSFADER
-10 +10
High
-10 +10
Mid
-10 +10
Low
-10 +10
High
-10 +10
Mid
-10 +10
Low
-10 +10
High
-10 +10
Mid
-10 +10
Low
Master
Booth
Cue Level
LR
Balance
Headphones
Mix
+6
+3
0
-
5
-
10
-
15
-
20
-
25
-
30
PWR
+6
+3
0
-
5
-
10
-
15
-
20
-
25
-
30
PWR
+3
0
-
5
-
10
-
15
+3
0
-
5
-
10
-
15
+3
0
-
5
-
10
-
15
+3
0
-
5
-
10
-
15
+3
0
-
5
-
10
-
15
Cue Cue Cue Cue Cue
10
9
8
7
6
5
4
3
2
1
0
10
9
8
7
6
5
4
3
2
1
0
-10 +10
5
Line 6 Line 8
010
CUE PGM
ASSIGN A ASSIGN B
010
010
-10 +10
CH 4
CH 3
CH 2
CH 1
CH 5
CH 4
CH 3
CH 2
CH 1
CH 5