
PDA User Manual
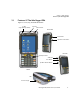
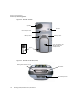


Chapter 2: Basic Checkout
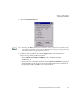
SSID
18 Ikôn Rugged PDA (Windows CE 5.0) User Manual
• Type a name using any alpha-numeric combination to uniquely identify this profile.
• Tap on OK to return to the Profile tab.
• Tap on Commit to save the profile name.
• When a pop-up message indicates that your profile will be saved, tap on OK.
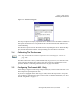
2.5.4.1 SSID
To configure the SSID for the network to which you want to associate:
• Type an SSID in the text box to the right of SSID. This field is limited to 32 characters.
• Tap on Commit and then, in the pop-up message, tap on OK to save your SSID setting.
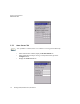
2.5.4.2 EAP Type
• Tap on the EAP type drop-down menu, and choose the appropriate type of authentica-
tion—LEAP, EAP-FAST, PEAP-MSCHAP, and PEAP-GTC.
• Next, tap on the Credentials button, and type credentials for IEEE 802.1X EAP types.
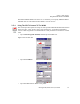
2.5.4.3 Encryption
• Tap on the Encryption drop-down menu, and choose the appropriate type of encryp-
tion—Manual WEP, Auto WEP, WPA PSK, WPA TKIP, WAP2 PSK, WAP2 AES, CCKM
TKIP, CKIP Manual, or CKIP Auto.
If you choose Manual WEP, WPA PSK, or WPA PSK:
• Tap on the WEP/PSK Keys button. For Manual WEP, choose up to four static WEP
keys. For PSK, type an ASCII passphrase or hex PSK.
• Configure any other settings that are supplied by the network administrator for the SSID
to which you will associate.
• Make certain that you tap on Commit following each change.
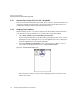
Once you’ve completed the configuration:
• Tap the Main tab. Tap on the Active Profile button—your new profile will be listed in
the drop-down menu.
Important: To learn more about the other options available in the radio attributes list,
refer to page C-5 of Appendix C: SCU For 802.11b/g Radio.
Important: Refer to page C-6 of Appendix C: SCU For 802.11b/g Radio for details
about security settings. Additional EAP details are described in “EAP Cre-
dentials” on page C-7.