
PDA User Manual


Chapter 3: Getting To Know Your Ikôn
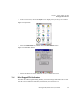
Inserting The microSD And SIM Cards
46 Ikôn Rugged PDA (Windows CE 5.0) User Manual
• Follow the headset manufacturer’s instructions to place the headset you want to place in
pairing mode.
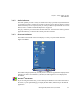
•In the Control Panel, tap on the Bluetooth icon choose the Devices tab and scan for
devices in your area. (Note that if you’re pairing the device for the first time, the device
scan occurs automatically—you do not need to tap on the Scan button to perform
a scan.)
When the scan is complete, a list of devices is listed.
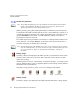
• Double-click on the headset you want to pair with. If you prefer, you can highlight
headset and tap on the Services button.
If the headset has authentication enabled, a dialog box appears requesting that you enter a
PIN number.
• Type your pin number and tap on OK.
A Services dialog box appears listing headset.
• Press and hold the stylus on headset. In the pop-up menu, choose Active.
Your headset is now paired. A COM/BSP port name will now appear beside the service for
this device. An asterisk will appear under the Active list in the Service screen.
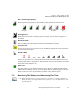
3.8 Inserting The microSD And SIM Cards
There are two slots available in the battery compartment—the left-hand slot is provided for a
microSD (Secure Digital Card) and the right-hand slot is for a SIM (Subscriber Identity
Module) card.
The microSD cards provide additional non-volatile memory to your Ikôn. SIM cards allow
access to the Ikôn Voice option, access the Internet, and so on.
3.8.1 Inserting The Cards
• Switch off the Ikôn.
• Remove the battery cover and the battery.
• Pull the SD door down as the arrow icon on the door indicates.
• Orient the microSD or SIM card according to the legend stamped into the battery
well plastic.
• For microSDs, slide the card into the left-hand slot, pushing it inward until it latches
into place.
• For SIM cards, slide the card into the right-hand slot, pushing it inward until it latches
into place.