Index 1. Introduction ....................................................................................................................... 2 2. Digital Scout Camera Specifications .................................................................................. 4 3. Parts Identification ............................................................................................................ 5 4. Packing Contents ..................................................................................
1. Introduction Congratulations on your purchase of the Night vision camera digital scout camera. This scout camera is designed to record the activity of wildlife game in the outdoors and enhance personal security with its still image and movie modes, weatherproof and rugged construction.
2. Digital Scout Camera Specifications Product Name Digital Scout Camera Model Number ST042 Image Sensor Type Effective Pixels Lens Aperture Camera Lens Sight Angle Trigger Speed Number of IR LEDs IR Filter Display PIR Distance Adjustor Max Night Vision Lighting Distance Time Delay Time Lapse Mode Duty Time Multi-shot Selectable Image Resolution Audio Video Resolution MMS/GPRS Compatible Photo Stamp Menu Languages Extra power Power Supply Dimension 1/2.5 Inch CMOS 5.0 Megapixels F2.
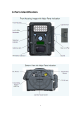
3.
4. Packing Contents Model Night vision camera Digital Scouting Camera • User Manual • USB cable • Mounting Kit 5. Battery and SD Card Installation Night vision camera Digital Scouting Camera is designed to operate using 2 x 4*AA Cell Batteries. We recommend using Alkaline batteries. NOTE: Always have camera in OFF position when installing or removing batteries. Do not mix old and new batteries together. Do not mix battery types—use all Alkaline or all Lithium.
Memory Your Night vision camera Digital Scouting Camera has a memory card slot and can accept SD cards with a max capacity of 32GB (SD card sold separately). Inserting SD card Make sure camera is in the OFF position whenever adding or removing memory. • Insert SD memory card in to the SD Card Slot completely and in the correct direction as shown by the sticker located at the side of the housing. • To remove the SD memory card, depress the SD card and pull out the card gently.
Menu Items Basic Setting 1 2 3 4 5 Items Options YYYY MM/DD HH:MM MM:SS FORMAT SD CARD 1P,3P and Movie 5M(HI), 3M(LO) for Photo 5 ~ 30s for Video DATE TIME DELAY FORMAT MODE Advance Setting Items 6 STATUS 7 DUTY Options PIR, TL or PIR+TL TL: 1m~24H (Time Interval) HH:MM (Start Time) ~ HH:MM (End Time) 6.2 Setup the camera In this chapter, it will tell you how to set up the camera. 6.2.1 Set PIR Sensitivity This camera has 3 sensitivity levels.
a) b) c) d) e) Turn on the camera Press “UP” and “DOWN” to Select “DATE” menu Press “OK” to confirm Press “UP” and “DOWN” to select year number Press “OK” to confirm and then it will come to set Month “MM”, Press “UP” and “DOWN” to select. f) Press “OK” to confirm and then it will come to set Date “DD”, Press “UP” and “DOWN” to select. g) Press “OK” to confirm h) Press “Setup” to QUIT or continue to the next menu item. 6.2.
a) b) c) d) e) Turn on the camera Press “UP” and “DOWN” to Select “DELAY” menu Press “OK” to confirm Press “UP” and “DOWN” to select minute “MM”. Press “OK” to confirm and then it will come to set seconds “SS”, Press “UP” and “DOWN” to select. f) Press “OK” to confirm g) Press “Setup” to QUIT or continue to the next menu item. 6.2.4 Format the SD Card You are able to format the SD card and clear all the pictures on the card. When you select this menu, you will see a 4 digits number.
f) g) h) i) j) Then it will show corresponding options for 1P 3P or Movie If you select 1P or 3P, the camera will ask you to set the photo resolution HI (5M) or LO(3M) If you select Movie, the camera will ask you to set the video length from 5s ~ 30s. Press OK to confirm Press “Setup” to QUIT or continue to the next menu item. 6.2.6 Set Status (PIR, Time-lapse) In the menu, you are able to set the camera working status such as PIR activated or time-lapse mode. We have three statuses. 1.
a) Turn on the camera b) Press “UP” and “DOWN” to Select “DUTY” menu c) Press “OK” to confirm d) Next you will set the starting point in HH:MM. e) Press “UP” and “DOWN” to select and press “OK” to confirm f) First you will set the ending point in HH:MM. g) Press “UP” and “DOWN” to select and press “OK” to confirm h) Press “Setup” to QUIT or continue to the next menu item.
a) Insert the strap through the strap slots on the rear housing. b) Wrap the strap around the mounting surface. Secure the strap and tighten the buckle in order to secure the camera. ▲ In order to obtain proper weather resistance, please make sure that both door latches are securely locked in place. 7.2 Turn on the Camera Just move the “POWER” switch to “ON”, and the camera will be turned on. If there is no operation in 1 minute, the camera will go into the sleeping mode.
7.4 Secure Your Camera Night vision camera Scouting Camera has a locking hole to have a lock on it. You can also use the cable lock with our camera to secure the camera on a tree or a pole. It also has a hole for a security chain. 7.5 Battery Status Reading a) If system voltage is greater than 4.1v, the camera will operate normally both day and night b) If system voltage is greater than 3.9v but less than 4.1v, the battery indicator will flash 2 times in the night and go into sleep mode.
8 Viewing the Images and Movies on a Computer Connect the Camera directly to the PC 1. Slide the “Power” toggle switch to the “on” position 2. Select “Setup” Mode (Refer to Section 6.1 ) 3. Connect your camera to the PC via the USB cable. The PC will recognize the new device as a “mass storage” camera drive. 4. Then the user can copy, move or delete the photos and videos that are on the SD card. Read Images by Card Reader 1. Depress the SD card and pull out the card gently. 2.
device produces unique consecutive images. 30 fps means that the camera produces video at 30 frames per second. Higher fps values provide higher quality video. Moon Phase Imprint: The activity of animals is believed by many to be related to the moon phase. Our unit features an imprint of the moon phase stamp on each photo, as to provide more information to the hunter or wildlife enthusiast. IR Flash: Also called IR LED Array or Infrared LED Night Vision feature.
Make sure that you have installed all 2x4 batteries in the battery compartment. Make sure that the batteries are installed correctly, observing proper polarity. Always place the negative (flat) end of each battery in contact with the spring tab side of its slot inside the camera. Still Photo and/or Video Quality Problems Night photos or videos appear too dark a. Try using a set of new batteries. The flash will stop operating near the end of the battery life. b.
PIR Sensor LED Flashes/Doesn’t Flash When the camera is in the “Setup” mode, the PIR Indicator LED on the front of the camera will flash when it senses motion. This is for setup purposes only and will help the user aim the camera. During use, the LED will not flash when the camera takes an image. This is to help keep the camera hidden from game.