Thank you for choosing Pyle Audio! To enjoy of the unit's features, along with proper and safe operation, please be sure to read through this manual before use. It is especially important to thoroughly understand and follow all system warnings and precautions. Keep the manual in a safe location for future reference when necessary. Contact your dealer or the nearest authorized repair center for any service, repair or technical support assistance.
Compatibility This unit is a standard “Double Din” sized radio. Check to see that your vehicle accepts a double din sized radio. This unit conforms to the standard size and dimensions of a DOUBLE DIN radio. Your vehicle may require a vehicle specific or 3rd party double din installation kit. Precautions & Warnings Please take a moment to read through this information booklet and heed all precautions to ensure a positive user experience.
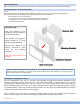
System Installation: Before starting: To prevent short circuits, be sure to disconnect the battery terminal before starting. Installation Guide - Double Din Fitting: Caution: 1) Consult your vehicle dealership before making any modifications to your car’s body (ex. Drilling holes) 2) Use included screws in installation. Improper hardware may result in damage.
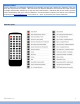
Remote Control Factory batteries are sometimes depleted from extended storage time. Replace the batteries if the unit does not respond to the remote. Also note that Pyle Receiver Remotes are universal and used between multiple radio models, which may or may not, have some buttons / functions that do not work or provide other functionality with your receiver headunit. If some functions respond your remote is not defective. Contact parts at www.PyleAudio.com.
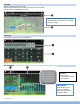
Front Panel and Buttons Button & Feature Layout IR Eject ˄ CD/DVD Mic Power/Home Navi VOLVOL+ RST AUX USB Micro SD (Left) Micro SD (Right) IR remote receiver port Ejects disk from the front-loading tray Front-loading disc slot Microphone port Power ON/OFF the unit, also reverts you to the 'Home' screen user interface Press to startup GPS Navigation Software Volume down Volume up Use a pin to insert into reset port to trigger unit reset. (Hold for 20 secs.
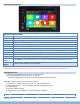
App Screen - Interface Layout A flashing app in this screen indicates that it is a currently selected source.
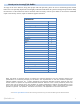
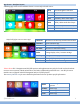
Settings 1) Scrolling Use the red bar to scroll through the list of all available options. 2) Turn on/ off Many settings can be toggled on or off in this screen *Note: Factory setup is not adjustable by user. Do not attempt to enter this setup menu. Set Time 1) Time Options Turn GPS auto update and 12 hour clock settings on and off here. *Not all models feature GPS Navigation Visit www.PyleAudio.com to learn more about model specific information.
Calendar Displays the day, month and year. Use forward and back arrows the view past or future months. Selected dates are highlighted in blue Note: Calendar does not allow entry of appointments. Date must be set within system settings Calculator A handy little app for simple calculations EQ - Equalizer Presets Select one to automatically adjust the equalizer Adjustments Hold and drag up or down to manually adjust the EQ by each frequency band PyleAudio.com 8.
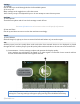
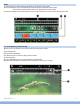
Radio 1) Scanning: Press, hold, and drag the slider to quickly tune the radio. 2) Current Station: The currently selected station will be displayed in the center. Press the forward and back arrows to change the current station. 3) Favorite Stations: Press and hold one of the six preset slots to set and save a selection for later. SD - Flash Memory File Browsing Warning: Do not attempt to browse files while operating the vehicle 1) Browsing Files File location is displayed.
USB - Flash Memory File Browsing Plug in flash drives to access music video and photos. Video 1) Brightness, Contrast, Hue Press, hold and drag to adjust the brightness, contrast and hue of the display. 2) Presets Select to automatically adjust the display settings. Wall Paper Note: Wallpapers can be imported from a flash drive or SD card. Check format sheet online for specs on formats.
Trouble Shooting Q: How do I use / set-up RDS? A: (*Traffic and weather feature only available in Europe) Q: My Bluetooth microphone is not working as expected A: -Check that nothing is covering microphone port.
Wiring - Back Panel: PyleAudio.com 12.
Wiring - Color Wiring: Wiring Radio Antenna Green/White Blue/White Orange Brown Pink Blue Gray/White Black (RCA) Red Yellow Black Orange Brown Purple Green Gray White Subwoofer Output Audio / Video Input Audio / Video Output 1 Audio / Video Output 2 SW KEY AMP REMOTE TURN ON ILLUMINATION BACK PARKING AUTO ANTENNA SW-GROUND CAM VIDEO IN ACC FUSE/ POWER B+ GROUND CANBUS INTERFACE CANBUS INTERFACE Speaker Rear R Speaker Rear L Speaker Front R Speaker Front L Radio antenna receptacle Pre amp subwoofer outpu
DVD DVD app will only open if a compatible DVD disc is detected. 1) Scrubbing Press and drag along the time line to quickly skip through DVD times line. (Note: DVD formatting does not allow scrubbing through previews and warnings) 2) Menu options & controls: PyleAudio.com 14.
Bluetooth Bluetooth app allows Bluetooth pairing with compatible devices for making calls and music playback. To pair your phone, ensure Bluetooth is enabled in your phone’s system settings and that you are disconnected from all other devices. In the Bluetooth app of your radio, press the “Gear” icon in the left column to access Bluetooth settings. Next, press the “Magnifying glass” icon to set the radio into pair mode.