
User guide


13
OPERATION
RADIO OPERATION
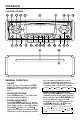
• BAND SELECTION
At tuner mode, press BAND button (18)
shortly to select the desired band.
The reception band will change in the
following order:
• SELECTING STATION
Press
button (16) or button (17)
shortly to activate automatic seek
function. Press for more than 3 seconds
until “MANUAL” appears on the display,
the manual tuning mode is selected.
If both buttons have not been pressed
for several seconds, they will return to
seek tuning mode and “AUTO” appears
on the display.
FOR WEATHER BAND OPERATION:
Press
button (16) or button (17)
shortly to choose channel backward or
forward. And the range of selecting
backward or forward is CH1~CH7. And
you can also press M1~M6 buttons
(19~24) shortly to select CH1~CH6
directly.
• AUTOMATIC MEMORY STORING &
PROGRAM SCANNING
- Automatic memory storing
Press AS/PS (ELAPSE) button (2) for
more than 2 seconds, the radio
searches the strongest stations and
stores them into the corresponding
preset number button. When all
completed, it will change to scan
preset station automatically.
- Program scanning
Press AS/PS (ELAPSE) button (2)
shortly to scan all station presets saved
in memory.
• STATION STORING
The preset buttons (14) can be used to
store 6 stations in each band (FM 1,
FM 2, FM 3 and AM1, AM2) for
convenient access to your favorite
stations.
- Programming stations
1. Select the desired band, then tune
in the station you want to store in
memory.
2. Press and hold one of the preset
buttons (14) for more than 2
seconds until the corresponding
preset button number appears.
Repeat steps 1. and 2. to program
additional stations.
- Quick tuning
Select the desired band, then press
one of the six preset buttons (14).
• SCAN
Press SCAN button (13) to scan through
strong stations in the current band.
Radio pauses for five seconds at each
strong station. At each time the
frequency is flashing on the display.
Press SCAN button (13) again to listen
to current station.
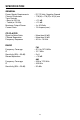
FM1 FM2 FM3 AM1 AM2 W.B