PLD179U Instruction Manual WWW.PYLEAUDIO.
CONTENTS Safety Information 1 Installation Wiring Diagram 2 4 Operation 5 Location and Function of Keys 5 Preparing The Remote Control 6 Using The Detachable Front Panel 7 General Operation 7 Radio Operation 9 DISC Operation 9 Unique DISC Operation 11 Data Disc Play Operation 13 Memory Card Play Operation 14 USB Play Operation 14 AV In Operation 14 Setup 15 System Setup 15 Language Setup 16 Audio Setup 16 Digital Setup 16 Specification 17 Troubleshooting 17
Safety Information CAUTION: Mobile DVD player is a class 1 laser product. However this mobile DVD player uses a visible/invisible laser beam which could cause hazardous radiation exposure if directed. Be sure to operate the mobile DVD player correctly as instructed. Use of controls or adjustments or performance of procedures other than those specified herein may result in hazardous radiation exposure. Do not open covers and do not repair yourself. Refer servicing to qualified personnel.
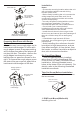
Installation Label side up Do not touch the underside of the disc Do not bend Wipe the disc from center toward the outside edge Preparing New Discs with Rough Spots A new disc may have rough edges on its inside and outside edges. If a disc with rough edges is used, the proper setting will not be performed and the player will not play the disc. Therefore, remove the rough edges in advance by using a ballpoint pen or pencil as shown on the right.
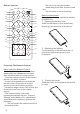
1 2 182 53 3 (Fig.1) 1. Dashboard 2. Hoder After inserting the holder into the dashboard, select the appropriate tab according to the thickness of the dashboard material and ben them inwards to secure the holder in place. 3. Screw 1. Frame 2. Release Frame Key Insert the release frame key into the groove at the right side of the frame, then prize out to remove the frame (You can also use the key to remove the frame from the left side.) 3.
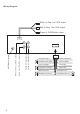
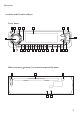
Wiring Diagram White to Rear Lch RCA output Red to Rear Rch RCA output 4 Yellow to Video output 1 Yellow to Video output 2 Red to Front Rch RCA output White to Front Lch RCA output ANTENNA Socket Green to SUB-Woofer output Violet Rear Right + Yellow to Battery B+ Violet/Black Rear Right - Black to GND B- Grey Front Right + Red to ACC Grey/Black Front Right - Blue to ANT White Front Left + Green Rear Left + White/Black Front Left - Green/Black Rear Left -
Operation Location and Function of Keys Front panel : 9 19 15 11 8 7 16 27 10 13 18 6 When you press 42 20 21 22 14 23 24 25 3 2 1 17 43 button (7) and the front panel flip down: 5 4 26 12 5
Remote control: - Do not put in a trouser pocket. - Keep away from food, moisture and dirt. - Do not place in direct sunshine. 9 15 6 28 41 22 40 29 19 39 30 31 38 Battery replacement Battery type: a button cell lithium battery (CR2025 3V) 1. Opening the battery case Slide out the battery cover while firmly pressing in the direction of the arrow. 32 37 16 36 17 35 33 25 20 24 34 14 23 13 2.
Using The Detachable Front Panel General Operation Removing the front panel Initial System Start-Up Be sure to press the RESET button (12) when using the unit for the first time, after all connections are completed correctly. 1. Turn off the unit power. 2. Press RESET with a ballpoint pen or similar pointed object. 1 . Press the release down the front panel. button (7) to flip 2 . Take away the front panel . 3 . Keep front panel into the case .
desired item. Also press ◄/► button (30) to choose the desired item. Display/Adjust Time 1. Displaying time: Press DISP button (15) to show current information and time on the LCD . Return to original status after 5 seconds. 2. Adjusting time: 1). Press and hold DISP button (15) until the clock begins blinking. 2). Press 9 / : or ◄/► button to move to between hour area and minute area. 3). Rotate VOL button (10) or ▲/▼ to adjust hour or minute.
Radio Operation Selecting The Frequency Band Press BAND button (13) to select the desired band. The reception band will change between FM and AM . seek mode. - In manual mode, press : / 9 button to select a station . Press preset 1-6 button (14) for several seconds to store current station into the number button. Stereo/Mono Press ST (1) or MO/ST (23) on the remote control to select mono/stereo mode.
button (17) to fast reverse or fast forward. It return to normal mode when you release the button. Pause Playback Press button (20) to pause playback. Press it again to resume playback. Stopping playback - Briefly press the < button ( 24 ) to stop the unit playback . W hen the < button is pressed and then press button ( 20), resume to the normal playback. - Press < button (24) twice and then press button to stop the playback and go back to initial track. Fast-Forward / Fast-Reverse 1.
Unique DISC Operation DISC Menu Operation Menu-driven playback is possible while playing back a DVD with menu-driven feature or VCD with the PBC (PlayBack Control). 1). Press TITLE/PBC (33) button, the title list or disc menu will appear on the monitor. 2). Use the cursor buttons (▲/▼/◄/►) (30) and ENTER button (31) to select item you want on the menu. * On some discs, you can select the items by the numeric key (33).
- The function only works for discs having scenes recorded at different angles. On Screen Display Function Press the SUB-T button (40) for several seconds during playback to display the console information of the current disc on the screen. Press SUB-T button (40) for several seconds continually , you will see the information as following : FOR DVD: Use the number keys (14) to input the desired Title, Chapter or Time, and then press ENTER button (31) to confirm.
media play window will be shown on the screen: Use ▲/▼/◄/► cursor button to select the item that you want to program . 1). The item you selected will become highlight . 2). Input the track number that you want to program by numeric buttons (0-9) on the remote control . 3). Press ▲/▼/◄/► cursor buttons to move to "PLAY" operation button and then press ENTER button (31) to program playback .
Memory Card Play Operation This disc player offers you a memory card slot (42). Using the SD/MMC card: When you insert a SD/MMC card into the memory card slot (42), the DVD player will read the SD / MMC card automatically. The unit gives first priority to the latter. If insert a disc into the disc slot ( 5 ) while read the SD/MMC card, the unit will play the disc. Press < (24) button to enter into PRE-STOP mode, then press GOTO button (25) to switch to the reading card mode.
Setup and AUTO. The default setting is NTSC format. In DVD mode, when the disc is playing or in stop mode, press SETUP button (32) to enter setup menu. 1. When the cursor is on the topside, use ◄/► buttons to move between the different pages. 2. Press ▼ button to move the cursor to the setup page below and then you can use ▲/▼ buttons to move between the different setup options. 3.
Password Change the password locking or unlocking . I nputting numbers are dispalyed as "XXXX". T he default password is “0000”. Parental Control Use this function to restrict the viewing of movies to children of appropriate age levels only. 1) Press ▲/▼ button to select “ PASSWORD ” then press ENTER button. 2) The password input mode is activate. Use the numeric keypad “0” to “9” to input the 4-digit password, and then press ENTER button. The default password is “0000” upon shipment from the factory.
Specification Troubleshooting 1. GENERAL Power Supply Requirements DC 12 Volts, Negative Ground Chassis Dimensions 178(W)x160(D)x 50(H) Tone Controls - Bass (at 100 Hz) - Treble (at 10 kHz) ±10 dB ±10 dB Maximum Output Power 4x60 watts Current Drain 15 Ampere (max.) 2. DVD PLAYER Signal to Noise Ratio > 55 dB Channel Separation > 40 dB Frequency Response 20Hz - 20 KHz 3. RADIO FM Frequency Coverage FM: 87.5 - 107.9 MHz IF If it appears that your DVD unit is faulty, first consult this checklist.
No Sound < Check audio connections. < If using a HIFI amplifier, try another sound source. Distorted Sound from HIFI Amplifier < Check to make sure that no audio connections are made to the amplifier phono input. The Player Does Not Respond To the Remote Control < Aim the remote control directly at the sensor on the front of the player. < Avoid all obstacles which may interfere with the signal path. < Inspect or replace the remote control battery.