0.
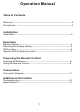
Operation Manual Table of Contents Welcome! ----------------------------------------------------------------------- 2 Precautions ---------------------------------------------------------------------3 Installation Installation ----------------------------------------------------------------------4 Operation Monitor Section --------------------------------------------------------------- 5 Adjusting the display setting-------------------------------------------------5 DVD section ---------------------------
Welcome! Thank you for purchasing the 10.4" headrest TFT-LCD Monitor with DVD Player. For Maximum enjoyment and prolonged life of the DVD player, we strongly recommend that you read the instruction manual carefully before attempting to operate the unit. Please store this manual in a safe place for future reference. Digital Video Discs are the best source of movies for your life. The latest digital technology allows compression of an entire movie onto one disc.
Precautions T o avoid the risk of serious injury or accident. Please read the following precautions before installing and operating the unit. On Safety IMPORTANT: Always comply with your local traffic rules and regulation. ▓ While driving ●The driver must not watch or operate the monitor. This is a safety hazard and may cause an accident. ●The driver must not listen to or use the headphones. It may be distracting and cause an accident.
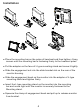
Installation ● Place the mounting bar on the poles of headrest and then tighten 4 long screws until the mounting bar is fastening firmly to the headrest poles. ● Put the adapter on the face of L type mounting stand and screw it tightly. ● Slide the engagement nut into the slide bracket slot on the rear of the monitor housing. ● Slide the engagement head on the monitor into the adapter of L-type mounting stand and tighten firmly.
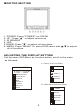
MONITOR SECTION 1. POWER: Press "POWER" for ON/Off. 2. UP : Press "▲" to adjust volume up 3. IR SENSOR 4. LED 5.DOWN: Press "▼" to adjust volume down. 6. MENU: Press "MENU" to select OSD menu with ▲/▼ to adjust all of functions. ADJUSTING THE DISPLAY SETTING Call the main OSD Menu by function button, scroll to the menu as followed: A. Source Selection Menu SOURCE MAIN MENU AUTO DETECT CUBS.1 = NTSC H. SYNC = +15.7K Hz V. SYNC = -60.
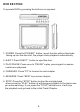
DVD SECTION To operate DVD by pressing the buttons on up panel: 1. POWER: Press the"POWER" button, insert the disc with printed side facing up into the disc slot, the player starts playback automatically. 2. EJECT: Press"EJECT" button to eject the disc. 3. PLAY/PAUSE: Press once to "PAUSE" a play, press again to resume continuous playback. 4. FORWARD: Press "FF" to forward to next chapter 5. REVERSE: Press "REW" to previous chapter 6.
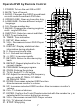
Operate DVD by Remote Control 1. POWER: To turn the unit ON or OFF. 2. MUTE: Turn off sound. 3. AUDIO: Changes the AUDIO soundtrack on multi-audio soundtrack DVD disc. 4. OPEN/CLOSE: Open or close disc tray. 5. LANGUAGE: Choose different output language. 6. 0-9: Choose number key 7. ANGLE: Changes the viewing angle on multi- angle DVD disc. 8. SUBTITLE: Select or cancel subtitles. 9. EXIT: To exit selection 10. TIMER: Time indication 11. SETUP: Menu setup. 12. VOL-: Decreases current DVD Player volume 13.
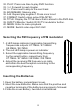
32. PLAY: Press one time to play DVD function. 33. >>I: Forward to next chapter 34. >>: Press next to skip to the next track 35. BOOKMARK: Memory play 36. A-B: Repeat play segment. Press once to set 37. FORMAT: Switch video output PAL/NTSC. 38. TITLE: Display the TITLE menu that is stored in the DVD disc. 39. DVD/TV/Monitor: Switch DVD /TV/ modulator button. 40. MENU: Enter to menu playback. 41. MODE: Switch video input AV1/AV2 Selecting the FM frequency of FM modulator 1.
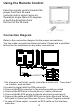
Using the Remote Control Face the remote control towards the player front face IR mark (remote control signal receiver). Operation angle: About 30 degrees in each the directions from the front of the IR mark. Connection Diagram Refer to the connection diagram for the proper connections. You can make connections shown as below. Please ask a qualified technician for assistance on any other connections. 1.On a towel or soft cloth, gently place the monitor unit "face down" on a stable work surface. 2.
TROUBLE SHOOTING Symptom and Solution: When having problem with the unit, please check this list for a possible solution before asking for service.
SPECIFICATION DVD PLAYER Power Supply Power Consumption Dimension Video System LaserSL Beam, wave length Frequency ResponseDVD Audio DC: 12V 25W 26cm x 23cm x 4.5cm NTSC/PAL 650nm, 780nm 45KHz PCM4 Hz~22Hz 96KHz PCM4 Hz~44KHz Audio CD 40Hz~20KHz >90dB Within measurable range Temperature 0 ~40 Operation status: horizon S/N Ratio Rotating Ratio Operation Condition MONITOR Screen Size Display Format Brightness Video Input Audio Output Power 10..