PLDVD168 OWNER'S MANUAL Mobile Video System OWNER'S MANUAL Mobile Video System REL EJ LOC LOUD DISC-RPT LOC RND INT MUTE ST FLAT CLAS ROCK POP SW TRACK MU EQ CLK MON BND MOD SEL PWR TUNE DISPLAY AUX GOTO EJECT STOP PLAY/PAUSE MUTE SUBTITLE AUDIO ANGLE SLOW ZOOM TITLE REPEAT A-B NEXT F.FWD ENTER PREV. F.
CONTENTS Safety Information ........................................................................................3 Disc Notes ....................................................................................................4 Installation.....................................................................................................5 Electric Connection ......................................................................................8 Remote Control............................................
SAFETY INFORMATION Region Management InformationRegion Management Information: This DVD Player is designed and manufactured to respond to the Region Management Information that is recordedon a DVD disc. If the Region number described on the DVD disc does not correspond to the Region number of this DVD Player, this DVD Player cannot play this disc. CAUTION: THIS DVD PLAYER IS A CLASS I LASER PRODUCT.
DISC NOTES Disc formats supported by this player DVD 12 cm disc (Single-sided disc only) Label side up Video CD 12 cm disc CD 12 cm disc MP3 12 cm disc Do not touch the underside of the disc Do not bend Discs which cannot be played with this player • DVD-ROM • DVD-R/DVD-RAM • CDV • CD-G Wipe the disc from center toward the outside edge Handling and Cleaning • Dirt, dust, scratches and warping disc will cause misoperation. • Do not place stickers or make scratches on discs. • Do not warp discs.
INSTALLATION Notes: • Choose the mounting location where the unit will not interfere with the normal driving function of the driver. • Before finally installing the unit, connect the wiring temporarily and make sure it is all connected up properly and the unit and the system work properly. • Use only the parts included with the unit to ensure proper installation. The use of unauthorized parts can cause malfunctions.
INSTALLATION DASH BOARD METAL MOUNTING STRAP HEXNUT SPRING WASHER PLAIN WASHER PLAIN WASHER TAPPING SCREW CONSOLE SLIDE BRACKET HOUSING HEX BOLT 6
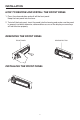
INSTALLATION HOW TO REMOVE AND INSTALL THE FRONT PANEL 1. Press the release button and pull-off the front panel. Keep the front panel into the case. 2. To install the front panel, insert the panel into the housing and make sure the panel is properly installed, otherwise, abnormalities occurs on the display or some keys will not function properly.
ELECTRIC CONNECTION WIRING CONNECTION FOR 4x7W SYSTEM MAIN UNIT AUX ANTENNA CONNECTOR IGNITION SWITCH RCA CABLE RED REAR RCA OUTPUT CABLE (OPTIONAL) CHOKE BOX POWER ANTENNA VIDEO OUT 1 YELLOW VIDEO OUT 2 YELLOW COAXIAL OUT BROWN RCH RED LCH WHITE YELLOW MEMORY BACK-UP (B+) GROUND (B-) VIDEO IN YELLOW RCH IN RED LCH IN WHITE FRONT RCA OUTPUTCABLE BLACK (FOR RCA LINE OUT VERSION ONLY) BLUE FRONT Lch SPK. GREY WHITE WHITE/BLACK GREY/BLACK GREEN/BLACK FRONT Rch SPK.
REMOTE CONTROL 11 1 12 DISPLAY AUX GOTO 13 2 EJECT PLAY/PAUSE STOP MUTE 14 3 SUBTITLE ANGLE AUDIO SLOW 4 5 15 ZOOM 6 7 TITLE REPEAT A-B 16 17 PBC 18 19 8 NEXT F.FWD ENTER 20 PREV. F.BWD 9 1 2 3 4 5 6 7 8 SETUP 9 0 +10 21 10 1. 2. 3. 4. GOTO DISPLAY EJECT SUBTITLE 5. AUDIO 6. 7. ZOOM TITLE 8. / / / / 9. 10. SETUP 11. 12. 13. AUX 14. 15. 16. 17. 18. 19 20. MUTE SLOW ANGLE A-B REPEAT / ENTER 21. 0 - 9 22.
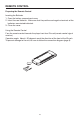
REMOTE CONTROL Preparing the Remote Control Inserting the Batteries 1. Open the battery compartment cover. 2. Insert the new batteries. Make sure that the positive and negative terminals of the batteries are oriented indicated. 3. Close the cover. Using the Remote Control Face the remote control towards the player front face IR mark (remote control signal receiver). Operation angle: About ± 30 degree in each the direction of the front of the IR mark.
BASIC OPERATION 18 1 19 REL EJ LOC LOUD FLAT CLAS ROCK POP LOC DISC-RPT RND INT MUTE ST SW TRACK MU EQ CLK MON BND MOD SEL PWR TUNE 3 2 4 5 6 7 8 9 10 11 12 13 14 15 17 16 ON/OFF Press POWER button (13) to turn on the unit. Press it again to turn off. FACEPLATE RELEASE SET Press REL button (2) to detach the removable faceplate. SET THE CLOCK Press CLK button (6) to change the display to clock display. Press it again to return to previous display.
BASIC OPERATION Volume Adjust volume level by using VOL+ (12) and VOL- (11) buttons. Note:The unit is initially set to volume mode. Bass Press SEL button (10) one time. Adjust bass level by using VOL+(12) and VOL-(11) buttons. Treble Press SEL button (10) two times. Adjust treble level by using VOL+(12) and VOL-(11) buttons. Balance Press SEL button (10) three times. Adjust sound balance between left and right speakers by using VOL+(12) and VOL-(11) buttons. Fader Press SEL button (10) four times.
BASIC OPERATION FLASHING LED If the front panel is not on the main unit, LED (16) will be flashing. RESET BUTTON FUNCTION RESET button (17) is placed on the housing and must be activated with either a ballpoint pen or thin metal object. The RESET button (17) is to be activated for the following reasons: -Initial installation of the unit when all wiring is completed. -All the function buttons do not operate. -Error symbol on the display.
BASIC OPERATION Stopping Play - Brief press the (Stop) button to stop the unit playback, when press the (14) button (Play) button it it can can continuous continuous normal normal playback. - Press (Stop) button twice, it will stop the playback and go back to initial Track/Chapter. Pause (still picture) during playback will stop Pressing play temporary. Return to normal playback, press once again.
BASIC OPERATION (3) Press DISPLAY for the third time: On-Screen Display Function P re s s t h e D I S P L AY b u t t o n d u r i n g playback to display the contents of the current disc on the screen.
BASIC OPERATION TITLE Menu Function DVD : If the DVD has multiple titles recorded on the disc. It can select preferred title from the title menu to start playback. 1. Press TITLE during playback. The title menu is display. 2. Press the cursor button shown in TV screen, select preferred title by the cursor button and confirmed by ENTER key. MP3 Disc Play MP3 disc is playing as the format of FOLDER by FOLDER.
SETUP INITIAL SETUP GENERAL SETUP SETUP MENU --- MAIN PAGE --- GENERAL PAGE --- GENERAL SETUP TV DISPLAY NORMAL/PS SPEAKER SETUP PIC MODE NORMAL/LB AUDIO SETUP ANGLE MARK WIDE PREFERENCES OSD LANG CAPTIONS SCR SAVER EXIT SETUP 1. Press SETUP in the stop mode. (Press the stop button twice to ensure the player under STOP mode.) MAIN PAGE TV Screen 2. The initial SETUP menu is displayed. 4:3 Video Material Normal 3. Select the preferred item by using the / buttons.
SETUP --- GENERAL PAGE --- --- GENERAL PAGE --- TV DISPLAY TV DISPLAY PIC MODE AUTO PIC MODE ANGLE MARK HI-RES ANGLE MARK OSD LANG N-FLICKER OSD LANG CAPTIONS CAPTIONS SCR SAVER SCR SAVER MAIN PAGE MAIN PAGE PIC mode setup Select AUTO, the player PIC mode will depend on DVD disc. Select HI-RES format for best image resolution. Select N-FLICKER format on format on image or picture under noise affect. ENGLISH OSD LANG type setup Select the preferred OSD language by using the / buttons.
SETUP --- GENERAL PAGE --- AUDIO SETUP --- AUDIO SETUP --- TV DISPLAY PIC MODE AUDIO OUT ANALOG OP MODE SPDIF/RAW LPCM OUTPUT SPDIF/PCM ANGLE MARK OSD LANG CAPTIONS DYNAMIC SCR SAVER ON OFF MAIN PAGE SCR SAVER setup Select the SCR SAVER output ON/OFF. MAIN PAGE AUDIO OUT This is to activate the audio output from ANALOG mode to SPDIF/RAW mode to SPDIF/PCM mode.
SETUP --- AUDIO SETUP --- PREFERENCES SETUP --- PREFERENCES PAGE --- AUDIO OUT OP MODE LPCM OUTPUT LPCM 48K DYNAMIC LPCM 96K TV TYPE AUTO AUDIO NTSC SUBTITLE PAL DISC MENU PARENTAL PASSWORD DEFAULTS SMART NAV MAIN PAGE MAIN PAGE TV type setup This player can play discs recorded in either PAL or NTSC format. Select NTSC format, when you connected to NTSC TV. Select PAL format, when you connected to PAL TV. Select AUTO format, the player TV output format will according to the DVD disc format.
SETUP --- PREFERENCES PAGE --- --- PREFERENCES PAGE --- TV TYPE TV TYPE 1G AUDIO AUDIO 2 SUBTITLE ENGLISH SUBTITLE 3 PG DISC MENU FRENCH DISC MENU 4 PG 13 PARENTAL SPANISH PARENTAL 5 PASSWORD CHINESE PASSWORD 6 PG-R DEFAULTS JAPANESE DEFAULTS 7 NC-17 SMART NAV SMART NAV 8 ADULT MAIN PAGE MAIN PAGE NO_PARENTAL SUBTITLE language setup Select the preferred SUBTITLE language by using the cursor buttons.
SETUP --- PREFERENCES PAGE --- DEFAULTS TABLE General Setup TV Display TV TYPE AUDIO SUBTITLE PIC Mode AUTO Angle Mark ON OSD Language English DISC MENU Captions PARENTAL SCR Saver PASSWORD DEFAULTS Normal/PS RESET OFF Speaker Setup Downmix Stereo Audio Setup Audio Out Analog OP Mode SMART NAV OFF Line Out Dynamic MAIN PAGE LPCM Out Preferences TV Type DEFAULTS Select reset to become factory initial setting.
SPECIFICATIONS Supply voltage Current consumption Signal system Discs played : : : : Audio Output Level Audio Signal Output Characteristics : Frequency Coverage IF Sensitivity (S/N = 30 dB) Stereo Separation : : : : : Frequency Coverage : IF : Sensitivity (S/N = 20 dB) : Frequency Coverage : IF : Sensitivity (S/N = 20 dB) : 12V DC (11V-15V), test voltage 14.4V, negative ground Less than 7A Compositive video 1.
TROUBLE SHOOTING Before going through the check list, check wiring connection. If any of the problems persist after check list has been made, consult your nearest service dealer. Symptom No power. Cause Solution The car ignition switch is not on. If the power supply is properly connected to the car accessory terminal, switch the ignition key to “ACC“. The fuse is blown. Replace the fuse.