Multimedia Lcd Projector www.PyleAudio.
ENGLISH TABLE OF CONTENTS Table of contents ............................................................................ 1 Important safeguards ..................................................................... 2 Product description ........................................................................ 3 Specifications ................................................................................. 4 Projector installation ......................................................................
Read this manual carefully before using this product. Heed the instructions to keep your warranty for this product. Prevent fire or electric shock. This product may only be repaired by qualified servicing personnel. Keep this manual for future reference. - Keep the original packaging in case of defects. Return the product in its original packaging. - Consult a professional before installing this product.
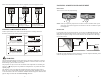
MAINTENANCE FILTER The filter should be cleaned at least once a month (more often in dusty environments), or the projector will overheat. 1. Turn the projector of with the On/Off switch and remove the plug from the mains supply. Never turn the projector on without a filter. 2. Remove the grille like indicated below (arrows). 3. Use the smallest amount of water or thinned dish cleanser to clean the filter. Dry the filter sufficiently. Never install a moist filter in this projector. 4.
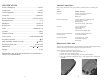
SPECIFICATONS TROUBLE SHOOTING Power consumption: ....................................................... <220 W Please refer to this chapter when you encounter a problem list prior to contacting your dealer. Lamp power: .................................................................... 150 W Color temperature: ......................................................... 9300 K Problem: No power Possible solution(s): Projector not connected to mains. Projector not turned on. Blown fuse.
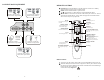
OSD menu Menu setting method PROJECTOR INSTALLATION 1. Using the projector press menu key, enter the main menu window (picture one) 2. Press key the menu enter into image > volume > function > system > setting > image secondary menu 3.Enter the secondary menu use key to elect the function (picture two 4. use key to change the parameter 5. Finished to adjust the parameter press the menu key again exit the window 6. Repeat operate the 2 5step till finished all the parameter's setting.
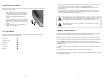
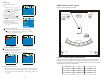
Please follow the instructions below when a trapezoid occurs on the projector screen: FOCUSING AND KEYSTONE ADJUSTMENT Screen FOCUSING Turn the lens to focus the projected image. Screen symmetry axis Projector Incorrect installation, the images left-right small. Installed correctly, the image is rectangular. Incorrect installation, the images right-left small. NOTE: When you replace the projector from a cold to a warm environment water vapour might occur.
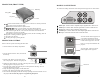
PROJECTOR (FRONT VIEW) MAKING CONNECTIONS TOP-Key The sockets for making connections on the back panel of the projector are shown below: Fan grille Keystone Lens button: Push this button to turn the projector on when it's in stand-by mode and push it again to return to stand-by mode. MENU button: Push this button to open the menu. / / / buttons: Use these buttons to navigate through the menu. PC/AV button: Use this button to select the video source you want to use.
CONNECT MAIN EQUIPMENT Connecting video equipment Without S-video output terminal. REMOTE CONTROL Connecting audio equipment With RCA output terminal. POWER button: Push this button to turn the projector on when it's in stand-by mode and push it again to return to stand-by mode. MENU button: Push this button to open the menu. / / / buttons: Use these buttons to navigate through the menu. AV/PV button: Use this button to select the video source you want to use.