PLCDCS300 OWNER’S MANUAL Mobile Audio System • PLL Synthesizer Stereo Radio • Digital Compact Disc Player • Cassette Player • Automatically Memory Storing • Preset Equalization • Auxiliary Input Function • Remote Control • Slide Down Undetachable Panel
CONTENTS Installation .....................................................................................................3 Wiring Connection ........................................................................................4 Operation .......................................................................................................5 General Operation ..................................................................................................6 Radio Operation...............................
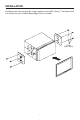
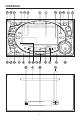
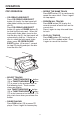
INSTALLATION Installation onto the car bracket using supplied screws (M5 x 6mm). The holes of the car bracket to use will differ depending on the car model.
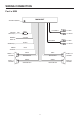
WIRING CONNECTION For 4 x 50W MAIN UNIT ANTENNA SOCKET (BLACK) IGNITION SWITCH (B+) MEMORY BACK-UP RED Lch WHITE YELLOW (GREY) RCA CABLE GROUND (B–) POWER ANTENNA FRONT Lch SPEAKER REAR Lch SPEAKER Rch RED TV AUDIO IN FUSE BLACK Rch RED Lch WHITE BLUE WHITE GREY WHITE/BLACK GREY/BLACK GREEN VIOLET GREEN/BLACK VIOLET/BLACK 4 FRONT Rch SPEAKER REAR Rch SPEAKER
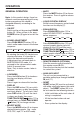
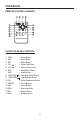
OPERATION 21 20 19 22 23 24 4 11 1 18 6 29 9 7 16 30 14 12 13 5 28 5 15 17 8 27 25 26 10 2 3
OPERATION • MUTE Press the MUTE button (2) to silence the receiver. Press it again to release the mode. GENERAL OPERATION Note: In this product design, there has different sound accompanying with every button pressed and the sound is designed differently according to the customers. • LIQUID CRYSTAL DISPLAY Exhibit current frequency and activated functions on the display (7). • ON/OFF Switch on the unit by pressing POWER button (9). When system is on, press POWER button (9) again to turn off the unit.
OPERATION Stations are searched automatically from next frequency and detected station is stored into the preset memory. In case of LOC state, the first Auto Store is done by LOC state and if 6 CH is not fully memorized, the seconds Auto Store search continued by Distant state. At the end of Auto Store operation, mode is change to Preset Scan. RADIO OPERATION • BAND SELECTION At radio mode, press BAND button (13) to select the desired band.
OPERATION CASSETTE OPERATION • TAPE OPEN/CLOSE Press TAPE OPEN/CLOSE button (26), the front panel will slide down to show the cassette compartment (28). Press TAPE OPEN/CLOSE button (26) again or POWER button (9) to slide up the front panel. • PROGRAM BUTTON These two buttons (27) perform the dual functions of changing the direction of tape playback and fast forward/rewind of the tape. - Change Tape Playback Direction Press both buttons together to play the other side of a tape.
OPERATION • REPEAT THE SAME TRACK Press RPT button (21) to continuously repeat the same track. Press it again to stop repeat. CDP OPERATION • CD OPEN/CLOSE/EJECT Press CD OPEN/CLOSE/EJECT button (4) shortly, the front panel will slide down halfway to show the disc slot (5). Press CD OPEN/CLOSE/EJECT button (4) again or POWER button (9) to slide up the front panel. When the front panel slides down, insert a disc into the disc slot (5), the front panel will automatically slide up.
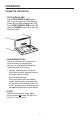
OPERATION REMOTE CONTROL HANDSET 1 7 4 3 8 9 6 5 13 2 12 10 11 14 15 FUNCTION KEYS & CONTROL 1. PWR 2. MUT 3. SEL 4. VOL 5. VOL 6. BND 7. MOD 8. TUNE/SEEK 9. TUNE/SEEK 10.EQ 11.PRESET 12.PAU 13.SCN 14.RPT 15.
SPECIFICATIONS GENERAL Power Supply Requirements Chassis Dimensions Loading Impedance Maximum Output Power Current Drain : : : : : DC 12 Volts, Negative Ground 200 mm (W) x 138 mm (D) x 100 mm (H) 4 - 8 Ω per channel 4 x 50 Watts 10 Ampere (max.) CD PLAYER Signal to Noise Ratio Channel Separation Frequency Response : More than 55 dB : More than 50 dB : 20 Hz - 20 KHz CASSETTE PLAYER Tape Speed Fast Forward Time Frequency Response Channel Separation Crosstalk Wow and Flutter : : : : : : 4.
TROUBLE SHOOTING Before going through the check list, check wiring connection. If any of the problems persist after check list has been made, consult your nearest service dealer. Symptom No power. Disc cannot be loaded or ejected. Cassette tape cannot be loaded or ejected. No sound. Sound skips or sound quality is poor. The operation keys do not work. Cause Solution The car ignition switch is not on.
MAINTENANCE 3. Clean the tape head with the cotton swab. For System The following suggestions help you care for the product so that you can enjoy it for years. 1. Keep the product dry. If it does get wet, wipe it dry immediately. Liquids might contain minerals that can corrode the electronic circuits. 4. Clean the capstans and the pinch rollers with the cotton swab. 2. Keep the product away from dust and dirt, which can cause premature wear of parts. 5.
CAUTION 3. Your unit has built-in filtering to eliminate most of the noise that might come through the power source. However, with some vehicles, particularly older models, some clicking or other unwanted noise might be present. 1. This unit is designed to operate on 12-volts DC, negative ground electrical system only. Do not attempt to install this unit in a vehicle having a positive ground system. 2. You should not touch the high-polished playback head with any metallic or magnetic tools.
www.pyleaudio.