www.PyleAudio.
CONTENTS Wa r n i n g Safety Precautions Caution Installation of projector Full setting standard setting front projection) Installation method input port instruction signalconnection map Remote control instruction Panel keystoke instruction Open/close Open operation Close operation Image trapezoid adjustment Focus adjustment Trapezoid adjustment Image trapezoid adjustment Menu setting method Image menu adjustment volume menu adjustment Function menu adjustment system menu adjustment preset menu adjustment M
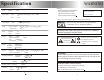
Specification LCD Model Input signal WARNING 5"TFT video component video(Ypbpr) ,VGA TV stereo audio HDMI warning Please remember the model Number and series number if you need.
Safety precautions Warning; when use this projector ,please read this manual carefully. If wrong operation ,it will cause electric shock or fire.so when use and repair this projector ,please comply with the following points 1,Read manual Before use this projector ,please read full manual carefully and operate according to this manual instruction 2,Clear when clear this projector ,please pull out the power cable. Use the wet cloth to clear,not the cleasner 3.Accessory please use our recommended accessory.
Trouble Shooting Caution TROUBLE SHOOTING Please refer to this chapter when you encounter a problem list prior to contacting your dealer.
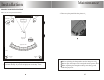
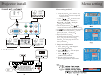
Maintenance Installation PROJECTOR INSTALLATION Please use the setup instruction below: Speaker L 2.Take away the panel like the picture 2 Speaker R Screen Subwoofer Speaker C Projector DVD Amplifier Appreciate seats Door Speaker Ls Speaker Rs In order to get good image quality ,donot let the sunlight shine the screen directly .
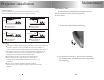
Projector Installation Maintenance Replace the projector lamp Our projector lamp warranty 6 months In different use environment after 6000hours the lamp brightness will reduce the image will become dark .Therefore please replace the lamp according to the following steps Standard setting Front projection Please refer to the following sheet , adjust your picture size and distance (from the lens to screen ) 1, use the tool to remove the screw,like the picture 1 show Taille D' cran 4:3 16:9 50" 2.
Maintenance Projector installation Maintenance filter Installation method: Contact a proffessional service man to mount this projector to a ceiling.
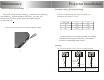
Projector installation Menu setting Input port instruction This projector can support component video signal, s-video signal,VGA signal and TV signal,the audio in and audio out function. • SOUND EOUALIZER BALANCE SOUND MODE AVC SURROUND AUDIO OUTPUT : MOVE OFF SLEEP TIMER STANDARD ON OFF OFF NORMAL : AD J MENU : EXIT : MOVE : AD J MENU : EXIT • SYSTEM OFF OFF MENU PIP TV LARGE MULITI WINDOW SUB SOURCE SIZE PIP H.POSITION PIP V.
Projector install Menu setting Menu setting method • • • • • • ••• • •• • •• • • •• •• ••• •• • •• • • • ••• • • •• •• • •• • •• • • • Connecting video equipment Without S-video output terminal. • • • ••• • • • • • • 1. Using the projector press menu key, the picture disply on screnn to adjust the menu(picture one) 2. press key the menu in turn circle into image > volume > function > system > setting > image adjust interface 3.
Remote control instruction Image adjustment The new projector using it first time commonly will appear image faintness and the the image is trapezoid it is course that not adjust well of the lens focus and the trapezoid please follow the step the correction Remote panel instruction 16 :9/4 :3 switch key switch the display picture for 16 :9 or4 :3 Focus adjustment • turn the lens into the projector then turn it out slowly at the same time looking at the resolution point carefully when the image is very
Panel keystoke instruction If the projector is the new one please read projector install chapter placed the projector connect the powerwire and the signelwire the operation as follow: Panel keystoke sketch map Open operation 1.Before use the remoter . Put in two 7 size battery in it 2.