User Guide for the Polycom® SoundPoint IP® 32x/33x Phone SIP 3.2.1 Rev. B | November 2009 | 1725-11241-001 Rev.
Trademark Information POLYCOM®, the Polycom “Triangles” logo and the names and marks associated with Polycom’s products are trademarks and/or service marks of Polycom, Inc. and are registered and/or common law marks in the United States and various other countries. All other trademarks are property of their respective owners.
About This Guide Thank you for choosing the SoundPoint IP 32x/33x SIP, a full-duplex, hands-free phone. This unit provides business telephony features and functions such as multiple call appearances, call hold, transfer, and conference over an IP network. This User Guide provides everything you need to quickly use your new phone. Verify with your system administrator that the network is prepared for configuring your SoundPoint IP 32x/33x SIP phone.
User Guide for the SoundPoint IP 32x/33x Desktop Phone iv
Contents About This Guide . . . . . . . . . . . . . . . . . . . . . . . . . . . . . . . . . iii Changes to this Guide . . . . . . . . . . . . . . . . . . . . . . . . . . . . . . . . . . . . . . . . . . . . iii 1 Getting Started with Your SoundPoint IP 32x/33x Phone . . 1–1 Parts List . . . . . . . . . . . . . . . . . . . . . . . . . . . . . . . . . . . . . . . . . . . . . . . . . . . . . . 1–2 Assembling Your SoundPoint IP 32x/33x Phone . . . . . . . . . . . . . . . . . . . .
User Guide for the SoundPoint IP 32x/33x Desktop Phone Placing a Call to a Contact . . . . . . . . . . . . . . . . . . . . . . . . . . . . . . . . . . . 2–16 Searching For a Contact . . . . . . . . . . . . . . . . . . . . . . . . . . . . . . . . . . . . . 2–17 Managing Incoming Calls . . . . . . . . . . . . . . . . . . . . . . . . . . . . . . . . . . . . . . 2–19 Distinguishing Calls . . . . . . . . . . . . . . . . . . . . . . . . . . . . . . . . . . . . . . . . 2–19 Rejecting Calls . . . . . . . . . . . .
Contents Access to Screens and Systems . . . . . . . . . . . . . . . . . . . . . . . . . . . . . . . . . . . 5–4 Calling . . . . . . . . . . . . . . . . . . . . . . . . . . . . . . . . . . . . . . . . . . . . . . . . . . . . . . . . 5–5 Displays . . . . . . . . . . . . . . . . . . . . . . . . . . . . . . . . . . . . . . . . . . . . . . . . . . . . . . . 5–7 Audio . . . . . . . . . . . . . . . . . . . . . . . . . . . . . . . . . . . . . . . . . . . . . . . . . . . . . . . . . 5–8 Productivity Suite . . . .
User Guide for the SoundPoint IP 32x/33x Desktop Phone viii
1 Getting Started with Your SoundPoint IP 32x/33x Phone This chapter provides basic installation instructions and information for obtaining the best performance with the SoundPoint IP 32x/33x (SoundPoint IP 320, 321, 330, 331, or 335) phone. The SoundPoint IP 32x/33x provides a powerful, yet flexible IP communications solution, delivering excellent voice quality. The graphic display supplies content for call information, multiple languages, directory access, and system status.
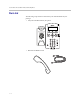
User Guide for the SoundPoint IP 32x/33x Desktop Phone Parts List The following components are included in your SoundPoint IP 32x/33x package: • Polycom SoundPoint IP 32x/33x phone Dial Line 1 Menu Line 2 1 ABC DEF 2 3 Hold 4 5 JKL MNO PQRS TUV WXYZ GHI 7 8 OPER 0 • 1-2 Handset and Handset Cord 6 9
Getting Started with Your SoundPoint IP 32x/33x Phone • Phone Base • Network / Power Cable • Quick Start Guide and registration card Ensure that you have received each item. If you are missing any items, contact your system administrator. Assembling Your SoundPoint IP 32x/33x Phone This section describes how to assemble your SoundPoint IP 32x/33x phone.
User Guide for the SoundPoint IP 32x/33x Desktop Phone Connecting Network and Power Source Use Power over Ethernet (PoE) for network and power source connections unless otherwise directed by your system administrator. Note The AC power adapter is a separate, optional accessory. Your system administrator will provide one if necessary. Power over Ethernet Using a regular CAT5 cable (optional accessory from Polycom), the phone can be powered from a PoE (IEEE 802.3af) compliant switch or hub.
Getting Started with Your SoundPoint IP 32x/33x Phone Connecting the Handset and Optional Headset To connect the handset and optional headset: 1. Connect the short straight end of the phone cord to the handset and the corresponding longer straight end of the cord to the handset jack on the back of the phone 2. Connect the headset (optional) to the headset jack on the back of the phone.
User Guide for the SoundPoint IP 32x/33x Desktop Phone For information on supported headsets, go to www.polycom.com/support/voice/soundpoint_ip/VoIP_Technical_Bulletins_pub.html and look for “Technical Bulletin 37477: Headset Compatibility List”. Note For headsets terminated in RJ-9 modular jacks to be used with SoundPoint IP 320, 321, 330, and 331 phones, a separate Headset Jack Adapter (P/N 2457-11095-001) is required. To purchase the Headset Jack Adapter, contact your reseller.
Getting Started with Your SoundPoint IP 32x/33x Phone To attach the base as a desk mount: 1. Place all cords in the recessed area above the modular jacks. 2. Align the protrusions on the bracket with their corresponding holes in the phone. 3. Snap them together to lock the bracket to the phone.
User Guide for the SoundPoint IP 32x/33x Desktop Phone To attach the base as a wall mount: 1. Place all cords in the recessed area below the modular jacks. 2. On the back of the phone, remove the key located behind the hook switch and reposition it so that the end tab (at a 450 angle) is facing up. 3. Using wall anchors (not included), fasten the base stand with the mounting tab facing up. 4.
Getting Started with Your SoundPoint IP 32x/33x Phone If your phone is not part of a large phone deployment, your phone may not be registered after you set it up. Before you use your phone, you or your system administrator will have to register it. For detailed information on how to register your phone after you install it, see Quick Tip 44011: Register Standalone SoundPoint® IP, SoundStation® IP, and Polycom® VVX™ 1500 Phones available at http://www.polycom.
User Guide for the SoundPoint IP 32x/33x Desktop Phone — Speed-Dial — Ringing — Call in progress/Conference — Call Forward — Do Not Disturb — Presence/BLF 3. Soft Keys—The screen will display labels for these keys, to identify their context-sensitive functions. 4. Line Indicators—Individual multi-color LEDs display the dynamic call state and remote user status (busy lamp field (BLF) and presence). The LED’s indicate the following: — Solid green—An active call is in progress.
Getting Started with Your SoundPoint IP 32x/33x Phone 12. Dial Pad—Provides the 10 digits, alphabetic characters, and special characters available in context-sensitive applications. 13. Feature Keys—Access important features using these keys. — —Dials phone numbers or allows you to view the placed call list. — —Accesses local (your phone) and call server features. 14. Display Control Keys—Use , , , and (arrow keys) to scroll through the displayed information.
User Guide for the SoundPoint IP 32x/33x Desktop Phone Before You Use Your SoundPoint IP 32x/33x Phone To navigate through menus and to enter data, these are useful tips: Note • Press • Press lists. to enter the basic settings menu or exit from any menu. and or hold and down to scroll through the Press the * key to page up. Press the # key to page down. These shortcuts can be used when lists appear on more than one page. However, these shortcuts do not work in the Contact Directory.
Getting Started with Your SoundPoint IP 32x/33x Phone The type of text entry available is displayed in the title line. Switch between alphabetic (with and without an uppercase letter first) and numeric text entry by pressing the # key. Special characters like * and _ are considered alphabetic and appear when you press *, 1, or 0. Switch to uppercase by pressing and to lowercase by pressing . Note Pressing the # also allows for URL or IP address entry.
User Guide for the SoundPoint IP 32x/33x Desktop Phone 1 - 14
2 Customizing Your SoundPoint IP 32x/33x Phone You can customize your SoundPoint IP 32x/33x desktop phone by adjusting the setting for time and date, display contrast, and ring type, for example. You can add contacts to the phone’s directory manually or from call lists. You can handle incoming calls from different contacts in different ways. This chapter provides basic operating instructions for customizing your SoundPoint IP 32x/33x phone.
User Guide for the SoundPoint IP 32x/33x Desktop Phone Configuring Basic Settings To configue basic settings, press , and then select Settings > Basic. You can configure the following basic settings: • The appearance of the time and date • Display contrast • Backlight intensity (SoundPoint IP 335 only) • Headset Memory Mode • Headset hookswitch selection • Ring type • Language support (localization) • Directory search You can mute the microphone and adjust the volume using separate keys.
Customizing Your SoundPoint IP 32x/33x Phone 5. Press to confirm your choice. For example, the following figure shows Clock Time. 6. Press or repeatedly to return to the idle display. Display Contrast To adjust the contrast on the display to a comfortable level: 1. Press . 2. Select Settings > Basic > Contrast. 3. Press the Up or Down soft keys to increase or decrease the display contrast. 4. Press the Save soft key to accept changes or 5. Press or to cancel changes.
User Guide for the SoundPoint IP 32x/33x Desktop Phone When you modify the Maximum Intensity, you are modifying the entire backlight intensity scale. For example, if you decrease the Maximum Intensity, the low, medium, and high values for both Backlight On intensity and the Backlight Idle intensity decrease.
Customizing Your SoundPoint IP 32x/33x Phone 3. Select Backlight On Intensity. 4. Use or to select high, medium, low, or off, and then press the Select soft key. The default level is High. 5. Select Backlight Idle Intensity. 6. Use or to select high, medium, low, or off, and then press the Select soft key. The default level is low. 7. Select Maximum Intensity. 8. Press the Up or Down soft keys to increase or decrease the backlight intensity. 9.
User Guide for the SoundPoint IP 32x/33x Desktop Phone Headset Memory Mode This feature is especially useful for permanent or full-time headset users. To permanently enable the Headset Memory Mode: 1. Press . 2. Select Settings > Basic > Preferences > Headset > Headset Memory. 3. Use the 4. Press or to select Enabled. to confirm your choice. 5. Press or repeatedly to return to the idle display. Repeat steps 1 to 4 to select Disabled and turn Headset Memory Mode off.
Customizing Your SoundPoint IP 32x/33x Phone 3. Use the or 4. Press to select your headset and press the Select soft key. or the Exit soft key repeatedly to return to the idle. Ring Type You can select from the different ring types to distinguish between lines or to have a different ring from your neighbor’s phone. You can set distinctive incoming ringing tones for contacts in your local directory (refer to Editing Contacts on page 1-3). To change the incoming ring to a desired sound: 1. Press . 2.
User Guide for the SoundPoint IP 32x/33x Desktop Phone Language Support Many languages are supported by the SoundPoint IP 32x/33x SIP phone. To change the language: 1. Press . 2. Select Settings > Basic > Preferences > Language. 3. Scroll through the list of available languages. 4. Press to confirm your choice. Text that appears on the graphic display will change to the language of your choice. 5. Press or repeatedly to return to the idle display.
Customizing Your SoundPoint IP 32x/33x Phone 3. Using and , select the directory search parameter. Last name is the default directory search parameter. 4. Press to select your choice. 5. Press the Yes or Cancel soft keys to accept or cancel changes. Note Depending on the size of your local contact directory, the reconfiguration may take a few minutes. The phone will restart to set the new directory search mode if you pressed the Yes soft key. Muting the Microphone During a call, press .
User Guide for the SoundPoint IP 32x/33x Desktop Phone Managing Call Lists A list of up to four current calls is maintained. You can scroll through this list using the and . Calls are ordered using the following priorities: active, alerting, then held. Calls with the same priorities are ordered oldest first. If there are no current calls, this list is empty.
Customizing Your SoundPoint IP 32x/33x Phone • To delete the call from list: — Press the Delete soft key. Press repeatedly to return to the idle display. Note Press the Right arrow key from the idle display to access the Placed Calls list. Press the Down arrow key from the idle display to access the Received Calls list. You can use these shortcuts while placing calls or performing transferring and conferencing functions. Note You can manually clear the call lists.
User Guide for the SoundPoint IP 32x/33x Desktop Phone 3. Press . The Directory screen displays. displays at the top of the list. Note When adding the first contact, you do not need to press the Up arrow key. 4. Press to add a new entry. 5. Press to enter a first name. Entry to this field is alphabetic as denoted by . 6. Enter the first name of the contact from the dial pad. 7. Press the Ok or Cancel soft keys to accept or cancel changes. 8.
Customizing Your SoundPoint IP 32x/33x Phone 11. Repeat steps 4 to 8 to change the Speed Dial Index if desired. It is automatically assigned to the next available index value. For more information, refer to Assigning Speed Dial Indexes on page 3-14. 12. Repeat steps 4 to 8 to change the Ring Type and Divert Contact if desired. These fields may be left blank. For more information on setting the Ring Type field, refer to Distinguishing Calls on page 2-19.
User Guide for the SoundPoint IP 32x/33x Desktop Phone 3. Press to select the entry. 4. (Optional) Press the Info soft key. The name is displayed. The number, time and date when the call started, and call duration are accessible through use of 5. (Optional.) Press . repeatedly to select the phone number. 6. Press the Save soft key to save the contact in the local contact directory. 7. Press Note repeatedly to return to the idle display.
Customizing Your SoundPoint IP 32x/33x Phone 5. Press the Save soft key to save the contact in the local contact directory. “Entry saved” appears on the graphic display. Only the first name, last name, and phone number are saved. If the contact already exists in the contact directory, “Entry already exists” appears. 6. Press repeatedly to return to the idle display. Editing Contacts To edit a contact in the local contact directory: 1. Press the Dir soft key. 2.
User Guide for the SoundPoint IP 32x/33x Desktop Phone 7. Make the desired changes. The Ok soft key is not displayed until a change has been made. The Cancel soft key in this context will cancel the edit session for the entry and return to the screen before the Edit soft key was selected (see step 3). Press and to place the cursor either at the beginning or end of the item respectively. Press to move to the next field. 8. Press the Ok or Cancel soft keys to accept or cancel changes. 9.
Customizing Your SoundPoint IP 32x/33x Phone Placing a Call to a Contact Placing Calls From the Contact Directory To place a call to a contact in the local contact directory: 1. Press the Dir soft key. 2. Select the local contact directory if it does not appear automatically by pressing 3. Use . and to scroll through the list to find the contact. 4. Press or lift the handset. Placing Calls From the Corporate Directory To place a call to a contact in the corporate directory: 1.
User Guide for the SoundPoint IP 32x/33x Desktop Phone 3. Search for a contact using the dial pad. You can change the directory search parameter used. By default, it is the contact’s last name. For more information, refer to Directory Search on page 2-8. The first time a dial pad key is pressed, the first entry whose last name starts with a character that matches the first letter on the key label will be retrieved. The second key press repeats the process using the second letter on the key and so on.
Customizing Your SoundPoint IP 32x/33x Phone — Press the AdvFind soft key, enter search values in the displayed fields. For example, enter Smith as the last name. — Press the Submit soft key. In this example, Bob Smith appears in the search results.. You can dial any successful matches from the resulting information on the graphic display.
User Guide for the SoundPoint IP 32x/33x Desktop Phone 6. Press to edit the Ring Type. 7. Enter the number corresponding to one of the ring types available. For more information, refer to Ring Type on page 2-5. 8. (Optional) To remove an existing value, press . 9. Press the Ok or Cancel soft keys to accept or cancel changes. 10. Press Note repeatedly to return to the idle display. This feature is local to the phone, and may be over-ridden by your organization’s settings.
Customizing Your SoundPoint IP 32x/33x Phone Diverting Calls You can customize your phone so that incoming calls from a particular party are transferred directly to a third party. To divert incoming calls from a particular contact: 1. Press the Dir soft key. 2. Use 3. Press and to scroll through the list to find the contact. to select the entry. 4. Press the Edit soft key. 5. Press repeatedly until the Divert Contact field is displayed. 6. Press . 7.
User Guide for the SoundPoint IP 32x/33x Desktop Phone System Customizations The following section details customizations of your SoundPoint IP 32x/33x phone that are performed by your system administrator. Supporting Multiple Lines Your SoundPoint IP 32x/33x phone can support up to 2 lines. Typically, the top-most Line Key is reserved for the principal directory number (DN) of the phone.
Customizing Your SoundPoint IP 32x/33x Phone Supporting Shared Lines Your SoundPoint IP 32x/33x phone supports shared lines. A shared line is indicated by a different line icon. In the following figure, the line 3413 is private and the line 3416 is shared. If two phones share a line, an incoming call to that number will cause both phones to ring. The call can be answered on either phone but not both. Calls on shared lines can be transferred, placed on hold, or added to a conference.
User Guide for the SoundPoint IP 32x/33x Desktop Phone 2 - 24
3 Using the Basic Features of Your SoundPoint IP 32x/33x Phone Your SoundPoint IP 32x/33x phone is designed to be used like a regular phone on a public switched telephone network (PSTN). You can place calls, transfer a call to someone else, or conduct a conference call. At any time, only one active call may be in progress on your phone. The active call is the one that has audio associated with it. There may be up to three other calls on hold or in an “Incoming call” or “Ringing” state on a particular line.
User Guide for the SoundPoint IP 32x/33x Desktop Phone To customize your phone, refer to Customizing Your SoundPoint IP 32x/33x Phone on page 2-1. To read about the phone’s advanced features, refer to Using the Advanced Features of Your SoundPoint IP 32x/33x Phone on page 4-1. Review useful tips about the phone in Before You Use Your SoundPoint IP 32x/33x Phone on page 1-12. If you require additional information or assistance with your new phone, contact your system administrator.
Using the Basic Features of Your SoundPoint IP 32x/33x Phone To place a call using the handset: 1. Do the following steps in any order: — Pick up the handset. — Dial the desired number using the dial pad. Note URL or IP dialing is not supported on registered phones. If your phone is intentionally unregistered, the default dialing mode is by URL.
User Guide for the SoundPoint IP 32x/33x Desktop Phone b c With the optional headset connected, dial the desired number using the dial pad. Press . Press . You will hear a dial tone. You can enter the desired number now. Note To permanently enable your headset, refer to Headset Memory Mode on page 2-6. To place a call using the Dial key: 1. Do one of the following steps: a Press the Callers soft key to view the Receive Call list. b Press 2. Use to view the Placed Call list. and 3.
Using the Basic Features of Your SoundPoint IP 32x/33x Phone • Multiple Line Keys per line If your phone is configured with multiple call appearances, refer to Using Multiple Call Appearances on page 4-3 for instructions on how to answer a call. Note Incoming calls may be ignored by pressing the Reject soft key (for private lines) or the Ignore soft key (for private and shared lines).
User Guide for the SoundPoint IP 32x/33x Desktop Phone To answer a call using the headset: ¾ Press to answer the call through an optionally connected headset. If Headset Memory Mode is activated, press soft key. or the Answer Answering When in Another Call You are busy on an active call and a second incoming call arrives on the same phone number.
Using the Basic Features of Your SoundPoint IP 32x/33x Phone 2. Press to access the new call. Soft key labels are updated on the display showing Ignore, Answer, and Reject. 3. Answer the incoming call. This places the original call on hold and refreshes the soft key labels. To answer an incoming call on a line configured for multiple Line Keys: Note Use this procedure after the call prompt disappears.
User Guide for the SoundPoint IP 32x/33x Desktop Phone Redialing To redial any call placed from your phone: ¾ Refer to Placing a Call on page 3-2. Placing a Call on Hold During a call, press . This will be indicated on the graphic display by the hold icon as the line indicator. Press icon (one of again or the Resume soft key to resume the call. The active audio , , or ) appears as the line indicator.
Using the Basic Features of Your SoundPoint IP 32x/33x Phone If calls are on hold on more than one Line Key, all calls are combined into a single call list. The Line Key that a call is associated with is indicated by the line icon in reverse colors. Pressing a Line Key with calls on hold will place the current active call on hold and resume the first call on that Line Key. Setting Up Conferences You can create a conference with other parties using the phone’s local conference feature.
User Guide for the SoundPoint IP 32x/33x Desktop Phone To set up a conference call using the Join soft key: ¾ When you are in an active call: a If you have one call on hold (on the same line or other line), use to go to the call on hold, then press the Join soft key. A conference is created with the active call, the call on hold and yourself. b If you have more than one call on hold, use and to switch to the desired call on hold, press the Join soft key.
Using the Basic Features of Your SoundPoint IP 32x/33x Phone To transfer a call: 1. During a call, press Trans soft key. The active call is placed on hold. 2. Do one of the following steps: a Enter the number to which you want to transfer the call. A normal (or consultative) transfer is assumed. b Press the Normal soft key to access the local contact directory, corporate directory, or received callers list. Then choose either the Dir or Callers soft key.
User Guide for the SoundPoint IP 32x/33x Desktop Phone d Press the Callers soft key to access the Received Call list, use and e Press to access the contact, and then press to access the Placed Call list, use to access the contact, and then press . and . At this point, the call is connected to the number to which you are transferring them. Forwarding Calls You can configure your phone so that all incoming calls are forwarded to another party (known as static forwarding).
Using the Basic Features of Your SoundPoint IP 32x/33x Phone 3. Using and then press , select the forwarding type you want to change and . The options are: — Always—For all incoming calls — No Answer—Once all options to accept calls have been taken — Busy—When you are already in a call 4. Depending on your selection: Note a If you select Always, enter a number to forward all future incoming calls to.
User Guide for the SoundPoint IP 32x/33x Desktop Phone Enabling Do Not Disturb Press and then select Features > Do not disturb to prevent the phone from ringing on incoming calls. A flashing icon and text on the graphic display indicates that Do Not Disturb is on. Calls received while Do Not Disturb is enabled are logged in the Missed Calls list unless configured to be forwarded to another party by your system administrator. To disable Do Not Disturb, press not disturb again.
Using the Basic Features of Your SoundPoint IP 32x/33x Phone For other frequently used numbers, you can associate them with a speed dial index. To dial a contact associated with a speed dial index, enter the speed dial index followed by the # key using the dial pad, then press up the handset or pick The Speed Dial list can be accessed by pressing and selecting Features > Speed Dial... or by pressing the Up arrow key from the idle screen.
User Guide for the SoundPoint IP 32x/33x Desktop Phone To assign a new speed dial key: 1. Press and hold if unassigned. A new empty entry in the contact directory is automatically opened allowing contact information to be added. 2. Press to enter a first name. 3. Enter the first name of the contact from the dial pad. 4. Press the Ok or Cancel soft keys to accept or cancel changes. 5. Press to display the next field in the contact’s entry. 6. Repeat steps 2 to 5 to enter the last name of the contact.
Using the Basic Features of Your SoundPoint IP 32x/33x Phone A stutter dial tone in place of normal dial tone is used to indicate that one or more voice messages are waiting at the message center. Note Voice Mail is an optional feature configured on the call server and may not be supported on your particular system. For more information, contact your system administrator. Screen options may vary with your application. Voice Mail may be accessible with a single key press.
User Guide for the SoundPoint IP 32x/33x Desktop Phone 3 - 18
4 Using the Advanced Features of Your SoundPoint IP 32x/33x Phone This chapter provides operating instructions for the advanced features of the SoundPoint IP 32x/33x phone. This chapter contains instructions on: • SIP-B Automatic Call Distribution • Using Multiple Call Appearances • Using Buddy Lists • Restarting Your Phone To customize your phone, refer to Customizing Your SoundPoint IP 32x/33x Phone on page 2-1.
User Guide for the SoundPoint IP 32x/33x Desktop Phone When ACD is enabled on your phone, the line icon appears. This is the default setting. No calls will be directed to your phone. After you log in (refer to To log into the ACD:), the line icon changes to . You are now considered available and calls will be directed to your phone. After you end a call, the line icon alternates between and showing you are now unavailable.
Using the Advanced Features of Your SoundPoint IP 32x/33x Phone 8. Enter your password and press the Login soft key. 9. Press repeatedly to return to the idle display. To log out of the ACD: 1. Press . 2. Select Features > ACD Login/Logout... 3. Select Logout. 4. Press repeatedly to return to the idle display. To set ACD agent availability: 1. Press . 2. Select Features > ACD Agent Availabilit... 3. Use and to switch between Available and Unavailable settings. 4. Press 5.
User Guide for the SoundPoint IP 32x/33x Desktop Phone For example, the first figure shows Line 2 in a held call with Dean at extension 1703 and Line 1 has a call on hold. The second figure shows Line 1 holding a call from Bob at extension 1701. To answer an incoming call when configured for multiple call appearances: ¾ Do one of the following steps: — Press to put the original call on hold and then answer the incoming call.
Using the Advanced Features of Your SoundPoint IP 32x/33x Phone Using Buddy Lists Your SoundPoint IP 32x/33x phone combines interactive message services and status monitoring to complement a traditional messaging application such as e-mail. Live interaction within a pool of phones is possible by monitoring the “presence” of the parties involved. Your phone can “watch” the status of up to 8 other phones or 8 buddies. These other phones form your “buddy list”.
User Guide for the SoundPoint IP 32x/33x Desktop Phone To add or delete a contact from your buddy list: 1. Press the Dir soft key. 2. Use or to scroll through the list to find the contact. 3. Press to select the entry. 4. Press repeatedly until the Watch Buddy field appears. 5. Press to select the Watch Buddy field. 6. Use or to switch between Enabled and Disabled settings. When Watch Buddy is enabled, the contact is added to your buddy list.
Using the Advanced Features of Your SoundPoint IP 32x/33x Phone Integrating With Microsoft Live Communications Server 2005 Your phone can be configured to work with Microsoft Live Communications Server 2005 and communicate with others using Microsoft Office Communicator and Windows Messenger. From your phone, you can invite, join, control, and monitor integrated multipoint audio and video conferences.
User Guide for the SoundPoint IP 32x/33x Desktop Phone 4. Press to select the entry. 5. Press Edit soft key. 6. Press to scroll through the list to find the Access field. 7. Press to select the field. 8. For Access, use or to select Enabled. When Access is enabled, you are allowing the contact to see your presence. When Access is disabled, you are disallowing the contact from seeing your presence. The default for access is Disabled. 9. Press repeatedly to return to the idle display.
Using the Advanced Features of Your SoundPoint IP 32x/33x Phone To restart the phone: 1. Press . 2. Select Settings > Basic> Restart Phone. “Are you sure?” appears on the graphic display. 3. If you still want to restart your phone, press the Yes soft key. The restart process process begins. The process ends when the idle display appears.
User Guide for the SoundPoint IP 32x/33x Desktop Phone 4 - 10
5 Troubleshooting Your SoundPoint IP 32x/33x Phone This chapter contains general troubleshooting information to help you solve any problems you might encounter when you use your SoundPoint IP 32x/33x phone. The table in this chapter list possible trouble symptoms, the likely causes of these problems, and the recommended corrective actions to take.
User Guide for the SoundPoint IP 32x/33x Desktop Phone Power and Startup Symptom Problem Corrective Action There are power issues. The SoundPoint IP 32x/33x phone has no power. Do one of the following steps: 5-2 • Verify that no lights appear on the phone when it is powered up. • Check if the phone is properly plugged into a functional AC outlet. • Make sure that the phone isn't plugged into a plug controlled by a light switch that is off.
Troubleshooting Your SoundPoint IP 32x/33x Phone Controls Symptom Problem Corrective Action The dial pad does not work. The dial pad on the SoundPoint IP 32x/33x phone does not respond. Do one of the following steps: • Check for a response from other feature keys or from the dial pad. • Place a call to the phone from a known working telephone. Check for display updates. • Check if the LAN port is active or inactive. Press the menu key, and then select Status > Network > Ethernet.
User Guide for the SoundPoint IP 32x/33x Desktop Phone Access to Screens and Systems Symptom Problem Corrective Action There is no response when you press a feature key. The SoundPoint IP 32x/33x phone is not in an active state. Do one of the following steps: The display shows “Network Link is Down”. 5-4 The LAN cable is not properly connected. • Press the keys more slowly. • Check with your system administrator to see if the key has been mapped to a different function or is disabled.
Troubleshooting Your SoundPoint IP 32x/33x Phone Calling Symptom Problem Corrective Action There is no dial tone. Power is not correctly applied to the SoundPoint IP 32x/33x phone. Do one of the following steps: Dial tone is not present on one of the audio paths. The phone is not registered. • Check that the display is illuminated. • Make sure the LAN cable is inserted properly at the rear of the phone (try unplugging and re-inserting the cable).
User Guide for the SoundPoint IP 32x/33x Desktop Phone Symptom Problem Corrective Action The phone does not ring. Ring setting or volume is low. Do one of the following steps: Outbound or inbound calling is unsuccessful. You turned off the ringer. • Adjust the ringing level from the front panel using the volume up/down keys. • Check status of handset, headset (if connected), and Hands-Free Speakerphone. Do one of the following steps: • Place a call to the phone under investigation.
Troubleshooting Your SoundPoint IP 32x/33x Phone Displays Symptom Problem Corrective Action There is no display. Power is not correctly applied to the SoundPoint IP 32x/33x phone. Do one of the following steps: The display is incorrect. The display has bad contrast. The contrast needs adjustment. Outbound or inbound calling is unsuccessful. The display flickers. A certain type of older fluorescent lighting causes the display to appear to flicker. • Check that the display is illuminated.
User Guide for the SoundPoint IP 32x/33x Desktop Phone Audio Symptom Problem Corrective Action There is no audio on the headset. The connections are not correct. Do one of the following steps: You are using a headset and the people you call hear echo. There may be an issue with the echo cancellation feature of your headset. • Ensure the headset is plugged into the jack marked Headset at the rear of the phone.
Troubleshooting Your SoundPoint IP 32x/33x Phone To test your phone hardware: >> Press , and then select Status > Diagnostics > Test Hardware > Audio Diagnostics, Keypad Diagnostics, or Display Diagnostics.
User Guide for the SoundPoint IP 32x/33x Desktop Phone 5 - 10
Regulatory Notices Service Agreements Please contact your Polycom Authorized Reseller for information about service agreements applicable to your product. Governing Law This Limited Warranty and Limitation of Liability shall be governed by the laws of the State of California, U.S.A., and by the laws of the United States, excluding their conflicts of laws principles.
User Guide for the SoundPoint IP 32x/33x Desktop Phone Polycom Limited Warranty and Limitation Liability LIMITED WARRANTY. Polycom warrants to the end user (“Customer”) that this product is expected to be free from defects in workmanship and materials, under normal use and service, for one year from the date of purchase from Polycom or its authorized reseller.
Regulatory Notices Safety and Compliance Part 15 FCC Rules This device is compliant with Part 15 of the FCC Rules. Operation is subject to the following two conditions: 1. This device may not cause harmful interference, and 2. This device must accept any interferences received, including interference that may cause undesired operation. Class B Digital Device or Peripheral Note: This equipment is tested and complies with the limits for a Class B digital device, pursuant to Part 15 of the FCC Rules.
User Guide for the SoundPoint IP 32x/33x Desktop Phone Safety and Compliance (continued) Russian Compliance Ministry of Information Technologies & Communication of the Russian Federation - Declaration of Conformity. DoC # Д-СПД-2950. Expiry 22.06.2012. Ministry of Information Technologies & Communication of the Russian Federation - Declaration of Conformity. DoC # Д-СПД-2948. Expiry 22.06.2012. Ministry of Information Technologies & Communication of the Russian Federation - Declaration of Conformity.
Index Symbols # key, page down shortcut 1–12 * key, page up shortcut 1–12 Numerics 123 icon 2–12 A ABC icon 2–12 answering calls 3–4, 3–5 assembling your phone 1–3 assigning speed dial indexes 3–14 B base, attaching 1–6, 1–8 block buddies 4–6 buddy lists 4–5 C call lists types of 2–10 calls ending 3–7 on hold 3–8 with handsets 3–3 with headsets 3–3 conferences, setting up 3–9 contact directory 2–11 contact lists.
User Guide for the SoundPoint IP 32x/33x Desktop Phone L language support 2–8 M managing buddies 4–5 Microsoft Office Live Communications Server 2005 4–5, 4–7 multiple call appearances 4–3 multiple calls, hold 3–8 multiple keys per line 2–22 multiple lines call forwarding 3–12 Do Not Disturb 3–14 ring type 2–7 support for 2–21 Voice Mail 3–17 muting microphone 2–9 MyStat 4–5 N navigation guide icon 1–12 navigation key usage 1–12 network connection, phone 1–4 P parts list 1–2 placing calls 3–2 PoE.
Index T text entry 1–12 time and date 2–2 transferring calls 3–10 troubleshooting audio problems 5–8 calling problems 5–5 controls problems 5–3 diagnostics 5–8 display problems 5–7 power and startup problems 5–2 screen and system problems 5–4 U useful tips 1–12 V voice mail 3–16 volume 2–9 W watch buddies 4–6 Index – 3
User Guide for the SoundPoint IP 32x/33x Desktop Phone Index – 4
End-User License Agreement for Polycom® Software This End-User License Agreement (“Agreement”) is a legal agreement between you (either an individual or a single entity) and Polycom, B.V for the Polycom Software Product licensed by Polycom B.V in Europe, the Middle East, Africa, and Asia Pacific or Polycom, Inc., for the Polycom Software Product licensed by Polycom, Inc. in the rest of the world (collectively, “Polycom”).
2.6 Copyright. All title and copyrights in and to the Software Product (including, but not limited to, any images, photographs, animations, video, audio, music, text, and “applets” incorporated into the Software Product), the accompanying printed materials, and any copies of the Software Product are owned by Polycom or its suppliers. The Software Product is protected by copyright laws and international treaty provisions.
refund the purchase price paid by you for any defective software product which is returned to Polycom with a copy of your receipt, or to replace any defective media with software which substantially conforms to applicable Polycom published specifications. Any replacement Software Product will be warranted for the remainder of the original warranty period or thirty (30) days, whichever is longer. 6.2 Warranties Exclusive.
not located in, under the control of, or a national or resident of any such country or on any such list. If you obtained this Software Product outside of the United States, you are also agreeing that you will not export or re-export it in violation of the laws of the country in which it was obtained. 10. MISCELLANEOUS. 10.1 Governing Law.