PLPK65TVD OWNER’S MANUAL Mobile Video System • Vertical Adjustable And Horizontal Rotatable Panel • 6.
FEATURES Protect the Disc Mechanism Avoid inserting any foreign objects into the slot of this player. Failure to observe this may cause malfunction due to the precise mechanism of this unit. Compatible with PAL DVD (Video CD) and NTSC DVD (Video CD) This player can play discs recorded in either PAL or NTSC format. • A single LSI chip now integrates all major DVD playback circuit functions including MPEG2 decoder, video D/A converter, and audio decoders.
CONTENTS Safety Information ......................................................................................................4 Disc Notes ...................................................................................................................5 Installation...................................................................................................................6 The Player ................................................................................................................
SAFETY INFORMATION REGION MANAGEMENT INFORMATION Region Management Information: This Mobile DVD Player is designed and manufactured to respond to the Region Management Information that is recorded on a DVD disc. If the Region number described on the DVD disc does not correspond to the Region number of this Mobile DVD Player, this Mobile DVD Player cannot play this disc. CAUTION: MOBILE DVD PLAYER IS A CLASS I LASER PRODUCT.
DISC NOTES Disc formats supported by this player unusable) depending on the way it is handled and conditions in the usage environment. Note these scratches are not an indication of any problem with the player.
INSTALLATION Notes: DIN FRONT-MOUNT (Method A) • Choose the mounting location where the unit will not interfere with the normal driving function of the driver. Installation Opening This unit can be installed in any dashboard having an opening as shown below: • Before finally installing the unit, connect the wiring temporarily and make sure it is all connected up properly and the unit and the system work properly. 53 mm 182 mm • Use only the parts included with the unit to ensure proper installation.
INSTALLATION Dashboard Removing the unit 1. Make sure the ignition is turned off, then disconnect the cable from the vehicle battery's negative (-) terminal. 2. Remove the metal strap attached the back of the unit (if attached). 3. Lift the top of the outer trim ring then pull it out to remove it. 4. Insert both of the supplied keys into the slots at the middle left and right sides of the unit, then pull the unit out of the dashboard. Tabs Screwdriver Sleeve 6.
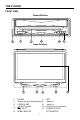
THE PLAYER FRONT VIEW Closed Position 6 1 5 2 4 3 Open Position 9 7 1. 2. 3. 4. 5. 6. 8 9 POWER Remote sensor (on the front panel) OPEN/CLOSE (EJECT button) DISC SLOT RESET BUTTON 8 10 7. PICT 8. Adjust (-) 9. Adjust (+) 10. Remote sensor (on the monitor panel) 11. 6.
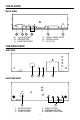
THE PLAYER BACK VIEW 12 13 14 15 16 12. 13-PIN SOCKET 13. RGB SYSTEM 14. REMOTE SOCKET 17 15. AUDIO/ VIDEO INPUT 16. DIGITAL AUDIO 17. DC 12V IN THE RADIO BOX ONE SIDE 2 3 4 1 ANOTHER SIDE 5 6 1. 20-PIN SOCKET 2. TO MAIN UNIT 3. VIDEO OUTPUT 4. AUDIO OUTPUT 5. ANTENNA SOCKET 6.
ELECTRICAL CONNECTION DVD UNIT DC 12V IN REMOTE AUDIO/VIDEO INPUT DIGITAL AUDIO MEMORY BLACK-UP (YELLOW) 0.
REMOTE CONTROL LOCATION AND FUNCTION OF KEYS 4 5 35 36 1 2 3 6 7 10 8 9 11 12 13 14 15 16 18 17 19 20 24 33 22 23 34 25 28 29 32 21 27 26 31 30 11
REMOTE CONTROL 1. 2. 3. 4. POWER EJECT OPEN/CLOSE SUBTITLE Press POWER to turn the unit ON or OFF. Only in DVD (DVD, VCD, CD, MP3) mode, press to eject the disc. Press to open/close the monitor. Changing of the SUBTITLE language on multi-subtitle language DVD disc. 5. ANGLE Changing of the view angle on multi-angle DVD disc. 6. DISPLAY Display statistical disc information during playback in DVD mode. 7. MODE Press to change between DVD, RADIO, TV, AV and RGB mode. 8.
REMOTE CONTROL Preparing the Remote Control Inserting the Batteries 1. Open the battery compartment cover. 2. Insert the new batteries. Make sure that the positive and negative terminals of the batteries are oriented as indicated. 3. Close the cover • Battery: Two AAA size battery Using the Remote Control Point the remote control towards the remote control signal receiver on the player front face. Operation angle: About ± 30 degree in each the direction of the front of the remote sensor.
OPERATION manually. Do not rotate the monitor forcibly to avoid mechanical damage. BASIC OPERATION Turnig the player on/off Press the POWER button on the front panel or (POWER) button on the remote control to turn the player on or off. Open/Close the Monitor and Angle Adjustment • Press OPEN/CLOSE button on the front panel or point the remote control to remote sensor on the front panel and press OPEN/CLOSE button on the remote control, the monitor will draw out automatically. Fig.
OPERATION - All the function buttons do not operate. - Error symbol on the display. Remote Sensor There is a remote sensor on the front panel. On the monitor, there is another remote sensor to receive remote control signal. You can point the remote control handset to the remote sensor on the front panel (when the monitor doesn’t stretch out) or the remote sensor on the monitor panel (when the monitor stretches out) and press function keys on the remote control to control the DVD unit.
OPERATION Pause (still picture) Pressing on the remote control during playback will stop play temporary. To return to normal playback, press on the remote control. DISC (DVD, VCD, CD, MP3) OPERATION Switching to DVD mode Press MODE button on remote control to select DVD mode. Mute Will mute the sound, but the disc continues playing. When you unmute the sound (press MUTE again), sound will resume.
OPERATION Disc Search (GOTO) the screen will display “PROGRAM P00:0000” and the program method is the same as described above. If you want to complete program setting, press (STOP) button first then press button to play tracks in programmed order. In stop mode, press PROGRAM button to exit program mode and “PROGRAM OFF” appears. If you set WITH MENU in SMART NAV item in PREFERENCE PAGE, you can use / , / buttons to select PROGRAM PXXX mode or track number and press ENTER button to confirm it.
OPERATION (2) Press DISPLAY for the second time: On-Screen Display Function Press the DISPLAY button during playback to display the contents of the current disc on the screen.
OPERATION (4) Press DISPLAY for the fourth time: between monaural and stereo sound. MONO LEFT MONO RIGHT STEREO TOTAL REMAIN 00:40:35 MENU Function (For DVD Only) TOTAL TRACK : 14 TRACK : - 01 Press MENU button while the disc is playing and the disc root menu will be displayed. You can navigate with the remote control navigation keys and select a feature with the ENTER key. 5) Press DISPLAY for the fifth time: The message on the screen will be cleared.
OPERATION Smart navigation in MP3 Play RADIO OPERATION MP3 disc is playing as the format of FOLDER. For example: • Switching to radio mode Press MODE button on remote control to select radio mode. SMART NAVI ROOT CD01 MP3 001 PLUMT CD02 MP3 002 RZID CD03 MP3 003 ASCIS CD04 MP3 004 DCYI CD05 MP3 005 BFZ PLAY MODE In radio mode, the following information will appear on the display. FM1 98.
OPERATION location button for several seconds. The current listening station will be stored into the number button. - Retrieve a Preset Station Press any one of the RADIO PRESET buttons (1~6) on remote control to retrieve a station which had been stored in the memory in advance the chosen number is shown on display. buttons to select the item upward or downward to switch between VOLUME, BASS, TREBLE, BALANCE, FADER, LOUD and EQ mode. Then press VOL +/- buttons to adjust the selected item.
OPERATION appears on the display, you can press “1 “button then press “6” button to select 16 channel. AV OPERATION • Switching to AV mode On the back of the unit, there is a pair of AUDIO/VIDEO INPUT jacks. When you connect an audio/video system through these jacks, press MODE button on remote control to select AV mode. • Mute Press MUTE button on remote control to cut down sound output. Press it again to resume the previous volume mode.
SETUP INITIAL SETUP GENERAL SETUP SETUP MENU --- MAIN PAGE --- GENERAL PAGE --- GENERAL SETUP TV DISPLAY NORMAL / PS SPEAKER SETUP PIC MODE NORMAL / LB AUDIO SETUP ANGLE MARK WIDE PREFERENCES OSD LANG CAPTIONS SCR SAVER EXIT SETUP 1. Press SETUP on the remote control in the stop mode.(Press the button twice to ensure that the player is in under STOP mode.) MAIN PAGE TV Screen 4:3 Video Material 2. The initial SETUP menu is displayed. Normal Pan Scan Wide (16:9) Letter-box 4:3 3.
SETUP --- GENERAL PAGE --- --- GENERAL PAGE --TV DISPLAY TV DISPLAY PIC MODE AUTO PIC MODE ANGLE MARK HI-RES ANGLE MARK OSD LANG N-FLICKER OSD LANG ENGLISH CAPTIONS CAPTIONS FRENCH SCR SAVER SCR SAVER GERMAN ITALIAN SPANISH MAIN PAGE MAIN PAGE OSD LANG type setup Select the preferred OSD (On Screen Display) language by using the / buttons. PIC mode setup Select AUTO, the player PIC mode will depend on DVD disc. Select HI-RES format for best image resolution.
SETUP --- GENERAL PAGE --- AUDIO SETUP --- AUDIO SETUP --- TV DISPLAY PIC MODE AUDIO OUT ANALOG ANGLE MARK OP MODE SPDIF/RAW OSD LANG DYNAMIC SPDIF/PCM CAPTIONS LPCM OUTPUT SCR SAVER ON OFF MAIN PAGE MAIN PAGE AUDIO OUT - Selet ANALOG mode to activate analog audio output. - Select SPDIF/RAW mode to activate raw digital audio output. And the digital audio format depends on the disc record format. - Select SPDIF/PCM mode to activate PCM digital audio output..
SETUP --- AUDIO SETUP --- PREFERENCES SETUP --- PREFERENCES PAGE --- AUDIO OUT OP MODE FULL DYNAMIC LPCM OUTPUT TV TYPE AUTO 6/8 AUDIO NTSC 4/8 SUBTITLE PAL 2/8 DISC MENU OFF PARENTAL PASSWORD DEFAULTS MAIN PAGE SMART NAV MAIN PAGE Dynamic Range Control Select DYNAMIC and adjust the dynamic range of a Dobly Digital encoded program. There are 8 steps between full compression and off compression. TV type setup This player can play discs recorded in either PAL or NTSC format.
SETUP --- PREFERENCES PAGE --- --- PREFERENCES PAGE --TV TYPE TV TYPE 1G AUDIO ENGLISH AUDIO 2 SUBTITLE FRENCH SUBTITLE 3 PG DISC MENU SPANISH DISC MENU 4 PG 13 PARENTAL CHINESE PARENTAL 5 PASSWORD JAPANESE PASSWORD 6 PG-R DEFAULTS GERMAN DEFAULTS 7 NC-17 SMART NAV ITALIAN SMART NAV 8 ADULT MAIN PAGE OFF MAIN PAGE NO_ PARENTAL SUBTITLE language setup Select the preferred SUBTITLE language by using the cursor buttons.
SETUP --- PREFERENCES PAGE --- DEFAULTS TABLE TV TYPE General Setup TV Display Normal/LB AUDIO PIC Mode AUTO SUBTITLE Angle Mark ON DISC MENU OSD Language English PARENTAL PASSWORD DEFAULTS RESET Captions ON SCR Saver ON Speaker Setup Downmix Stereo Audio Setup Audio Out SPDIF/RAW SMART NAV OP Mode Line Out MAIN PAGE Dynamic FULL LPCM Output LPCM 96K DEFAULTS Select reset to revert to factory initial settings.
TROUBLE SHOOTING If it appears that your DVD unit is faulty, first consult this checklist. It may be that something simple has been overlooked. • If using a HIFI amplifier, try another sound source. • Check if the volume is minimum, and adjust the VOL+ to increase the volume level. Under no circumstances should you try to repair the player yourself, as this will invalidate the warranty. Only qualified service personnel can remove the cover or service this player.
SPECIFICATIONS GENERAL Power Supply Requirements : DC 12 Volts, Negative Ground Maximum Output Power : 4x40 watts Current Drain : 15 Ampere (max.) TV TV Sensitivity : 45dBµ V @CH25 in average RADIO FM 87.5 to 107.
MOBILE TV TUNER UNIT 31
CONTROL & FUNCTION KEYS 1 3 2 This unit can’t be used separately and it must be used with other special system with the 13-pin cable. The unit is connected to another system through the 13-pin din socket (3). And the unit can receive TV signal through the antenna input jack (2). 1 POWER INDICATOR LIGHT When the unit is connected to the other system with the 13-pin din cable and the other system turns on, the power indicator light (1) will be illuminated red and the unit turns on.
PLPK65TVD OWNER'S MANUAL FULL PANEL FOLD DOWN DETACHABLE PLL SYNTHESIZER STEREO RADIO CASSETTE PLAYER www.pyleaudio.
INSTALLATION Notes: • Choose the mounting location where the unit will not interfere with the normal driving function of the driver . • Before finally installing the unit, connect the wiring temporarily and make sure it is all connected up properly and the unit and the system works properly. • Use only the parts included with the unit to ensure proper installation. The use of unauthorized parts can cause malfunctions.
1. Dashboard 1 6 2. Nut (5mm) 3. Spring washer 4 2 4. Screw (5 x 25mm) 5 3 5. Screw 6. Strap Be sure to use the strap to secure the back of the unit in place. The strap can be bent by hand to the desired angle. (Fig. 2) Removing the unit 1. Frame 1 2. Insert fingers into the groove in the front of frame and pull out to remove the frame. (When reattaching the frame, point the side with a groove downwards and attach it.) 2 3.
USING THE DETACHABLE FRONT PANEL To Detach the Front Panel 1. Press the open button (open), then the front panel will be folded down. Open 2. Remove the front panel by pulling its middle hand outward. Front Panel 3. For safekeeping, store the front panel in the supplied protective case immediately after being removed. Protective Case Front Panel 4. Push the front metal plate into the main body, A 'click' sound be heard.
To Reinstall the Front Panel 1. Push the front panel into the main body, A 'click' sound should be heard. 2. Note that if the front panel fails o lock in position properly, press control button may not function and LCD display may be missing some segments. Pushing the open button and then reinstall the front panel again. Precautions when Handling 1. Do not drop the front panel. 2. Do not put pressure on the display or control buttons when detaching or reinstalling the front panel. 3.
WIRING CONNECTION CD CHANGER CONNECTOR SOCKET (FOR CD CHANGER VERSION ONLY ) MAIN UNIT ANTENNA CONNECTOR (BLACK) IGNITION RED SWITCH (B+) MEMORY YELLOW BACK-UP BLACK GROUND (B-) POWER ANTENNA FRONT Lch SPEAKER REAR Lch SPEAKER Rch RED AUX IN CABLE Lch WHITE (GREY) REAR RCA CABLE Rch RED Lch WHITE (FOR RCA LINE OUT VERSION ONLY) BLUE WHITE GREY WHITE/BLACK GREY/BLACK GREEN VIOLET GREEN/BLACK VIOLET/BLACK 6 FRONT Rch SPEAKER REAR Rch SPEAKER
OPERATION 11 12 7 13 6 10 27 17 16 26 3 8 1 2 18 4 20 21 19 22 14 23 5 24 28 25 30 9 15 29 GENERAL OPERATION ON/OFF (FOR VFD VERSION ONLY) Switch on the unit by pressing any button (except EJECT button (4) and REL button (7)). When system is on, press ILL/PWR button (9) shortly to adjust the brightness of the VFD display, press it for several seconds to turn off the unit. FACEPLATE RELEASE Press REL button (7) to detach the removable faceplate.
SOUND ADJUSTMENT Press SEL button (10) to select the desired adjustment mode. The adjustment mode will change in the following order: Volume Bass Treble Balance By pressing VOL button (11) or VOL desired sound quality. Fader button (12), it is possible to adjust the LOUDNESS Press BND/LOU button (13) for several seconds to reinforce the bass output and display will show “LOUD”. Press it for several seconds again to release this function.
RADIO OPERATION BAND SELECTION At tuner mode, press BND/LOU button (13) shortly to select the desired band. The reception band will change in the following order: FM1 FM2 FM3 AM STATION SELECTION Press TUNE/SEEK button (16) or TUNE/SEEK button (17) shortly to activate automatic seek function. Press for several seconds until “MANUAL” appeared on the display, the manual tuning mode is selected.
CASSETTE OPERATION PROGRAM BUTTON These two buttons (28) perform the dual functions of changing the direction of tape playback and fast forward/rewind of the tape. - Change Tape Playback Direction Press both buttons together to play the other side of a tape. - Fast Forward/Rewind Press the button with the double arrows pointing the same direction as the direction indicator in the LCD to fast forward; press other button in the opposite direction to fast rewind.
SPECIFICATION GENERAL Power Supply Requirements Chassis Dimensions : DC 12 Volts, Negative Ground : 178 (W) x 155 (D) x 50 (H) Maximum Output Power Current Drain : 4 x 25 Watts 10 ampere (max.) TAPE PLAYER Tape Speed Fast Forward Time : 4.76 cm/sec : 180 seconds (C - 60 type) Frequency Response Channel Separation Channel Separation : 50 - 8,000 Hz : 35 dB : 40 dB Wow and Flutter Tone Controls - Bass (at 100 Hz) - Treble (at 10 KHz) : : : 0.35% WRMS 10 dB 10 dB RADIO Frequency Coverage I.F.
TROUBLE SHOOTING The following checks will assist in the reaction of most problems which you may counter with your unit. Should any problem persest after you have made these check, consult your nearest service dealer. Before going through the check list be first refer back to the connection operation procedures Symptom No power Solution Cause The car ignition switch is not ON. If the power supply is connected to the car accessory circuits, but the engine is not moving, switch the ignition key to "ACC".
TROUBLE SHOOTING For System The following suggestions help you care for the product so that you can enjoy it for years. 1. Keep the product dry. If it does get wet, wipe it dry immediately. Liquids might contain minerals that can corrode the electronic circuits. 2. Keep the product away from dust and dirt, which can cause premature wear of parts. 3. Handle the product gently and carefully. Dropping it can damage circuit boards and cases, and can cause the product to work improperly. 4.
CAUTION 1. This unit is designed to operate on 12-volts DC, negative ground electrical system only. Do not attempt to install this unit in a vehicle having a positive ground system. 2. You should not touch the high-polished playback head with any metallic or magnetic tools. 3. Your unit has built-in filtering to eliminate most of the noise that might come through the power source. However with some vehicles, particularly older models, some clicking or other unwanted noise might be present.
www.pyleaudio.