VIDEO CASSETTE RECORDER WITH BUILT-IN TV TUNER PLTVCP85
CAUTIONS AND WARNINGS To obtain the best results and to avoid malfunctions, PLEASE READ CAREFULLY THE DESCRIPTIONS AND OPERATING PROCEDURES CONTAINED IN THIS OWNER'S MANUAL PRIOR TO OPERATING THE VIDEO CASSETTE RECORDER. CAUTION RISK OF ELECTRIC SHOCKS DO NOT OPEN CAUTION TO REDUCE THE RISK OF ELECTRIC SHOCK, DO NOT REMOVE THE COVER. NO USER-SERVICEABLE PARTS INSIDE. REFER SERVICING TO QUALIFIED SERVICE PERSONNEL.
SAFETY INSTRUCTIONS 1. Read Instructions-All the safety and operating instructions should be read before the Video Cassette Recorder is operated. 2. Retain Instructions- The safety and operating instructions should be retained for future reference. 3. Heed Cautions and Warnings-All cautions and warnings regarding the Video Cassette Recorder should be adhered to. 4. Follow Instructions-All operating instructions should be followed. 5.
INFORMATION TO THE USER This equipment has been tested and found to comply with the limits for a Class B digital device, pursuant to part 15 of the FCC Rules. These limits are designed to provide reasonable protection against harmful interference in a residential installation. This equipment generates, uses and can radiate radio frequency energy and, if not installed and used in accordance with the instructions, may cause harmful interference to radio communications.
FEATURES BUILT-IN TV TUNER (TV/CATV) HI-FI STEREO SYSTEM BACK LIGHTING OF FUNCTION BUTTONS ON SCREEN DISPLAY (English) EXTERNAL IR REMOTE CONTROLLER WITH RECEIVER DEW & HEAT SENSORS FOR TAPE PROTECTION NTSC COLOR SYSTEM TWO AUDIO/VIDEO INPUTS ENCORE FUNCTION - Press ENCORE key on the remote controller to watch the desired picture once during playback. AUTO REPEAT PLAY - This function can be turned on/off from "menu". DIGITAL AUTO TRACKING - This VCR plays clear pictures without special operations.
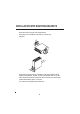
INSTALLATION WITH MOUNTING BRACKETS Use the short screw for the joint of the VCR and bracket. Use the long screw for installation of this VCR to your vehicle or any other place. The VCR can be mounted vertically , horizontally or at any angle in between with the supplied mounting brackets. The VCR cannot be mounted upside down or on its side. VCR is sensitive to dirt and other contaminants. Do not mount the unit in direct sunlight or where fluids are likely to spill on or in the unit.
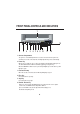
FRONT PANEL-CONTROLS AND INDICATORS 1 REC DEW /HEAT Hi-Fi 13 2 3 4 5 6 7 8 9 10 11 12 1. Cassette Compartment The power is on automatically when the cassette is inserted even if the power was off. When the cassette is inserted, Auto Tracking Adjustment operates automatically. 2. Power Key When power is supplied to the set, the power indicator lamp will always light up in red. The Power ON and Power OFF mode will be toggled by pressing this key.
7. Play / Re-AutoTracking Press this key to playback a recorded tape, or to release special operation such as the search mode. In the playback mode the playback indicator lamp will be light in red, and Auto Tracking mode, this indicator lamp will blink. When the playback picture is noisy, press this key to operates Re-Auto Tracking. 8. Fast Forward / Cue Key If this key is pressed in the PLAYBACK mode, the VCR enters the forward picture search mode, and "FF" indicator lamp will be blinked.
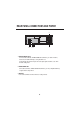
REAR PANEL-CONNECTIONS AND POWER 6 1 2 7 34 5 1. AUDIO/VIDEO IN (AV1) Connector this terminal to VIDEO/AUDIO OUT terminal of your Game machine, Camcorder, Portable DVD Player, using the RCA cord For displaying this Rear A/V input connected, Input Signal should be set to "AV1" in Menu setting mode. 2. AUDIO/VIDEO OUT Connect this terminal to VIDEO/ AUDIO IN terminal of your TV (or Amplifier/Monitor), using the RCA cord provided. 3. IR INPUT Connect this terminal to Remote IR Sensor cable provided.
4. DC 12V IN JACK (Locking type) For car using, we recommend to use this connecter with 3-wire system. * Connector description for 4 ACC 12V GND VEHICLE BATTERY 12V 5. DC 12V IN JACK ( Round type) To use this connector, below Convert-Adapter accessory should be locked into above connector 4. ( Convert-Adapter) * Please note : We highly recommend to connect the unit corresponding to the 3-wire system of 4. Thus, to make sure a proper working of power-off tape guide.
REMOTE CONTROLLER 1. To watch the desired picture once more during playback, press "ENCORE" key . The VCR unit rewinds the tape for 5 seconds and will play the picture watch again. 2. POWER ON/OFF 3. To watch the picture from start position of tape, press "REPLAY" key . The VCR unit rewinds the start position of tape. 4. TRACKING -,+ (Manually Tracking in playback mode) / CHANNEL -,+ ( in TV or CATV mode) 5. PLAY 6. FAST FORWARD 7. SELECT 8. Tape speed in recording (SP,EP) 9. SHIFT (Cursor Move) 10.
SETTING THE MENU Setting the OSD (On Screen Display) MENU OSD AUTO PLAY AUTO REPEAT RECORD SPEED VCR OUTPUT CH INPUT SIGNAL SHIFT: SEL: ON ON ON EP CH3 TV END:MENU 1. Press MENU key on the remote control. 2. Press select key until the appropriate system is selected. ( "on" or "off" ) 3. On completion, press MENU key to exit the menu. Setting the Auto PLAY MENU OSD AUTO PLAY AUTO REPEAT RECORD SPEED VCR OUTPUT CH INPUT SIGNAL SHIFT: SEL: ON ON ON EP CH3 CATV END:MENU 1.
Setting the Record Speed MENU OSD AUTO PLAY AUTO REPEAT RECORD SPEED VCR OUTPUT CH INPUT SIGNAL SHIFT: SEL: ON ON ON EP CH3 TV END:MENU 1. Press MENU key on the remote control. 2. Press shift key, until the cursor is placed in front of the "RECORD SPEED" option. 3. Press select key until the appropriate system is selected. ("EP" or "SP") 3. On completion, press MENU key to exit the menu.
OPERATING TV TUNER TV CHANNEL SET If RF-Signal is not input searching channel will be displayed blue-back picture. MENU OSD AUTO PLAY AUTO REPEAT RECORD SPEED VCR OUTPUT CH INPUT SIGNAL SHIFT: SEL: ON ON ON EP CH3 TV CH*** AUTO SEARCHING.......... END:MENU 1. Press MENU key on the remote control. 2. Press shift key, until the cursor is placed in front of the "INPUT SIGNAL" option. 3. Press select key, then the current input signal mode will be blinked. 4. Press shift key, until "TV" is selected.
VIDEO HEAD CLEANING The video heads enable the VCR to read video information pictures from the tape during playback. In the unlikely event that the heads become clogged with dirt video playback will be impossible. This can easily be determined during playback of a known good tape, there is good sound, but the picture is extremely snowy. If this is the case, have the video cassette recorder checked by qualified service personnel.
TROUBLE SHOOTING Before calling service personnel, check the following points for a possible cause of the trouble. A minor adjustment on your part may eliminate the trouble. SYMPTOMS CAUSE POSSIBLE SOLUTIONS The power cord is not connected. The polarity of power cord is not correct. Check the power cord. Noise bars on screen. Tracking is not adjusted. Adjust the picture to be clear by pressing the Re-tracking. Operation key does not work.
SYMPTOMS CAUSE POSSIBLE SOLUTIONS (Unit in dew mode) Dew feature activated (see instruction manual) Retain power to recorder and allow unit for a time to get rid of moisture. (After 30 minutes if dew indicator is still on, completely switch power off from unit and resupply after a minute. This can reset dew indicator if moisture eliminated.) No tape in unit. Insert the tape. Low voltage. Start the vehicle, if not running. Poor video/snow picture or line on screen. Dirty heads.
SPECIFICATIONS MODEL PLTVCP85 POWER SUPPLY DC 12V POWER CONSUMPTION 13W DIMENSION 265 X 91 X 275 (W xH x D)mm WEIGHT APPROX 2.9Kg VIDEO SIGNAL SYSTEM NTSC color TAPE TYPE VHS Type TAPE SPEED SP: 33.35 mm/sec, LP: 22.23mm/sec, SLP: 11.12 mm/sec Antenna In/Output terminnals UHF/VHF 75 F type connector. FF/REW TIME(T-120) Approx. 5min VIDEO SIGNAL INPUT Video In terminal (RCA) 1.0 Vp - p AUDIO SIGNAL INTPUT Audio In terminal (RCA),47K ohm VIDEO SIGNAL OUTPUT (LINE) 1.