PLVW1048VGA 10.4” FLIP-DOWN IN-CAR DISPLAY (+VGA) USER MANUAL V1.
INDEX NO CONTENT 1 Specification 2 Installation 3 OSD function 4 Content of OSD function 5 Accessories 6 Outside dimension 7 Precaution 8 Remark PAGE
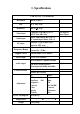
1. Specification CAR-TV 10.4” + VGA function Resolution 800(H) x 600(V) Size 10.4” TFT LCD Brightness 200 cd/㎡ (Typ) Video input Composite Video(RCA)(F) ×2 (NTSC,PAL,SECAM) Audio input Stereo Sound Input (RCA)(F) ×2 PC Sound Input (Phone Jack) ×1 PC input Frequency Range Support VESA Power input Not support mono signal Analog 0.7Vp-p/75ohms, Sync Separate, TTL level. Horizontal 30k ~ 70k(Hz), Vertical 50 ~ 75(Hz) DDC2B, EDID v1 r1, DPMS DC 12~35V,3A(Max) IR Transmitter 2.3MHz&2.
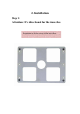
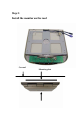
2. Installation Step 1: Attention: It’s directional for the iron slice.
Instruction to fix the screw of the monitor Screw hole 4 mm
Step 2: Install the monitor on the roof.
Step 3: Fix the monitor on the iron slice with the screws.
3. OSD function VIDEO control keys: 1 2 3 4 5 6 dome lights ON/OFF 1. Power: When you push this button, it will Power ON or OFF the LCD. 2. ” — “:When you push this button, it will decrease the degree of the function that you selected. 3. ” ┼ “:When you push this button, it will decrease the degree of the function that you selected. 4. MENU/SELECT:Show function menu list and select the function on the menu, when you push this key. 5. V1/V2:Select Video 1 or Video 2 input. 6. PC: Select PC input.
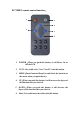
PC/VIDEO remote control function: 1 6 4 2 3 5 1. POWER:When you push this button, it will Power On or Off the LCD. 2. V1/V2: You could select V1 or V2 or PC with this button. 3. MENU:Show Function Menu List and Select the function on the menu, when you push this key. 4. UP:When you push this button, it will increase the degree of the function that you selected. 5. DOWN:When you push this button, it will decrease the degree of the function that you selected. 6.
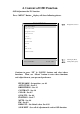
4. Content of OSD Function OSD Adjustment for PC function Press “MENU” Button,display will show following picture. BIOS VERSION Display Bios Version PIP Enable Auto Tune Brightness Contrast Color Quality Position Mute FM Default Save Exit 800X600 H:37.6KHz PC Display Mode V:59.7Hz PC Input Frequency Continue to press “UP” & “DOWN“ buttons and select above functions. Then, use “Menu” button to enter these functions and adjust them to your personal preference. PIP ENABLE : Set position ; see 4.
4.1 PIP CHANNEL SELECT( Under PC Mode ) VIDEO 1 VIDEO 2 PIP OFF RETURN VIDEO 1: Set VIDEO 1 Input (Press “MENU” to enter) VIDEO 2: Set VIDEO 2 Input (Press “MENU” to enter.) PIP OFF : exit PIP function. RETURN: Back to new setting. 4.2 AUTOTUNE( Under PC Mode ): AUTOTUNE DOING AUTOTUNE : Auto tracking , positioning, phase and size (press “MENU” to enter this adjustment. It takes 5 second to finish this adjustment.) 4.
4.4 CONTRAST CONTRAST 0 63 CONTRAST: Adjust white color level 0~63 of the image. 4.
4.6 QUALITY SIZE PHASE TEST/GFX SHARPNESS RETURN SIZE : Adjust size of the image. PHASE : Adjust phase level 0~63 of the image. TEXT/ GFX: DOS MODE/ change Text 720x400 & Gfx 640x400. SHARPNESS : Adjust Sharpness level 0~15 of the image. RETURN: Back to new setting 4.7 POSITION IMAGE POS OSD POS SPEED EN SPEED ADJ RETURN H:37.6KHz V:59.7Hz IMAGE POS : Adjust UP/ DOWN/ HOR/VER position of the image. OSD POS : Adjust OSD UP/ DOWN/ HOR/VER position of the image. SPEED EN : Select open or exit OSD speed.
4.8 MUTE MuteOff MuteOn H:37.6KHz V:59.7Hz Mute Off : Choose this to close the mute function. Mute On : Choose this to open the mute function 4.9 FM BIOS VERSION FM88.0MHZ FM88.1MHZ FM88.2MHZ FM88.3MHZ FM88.4MHZ FM88.5MHZ FM88.6MHZ FM88.7MHZ FM88.8MHZ FM88.9MHZ Return 800X600 H:37.6KHz V:59.
Channel in frequency modulation FM88MHz that the radio is adjusted Receive the sound to export. Adjusting range: 88.0MHz~88.9MHz RETURN : Back to new setting 4.10 DEFAULT DEFAULT YES NO 5 OSD Adjustment for VIDEO function Press “MENU” Button,display will show following picture. BIOS VERSION Display Bios Version Brightness Mute FM PIC Mode Contrast Saturation Hue Default Save Exit TV NTSC H:15.7KHz BRIGHTNESS : See 5.1 Mute : See 5.2 FM : See 5.3 Video System V:59.
PIC MODE : See 5.4 CONTRAST : See 5.5 SATURATION : See 5.6 HUE : See 5.7 DEFAULT : Set default value. See 5.8 SAVE EXIT : Save all of adjustment & exit to OSD function. 5.1 BRIHTNESS BRIGHTNESS 0 63 BRIGHTNESS: Adjust LCD brightness level 0~63 of the image 5.2 MUTE MuteOff MuteOn H:37.6KHz V:59.7Hz Mute Off : Choose this to close the mute function.
5.3 FM BIOS VERSION FM88.0MHZ FM88.1MHZ FM88.2MHZ FM88.3MHZ FM88.4MHZ FM88.5MHZ FM88.6MHZ FM88.7MHZ FM88.8MHZ FM88.9MHZ Return 800X600 H:37.6KHz V:59.7Hz The signal carrier frequency of the sound outputs the function: Can use Channel in frequency modulation FM88MHz that the radio is adjusted Receive the sound to export. Adjusting range: 88.0MHz~88.9MHz RETURN : Back to new setting 5.
5.5 CONTRAST CONTRAST 0 63 CONTRAST: Adjust white color level 0~63 of the image. 5.6 SATURATION. SATURATION -128 +127 SATURATION: Adjust color Saturation level ~128~127. 5.7 HUE HUE -128 +127 HUE: Adjust color Hue level –128~127 5.
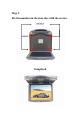
5. Description of Accessories Accessory 1. Description Video, audio, power input See chart 1 Power cable+ Fuse(spec:3A/250V) Yellow:video input 1, video input 2 Red:audio input (R)1, audio input(R)2 White:audio input(L)1, audio 2 3 input(L)2 Power input connector: Red: Anode Black: Ground See chart 2 IR transmitter: Receive 2.3MHz & 2.
4 5 6 7 Sound cable: PC audio output connect to audio input of monitor PC audio input RGB cable: connect PC to video input of monitor PC video input
Description of accessories: Chart 1:
Chart 2:
6. Outside dimension L:306.65mm W:304.40mm H:42.
7. Precaution 1. It does not support mono signal. 2. When there’s no input signal of PIP function, the feedback of OSD key may become slow. You could just turn off the PIP window. 3. Do not apply Pressure to the screen 4. Do not sprinkle any liquid to clean LCD. If you need to clean it, please use LCD Clean cloth. 5. Please do not add any parts or use any accessory which is not provided from the manufacturer. 6. Please do not use and store in the high Temperature. (Storage 5~48℃, Operating 5~39℃) 7.
8. Remark 1:M4×0.