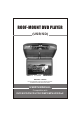
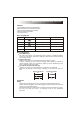
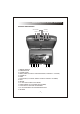
ROOF-MOUNT DVD PLAYER ( USB / SD ) 9" TFT LCD COLOR MONITOR MODE V PLAY STOP V WARNING! HAZARD! DO NOT OPERATE THIS UNIT UNLESS VEHICLE IS PARKED IN SAFE AND LEGAL AREA.
封二空白
Roofmounting monitor with multi-media player TABLE OF CONTENTS GENERAL INFORMATION . . . . . . . . . . . . . . . . . . . . . . . . . . . . . . 2-4 REMOTE CONTROL . . . . . . . . . . . . . . . . . . . . . . . . . . . . . . . . . 5 & 6 OPERATION BUTTONS. . . . . . . . . . . . . . . . . . . . . . . . . . . . . . . . . . 7 WIRING INSTALLATION . . . . . . . . . . . . . . . . . . . . . . . . . . . . . . . . . 8 DVD/SD CARD/USB LOCATIONS . . . . . . . . . . . . . . . . . . . . . . . . . .
Roofmounting monitor with multi-media player Please read the manual carefully before using and keep it well for your future reference. Important instruction for safely: For your safety, do not turn on, watch or operate the unit while driving. In some countries and regions, it may be against the laws. The product is comprised of many precision electronic components. Self-renovation or disassembling may cause malfunction to the device.
Roofmounting monitor with multi-media player Features: 1. The display unit has built in DVD player. 2. Built in USB 2.0 host and SD card reader. 3. Built in wireless FM Audio transmitter. 4. Built in IR Audio transmitter. 5.
Roofmounting monitor with multi-media player Placement The storage temperature ranges from -30°C to -75°C, operating temperature ranges from -10°C to 55°C. Please keep the pick-up clean and away the dust. If so, the cleaning disc can help deal with this problem. For detailed operation instructions for cleaning the pick-up, you can consult the user's manual of pick-up cleaning disc. Do not expose this unit to rain or moisture. Avoid dropping or impact to the unit.
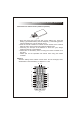
Roofmounting monitor with multi-media player Instructions for remote control (shown as pictures) Pull Push * Press the catch and at the time pull out the battery tray. Insert the battery, type CR2025 battery with the stamped (+) mark facing upward. Insert the battery tray into the remote control. * Direct the remote controller to infrared receiver window of the machine within 60 and 3 meters, without any barriers between them.
Roofmounting monitor with multi-media player REMOTE CONTROL FUNCTION 1. POWER button: Press the POWER key to turn the power ON/OFF. 2. NUMBER button: In the DVD/SD/USB mode by pressing these button you can directly select the program. In TV mode, you can directly select the TV channel. 3. SUBTITLE button: muti-subtitle select. 4. DISPLAY button: show information about DVD/SD/USB/TV. 5. AUDIO button: muti-language select. 6. ANGLE button: muti-angle select. 7.
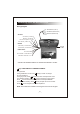
Roofmounting monitor with multi-media player MONITOR DESCRIPTION: SD Card Slot USB Port 16 15 14 13 12 11 10 9 9" TFT LCD COLOR MONITOR MODE V 1 2 3 4 PLAY STOP V 5 6 7 8 1. REMOTE WINDOW 2. POWER BUTTON 3. VOLUME DOWN 4. MENU (PRESS TO DISPLAY OSD BRIGHTNESS, CONTRAST....CONTROL) 5. VOLUME UP 6. MODE 7. PLAY/PAUSE ( IN TV MODE ,PRESS TO SELECT DOWN TV CHANNEL) 8. STOP 9. RETURN 10,11. RIGHT/LEFT DIRECTION CURSOR 12. OPEN (PRESS TO FLIP DOWN YOUR SCREEN) 13.
Roofmounting monitor with multi-media player Wiring Diagram YELLOW RCA (V OUT) WHITE RCA (AUDIO OUT) RED RCA (AUDIO OUT) AV INPUT: WHITE RCA (L AUDIO IN) RED RCA ( R AUDIO IN) YELLOW RCA (VIDEO 1 IN) YELLOW RCA ( VIDEO 2 IN) POWER: RED WIRE (+12V SWITCHED) BLACK WIRE (-12V GROUND) 9" TFT LCD COLOR MONITOR DOME LAMPS: BLUE: GROUND YELLOW WIRE: + DOOR SWITCH RED WIRE: CONSTANT +12V MODE V PLAY STOP V * FOR BETTER UNDERSTANDING ALL WIRES ARE PROPERLY TAGED. key: LIGHT SWITCH / TIME ADJUSTMENT A.
Roofmounting monitor with multi-media player 9" TFT LCD COLOR MONITOR MODE V PLAY STOP V Left-right 360° Rotating Up-dwon 105° Flipping 9
Roofmounting monitor with multi-media player 2x 2x 4x 4x 8x 16 x 8x 16 x 10 32 x 32 x
Roofmounting monitor with multi-media player DVD AV1 TV AV2 SD MEDIA USB SLOT 11
Roofmounting monitor with multi-media player 12
Roofmounting monitor with multi-media player 13
Roofmounting monitor with multi-media player Press CONSOLE button and you will be able to change the factory settings for Brightness, Contrast, Color and Hue levels and you can adjust FM transmitter and IR frequency as well with +/- buttons. Note: By selecting RESET you will return to factory de fault settings.
Roofmounting monitor with multi-media player Setup Press Setup to enter into Setup page, Move Up/Down to select the desired item, Move Left/Right to select the desired item, Press Enter to confirm 15
Roofmounting monitor with multi-media player Preference setup 16
Roofmounting monitor with multi-media player Passward 17
Roofmounting monitor with multi-media player TV Setup page 18
Roofmounting monitor with multi-media player SD/USB Trouble shooting - Please check if DVD has not been placed backwards - Check if disc is dirty or schratched. - Make sure if there is no moisture inside the unit (disconnect the unit for one hour) - Disconnect the power cord and reconnect to reset the unit form any wrong setting.
Roofmounting monitor with multi-media player FM Frequency 87.7~89.
封三空白
Thank you for purchasing the TFT LCD color monitor/DVD. To enjoy the features of this device and to ensure years of trouble-free operation, please read this manual carefully and follow the instructions. WARNING: Hazard do not operate this unit unless vehicle is parked in safe and legal area.