L CLASSICAL TURNTABLE WITH AM/FM RADIO ,CD PLAYER,CASSETTE,USB RECORDING,AUX IN ~~PYLE"PR() VINTAGE www.pyleaudio.
CAUTION TO PREVENT FIRE OR SHOCK HAZARD,DO NOT USE THIS PLUG WITH ANEXTENSION CORD,RECEP TACLE OR OTHER OUTLET UNLESS THE BLADES CAN BE FULLY INSERTED TO PREVENT BLADE EXPOSURE.TO PREVENT FIRE OR SHOCK HAZARD,DONOT EXPOSE THISAPPLINACE TO RAIN OR MOISTURE. IMPORTANT SAFETY INSTRUCTIONS 1.) Read these instructions. 2.) Keep these instructions. 3.) Heed all warnings. 4.) Follow all warnings. 5.) Do not use this apparatus near water. 6.) Clean only with dry cloth. 7.) Do not block any ventilation openings.
IMPORTANT NOTES Avoid installing this unit in places exposed to direct sunlight or close to heat radiating appliances such as electric heaters, on top of other stereo equipment that radiates too much heat, places lacking ventilation or dusty areas, places subject to constant vibration and/or humid or moist areas. Do not attempt to clean this unit with chemical solvents as this might damage the finish. Use a clean dry cloth. Operate controls and switches as described in the manual.
POWER SOURCE This product is designed to operate on 120V 60Hz AC only. Attempting to operate this system from any other power source may cause damage to the system, and such damage is not covered by your warranty. NOTE: You will note that this system is equipped with domestic standard AC power 2-pin plug. If this plug does not fit into your existing AC outlet, do not try to defeat this safety feature by filing the wide blade to make it fit into your outlet.
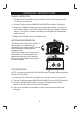
LOCATION OF CONTROLS AND INDICATORS FRONT PANEL 29 26 25 24 19 3 20 31 30 21 22 23 1 2 3 4 5 6 7 8 9 10 12 14 11 16 13 15 18 17 28 1) 2) 3) 4) 5) 6) 7) 8) 9) 10) 11) 12) 13) 14) 15) 27 16) SKIP REV. Control Button. 17) SKIP FWD. Control Button. 18) OPEN/CLOSE Control Button. 19) PHONO Speed Selector. 20) CD Track Number Display. 21) REC Control Button. 22) FOLDER+/+10 Control Button. 23) FOLDER-/-10 Control Button. 24) Tone Arm. 25) Syphon. 26) Connector Tube. 27) OFF/VOLUME Knob. 28) PHONE Jack.
PHONOGRAPH BACK PANEL 39 32 AUX IN 34 35 38 33 31 31.) Antenna Jack/FM Antenna. 32.) AUX IN (Audio input). 33.) AC Power Cord. 36 37 34.) Turntable. 35.) 45 RPM Adapter. 36.) Speed Selector(33/45/78 RPM). 37.) Tone Arm with Stylus. 38.) Speed Display. 39.) PHONO Power Switch. REMOTE CONTROL OPERATION: R1) R2) R3) R4) R5) R6) OPEN/CLOSE. RECORD. REPEAT. PLAY/PAUSE. DN/FB(SKIP REV.). UP/FF(SKIP Forward.). R7) STOP. R8) TRACK-10. R9) TRACK+10. R10) RANDOM. R11) DELETE. R12) PROGRAM.
PARTS LIST A) Horn Speaker (1pc) B) U-type Bracket (1pc) C) Middle Tube (1pc) D) Bottom Tube (1pc) D) Screw A (2pc) (KM5*8mm) F) Screw B (2pc) (PM4*16mm) G) Screw C (3pc) (BA4*18mm) G) Screw D (4pc) (KA3*14mm) Important note: Assemble this unit on clean and smooth surface, so as not to scratch or damage the surface of the unit.
BIG HORN SPEAKER ASSEMBLY INSTRUCTIONS 1.) Look at picture Fig1. According to the correct position, put the big horn speaker(A) into the middle tube(C). Please note to line up the hole on the speaker with the slot on the tube. Be careful that your hand is not inured by the big horn speaker. 2.) Look at Fig2. Fig3. Rotate two screws A (E) clockwise into the hole. Tighten clockwise with a Philip's head screwdriver. 3.) Look at Fig4.It shows the assembled big horn speaker apparatus Fig1 Fig2 Fig4 Fig3 4.
7.) Look at Fig7. Match the holes on the U-type(B) bracket according with the holes on the PTCDCS3UIP host cabinet as shown. Rotate clockwise four screws D(H) into the holes on the sides and one screw B(F) inot the middle and tighten. 8.) Look at Fig8. It shows the assembled PTCDCS3UIP host cabinet with the U-type bracket (B) apparatus. Fig7 Fig8 9.) Look at Fig9. Nest the assembled big horn speaker (A) into the tubing of the PTCDCS3UIP host cabinet in the correct position.
OPERATING INSTRUCTIONS RADIO OPERATION 1) Rotate the OFF/VOLUME control clockwise until a ‘click’ is heard and set the volume to a low level. 2) Set the Function selector(AM/FM/PH/CD/USB/TA) to AM or FM position. 3) Rotate the TUNING control to tune the desired radio station. If you tune to an FM stereo station, the FM ST. indicator will light and reception will be in stereo. If you tune to a weaker FM station, the reception will automatically switch to mono. 4) Adjust the VOLUME control to a desired level.
5) Press the OPEN/CLOSE button again to close the CD drawer. The disc will spin for a few seconds while the player is reading the disc, then the disc stops spinning and start to play the first track on the disc. The playing track number, Cd and the folder name will be shown on the screen 5 seconds in turn during the playback. For example: ‘001'’Cd’’F01'. 6) Press the SKIP REV.(DN/FR) or SKIP FWD.(DN/FF) button to choose play the desired track. 7) Adjust the OFF/VOLUME to the desired level.
PROGRAMMED PLAYBACK This feature allows you to program up to 20 CD tracks and 99 MP3 tracks on a disc for playback in any desired order. 1) Press the PROGRAM button to enter the Program mode. The program number briefly shows ‘ P01', the Program indicator flashes. 2) Press SKIP REV. or SKIP FWD. button to select the first track number you wish to enter in the program memory. Example: Track Number ‘008’.
CASSETTE OPERATION Note: Before inserting a tape in the player be sure that there is no excess slack in the cassette that could become jammed in the mechanism. Refer to the Care and Maintenance section for instructions on removing excess slack from the cassette. 1) Rotate the OFF/VOLUME control clockwise until a ‘click’ is heard and set the Volume to a low level. , 2) Set the function selector(AM/FM/PH/CD/USB/TA) to TA position, ‘TAP’ will be shown on the display.
3) Make sure that you have removed the stylus cover from the stylus and have released the Tone Arm Lock that secured the tone arm to the tone arm rest. 4) Set the turntable Speed Selector to the appropriate speed, 33, 45, or 78 RPM. If you are playing 45 RPM singles , place the 45 RPM adapter on the centre spindle. 5) Place your record on the centre spindle. 6) Raise the CUE lever to lift the tone arm off its rest. Move the tone arm to the edge of the record. The turntable starts automatically.
speed as long as the buttons are depressed. When you hear the desired passage release the buttons. Normal playback will resume at that point. During CD or MP3(in CD/USB mode)playback, repeatedly press FOLDER +/+10 or FOLDER-/-10 buttons on the remote control to skip to higher or lower 10 number tracks by pressing one time. During the CD or MP3(in CD/USB mode) stop mode, repeatedly press FOLDER+/+10 or FOLDER-/-10 buttons on the remote control to skip higher or lower folders.
start to record the playing track into USB, the track will be re-start play from the beginning of the selected track. ’rEC’ will be shown on the display and ‘rEC’ indicator flashes. 5) Press STOP button will cancel the record function. Press STOP button once will stop RECORD mode, and ‘rEC’ indicator goes ‘Off’, press twice will stop CD playing. NOTE: When the player Playback MP3 disc, the display will show ‘Cd’. PROGRAM RECORDING This feature allows you choose the desired tracks to be recorded at one time.
CASSETTE RECORDING , 1) Rotate the OFF/VOLUME control clockwise until a ‘click’ is heard, and set the Volume to a low level. 2) Set the function selector(AM/FM/PH/CD/USB/TA) to TA position. 3) Plug U Disk into USB socket. Place the record on the turntable center and play the record. Press RECORD button twice to enter into record mode. The player will re-start play the first point of the track to be selected. ‘rEC’ will be shown on the display and ‘rEC’ indicator remain flash.
COMPACT DISC CARE CARE MAINTENANCE To remove a disc from its AND storage case, press down on the centre of the case and lift the disc out, holding it carefully by the edges. Fingerprints and dust should be carefully wiped off the discs recorded surface with a soft cloth. Unlike conventional records, compact discs have no grooves to collect dust and microscopic debris, so gently wiping with a soft cloth should remove most particles. Wipe in a straight line from the inside to the outside of the disc.