
User guide


AUTO TOTALING TIME CLOCK INSTRUCTIONS
Model 5000
+
/5000
+
HD
TECHNICAL SUPPORT
Remove time clock from carton & place on a flat, level surface.
Plug unit into AC wall outlet.
DESKTOP SETUP
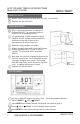
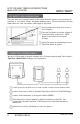
Use key to unlock & remove top/front cover. Locate programming buttons
labeled SELECT, (UP) & (DOWN).
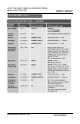
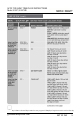
Press SELECT until desired feature is displayed (see chart on page 2).
Press (UP) or (DOWN) to scroll through feature options.
Press SELECT to save option setting & move to next feature.
PROGRAMMING
888.479.7264
2 INSTALLATION & PROGRAMMING
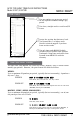
WALL MOUNTING
Select a location convenient to employees
clocking IN & OUT. Be sure power outlet is
within 6 feet of mounting location.
Use masking tape to hold included mounting
template on wall, making certain template is
positioned so bottom of time clock is
approximately 45 inches from floor.
Drill holes using template as a guide.
Remove template from wall & install #10 screws,
leaving approximately 3/16 inch of screws
exposed. For sheetrock walls, use plastic
anchors.
Hang time clock on wall, aligning keyholes on the
rear with screw heads. Press downward on time
clock until it lowers onto screws. If mounting
5000+HD Time Clock, unlock & remove top/front
cover, & tighten wall screws to fasten.
Plug unit into AC wall outlet.
Model 5000
+
Model 5000
+HD