888 534-5994 TimeTrax EZ USER MANUAL
TIME & ATTENDANCE SYSTEM Time and Attendance System REFERENCE GUIDE
TIMETRAX EZ TIMETRAX EZ PRODUCT & SOFTWARE LICENSING AGREEMENT Copyright © 2001-2006 Pyramid Technologies, LLC Portions of this program Copyright © 1991-2005 Microsoft Corp. Portions of the report generation software are distributed under a licensing agreement with Data Dynamics, Ltd. Portions of this program Copyright © 1994-2000 eHelp Corp. All rights reserved. Portions of this program Copyright © 1990-2005 Info-ZIP, and distributed under license dated 2005-Feb-10.
TIME & ATTENDANCE SYSTEM No rental, leasing or commercial hosting. You may not rent, lease, lend or provide commercial hosting services to third parties with the TimeTrax EZ software. Software Transfer.
TIMETRAX EZ 8) LIMITED WARRANTY. Pyramid Technologies, LLC. warrants that (a) the TimeTrax EZ software will, for a period of ninety (90) days from the date of delivery, perform substantially in accordance with Pyramid Technologies, LLC.’s written materials accompanying it, and (b) any Support Services provided by Pyramid Technologies, LLC. shall be substantially as described in applicable written materials provided to you by Pyramid Technologies, LLC. CUSTOMER REMEDIES.
TIME & ATTENDANCE SYSTEM TABLE OF CONTENTS What’s in the Box? . . . . . . . . . . . . . . . . . . . . . . . . . . . . . . . . . . . . . . . . . . . . . . . . . . . . . . 1 Minimum System Requirements . . . . . . . . . . . . . . . . . . . . . . . . . . . . . . . . . . . . . . . . . . . 1 Cable Installation . . . . . . . . . . . . . . . . . . . . . . . . . . . . . . . . . . . . . . . . . . . . . . . . . . . . . . . 2 Introduction . . . . . . . . . . . . . . . . . . . . . . . . . . . . . . . . . . . . . . . .
TIMETRAX EZ Setup Tab . . . . . . . . . . . . . . . . . . . . . . . . . . . . . . . . . . . . . . . . . . . . . . . . . . . . . . . . . . . . .15 Payroll Tab . . . . . . . . . . . . . . . . . . . . . . . . . . . . . . . . . . . . . . . . . . . . . . . . . . . . . . . . . . . .15 Payroll Details . . . . . . . . . . . . . . . . . . . . . . . . . . . . . . . . . . . . . . . . . . . . . . . . . . . . . . . . .16 Assert Global Special Pay . . . . . . . . . . . . . . . . . . . . . . . . . . . . . . . . . . . . .
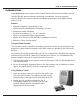
TIME & ATTENDANCE SYSTEM WHAT’S IN THE BOX? • TimeTrax EZ time recorder • AC Power supply • 50’ flat Cat5 communications cable with RJ45 connectors on both ends • RJ45 to 9-pin (DB9) serial port adapter • User’s Manual with EZ Installation Guide • Diagnostic (loop-back) plug – DO NOT DISCARD, save for future use. • Stainless steel mounting bracket • Mounting bracket release key • Mounting screws (#10 x 1” long – Qty.
TIMETRAX EZ CABLE INSTALLATION A E B OPTION 1 D OPTION 2 C D B F G PARTS REFERENCE A Central PC E TimeTrax EZ (PN TIMETRAXEZK) B RJ45 to DB9 Adapter (PN 41400) F AC Power Supply (included in shipping) C USB to RS232 Adapter (PN 41685) G Standard 115v Wall Power Outlet D 50’ White Flat Cat5 Cable (PN 1269) CONNECTING POWER: Connect the AC power supply (fig. F) to a standard 115v wall power outlet (fig. G) and also to the TimeTrax EZ unit (fig. E).
TIME & ATTENDANCE SYSTEM INTRODUCTION Congratulations on your purchase of the Pyramid TimeTrax EZ Time and Attendance System. TimeTrax EZ takes proven card reader technology and combines it with the powerful TimeTrax EZ software to create a time and attendance solution that is both highly effective and easy to use.
TIMETRAX EZ INSTALLING THE SOFTWARE Click NEXT to continue To accept licensing agreement click NEXT to continue Enter User Name and Organization. Choose for whom to install the application.
TIME & ATTENDANCE SYSTEM Click NEXT to continue Click INSTALL to begin installation When installation is complete, click FINISH Double click the ICON placed on your desktop to begin 5
TIMETRAX EZ LOG IN WINDOW When the program is launched, you are presented with the Log In Form. Enter ADMIN into USER NAME field Enter PTI (uppercase) into PASSWORD field INITIAL COMMUNICATION FORM After you successfully log in, the system initializes communications with the time recorder attached to the PC. When this is successfully accomplished, you will see Recorder Found.
TIME & ATTENDANCE SYSTEM TIMETRAX EZ SETUP WIZARD Click YES to continue PAYROLL SETUP Click the EDIT button to start Select your Pay Period. Note: Hourly employees paid on a Monthly and Semi-Monthly basis could accrue overtime in one Pay Period that is applied to the next. Select the day that your Pay Period starts on. Click SAVE to continue Once saved, click on SETUP PAY CATEGORIES Select the time to begin the new Pay Period.
TIMETRAX EZ PAY CATEGORIES SETUP Pay categories are classifications of employee hours. Click EDIT to begin. PAY CATEGORY: Predefined classifications of employee hours. (Holiday, Other, Overtime 1.5, Overtime 2, Regular, Sick, Vacation) RATE MULTIPLIER: The rate at which the Pay Category is paid; i.e., Holiday would be rate multiplier 1 if the employee is paid regular rate for the day. If you choose to pay time and a half, the rate multiplier is 1.5.
TIME & ATTENDANCE SYSTEM Click EDIT to start. DAILY OVERTIME: Choose how it is paid and after how many hours. WEEKLY OVERTIME: Choose how it is paid and after how many hours. MONTHLY/SEMI-MONTHLY PAY PERIODS ONLY: Must select the day and time that the workweek begins to calculate overtime correctly. Max Hours Before Missed Punch Assumed: The maximum number of hours an employee can work without punching before the system assumes the employee forgot to punch out.
TIMETRAX EZ ADVANCED EMPLOYEE GROUPS SETUP Employee Groups Advanced can be used when the standard Employee Groups is not sufficient for an organization. Shift Warnings: Allows the employee to punch at any time, but will generate a warning when an employee punches outside of the defined shift. The user can define the warning based on minutes before or after the shift starts or ends.
TIME & ATTENDANCE SYSTEM EMPLOYEE DETAILS SETUP This section is where individual employee information is stored. (For QuickBooks users, please see the section on Importing Employees from QuickBooks) Click ADD to continue CARD 1, 2, 3: TimeTrax EZ allows up to 3 different card numbers to be assigned to each employee. Card 1 is a required field. ENTER EMP#: NOTE: It is very important that you verify the Employee Number with your Payroll Service for proper exporting.
TIMETRAX EZ VERTICAL ICON BAR PAYROLL TAB: SETUP TAB: The working Vertical Icon Bar where daily transactions occur. Operational setup handled initially through the wizard. CONFIGURE TAB: Normal one time setup for systems administration. These Icons can also be seen on the top menu bar by selecting FILE – Show More Menus.
TIME & ATTENDANCE SYSTEM CONFIGURE TAB Date/Time Setup: This is the screen in which you will make any adjustments necessary to the TimeTrax EZ date and time, as well as Daylight Savings Time settings. Preferences: This is the screen in which you will define the preferences for your system settings. Click SAVE and EXIT button when completed. FORCE TEXT TO UPPERCASE: Select this option if you want all text entries to be UPPER CASE.
TIMETRAX EZ AUTOMATIC BACKUP This is the screen in which you will enable automatic backups for use when you exit the system. This will create a file and save it to a specified location of your choice. ACTIVATE AUTOMATIC BACKUP: Select this option to turn on automatic backups. BROWSE: Click this button to find the location you would like to store the backups. NOTE: This can be on a network drive. BACKUP NOW: Immediate Backup. APPLY: Click after screen changes.
TIME & ATTENDANCE SYSTEM TIME SOURCE & SYNC STANDARDS It is not necessary to make any changes on this screen. TIME SOURCE STANDARD: By default Time Recorder is the most reliable option for time keeping. You can change the default to PC if you choose, however, PCs experience fluctuation by gaining and losing time. TIME SYNCHRONIZATION STANDARD: By default Powerline is the most reliable option for time keeping.
TIMETRAX EZ PAYROLL TAB Cont. PUNCH EDITING Insert Punch: To insert a punch, click the INSERT PUNCH button. Select the date of the punch and then select the time of the punch and choose SAVE. Edit Punch: Highlight the punch in question, click the EDIT PUNCH button, change the date and/or time of the punch, and choose SAVE. Delete Punch: Highlight the punch in question, click the DELETE PUNCH button, and choose YES on the verification screen, if you are sure you want to delete this punch.
TIME & ATTENDANCE SYSTEM ASSERT GLOBAL SPECIAL PAY In the circumstances where you wish to pay all employees or a group of employees the same number of hours (i.e., Independence Day @ 8 hours) go to FILE – Assert Global Special Pay. EMPLOYEE SELECTION: Choose either EMPLOYEE BY GROUPS in the Selected Payroll Group or INDIVIDUAL EMPLOYEES in the Selected Payroll Groups. If you choose EMPLOYEE BY GROUPS you are selecting every employee within the selected employee group.
TIMETRAX EZ REPORTS / EXPORTS REPORTS When generating REPORTS you must select the PAY PERIOD you want included in the report, as well as the EMPLOYEE GROUP or INDIVIDUAL EMPLOYEES you want included in the REPORT. Then, select the REPORT you want to run. Select PAY PERIOD to be included in REPORT Choose REPORT Click CREATE REPORT Select who is included in the REPORT. Choose either EMPLOYEE GROUP or INDIVIDUAL EMPLOYEES.
TIME & ATTENDANCE SYSTEM Employee Contact Information: Shows NAME, ADDRESS, HOME PHONE and WORK PHONE. Employee Seniority Report: Shows EMPLOYEE NAME, ID NUMBER, HIRE DATE and DAYS EMPLOYED. You can sort by either 30/60/90 or 410-DAY BANDS or BY NAME or BY DATE HIRED. ARCHIVE REPORTS Once a payroll record is approved, it is placed in Archive. Archive Reports allow you to run reports from the date TimeTrax EZ was installed up to and including the current date. Select who is included in the REPORT.
TIMETRAX EZ IMPORTING EMPLOYEES FROM QUICKBOOKS This section discusses how to import employees from your QuickBooks system to TimeTrax EZ to eliminate the double entry of employee information. After you complete the setup of EMPLOYEE GROUPS, you will be presented with the following screen: Click YES to continue. Click SYNC EMPLOYEES WITH QUICKBOOKS to continue. Click LINK RULES to setup how the system will import your employees.
TIME & ATTENDANCE SYSTEM MATCH ONLY ON EMPLOYEE ID: The import will only match Employee ID’s. UNIQUELY MATCH: The import will do a cross reference on all employee data to ensure it is correct (Pyramid strongly recommends use of this option). Check this option to have TimeTrax EZ update your QuickBooks Employee data. Check this option to have QuickBooks update your TimeTrax EZ employee data. (PYRAMID STRONGLY RECOMMENDS USE OF THIS OPTION).
TIMETRAX EZ ADP The following are instructions for setting up and using the ADP EXPORT contained in the TimeTrax EZ. You will have to go into the REPORTS/EXPORTS tab to proceed with the export. It may also be necessary for you to setup the CATEGORY CODES within the SETUP – PAYROLL GROUPS – SETUP PAY CATEGORIES. (These codes will be provided to you from your payroll service provider). It is also required that individual payroll records are approved before export on the PAYROLL DETAILS SCREEN. Choose EXPORT.
TIME & ATTENDANCE SYSTEM GENERIC TEXT The following are instructions for setting up and using the GENERIC TEXT EXPORT contained in the TimeTrax EZ. You will have to go into the REPORTS/EXPORTS tab to proceed with the export. It may also be necessary for you to setup the CATEGORY CODES within the SETUP – PAYROLL GROUPS – SETUP PAY CATEGORIES. (These codes will be provided to you from your payroll service provider).
TIMETRAX EZ PAYCHEX PREVIEW The following are instructions for setting up and using the PAYCHEX PREVIEW EXPORT contained in the TimeTrax EZ. You will have to go into the REPORTS/EXPORTS tab to proceed with the export. It may also be necessary for you to setup the CATEGORY CODES within the SETUP – PAYROLL GROUPS – SETUP PAY CATEGORIES. (These codes will be provided to you from your payroll service provider).
TIME & ATTENDANCE SYSTEM PAYCHEX PAYLINK The following are instructions for setting up and using the PAYCHEX PAYLINK EXPORT contained in the TimeTrax EZ. You will have to go into the REPORTS/EXPORTS tab to proceed with the export. It may also be necessary for you to setup the CATEGORY CODES within the SETUP – PAYROLL GROUPS – SETUP PAY CATEGORIES. (These codes will be provided to you from your payroll service provider).
TIMETRAX EZ PRODATA EVOLUTION The following are instructions for setting up and using the PRODATA EVOLUTION EXPORT contained in the TimeTrax EZ. You will have to go into the REPORTS/EXPORTS tab to proceed with the export. It may also be necessary for you to setup the CATEGORY CODES within the SETUP – PAYROLL GROUPS – SETUP PAY CATEGORIES. (These codes will be provided to you from your payroll service provider).
TIME & ATTENDANCE SYSTEM QUICKBOOKS 2003+ The following are instructions for setting up and using the QUICKBOOKS 2003+ LINK EXPORT contained in the TimeTrax EZ. You will have to go into the REPORTS/EXPORTS tab to proceed with the export. It may also be necessary for you to setup the CATEGORY CODES within the SETUP – PAYROLL GROUPS – SETUP PAY CATEGORIES. (These codes will be provided to you from your payroll service provider).
TIMETRAX EZ QUICKBOOKS – 2002 The following are instructions for setting up and using the QUICKBOOKS PRE-2002 LINK EXPORT contained in the TimeTrax EZ. You will have to go into the REPORTS/EXPORTS tab to proceed with the export. It may also be necessary for you to setup the CATEGORY CODES within the SETUP – PAYROLL GROUPS – SETUP PAY CATEGORIES. (These codes will be provided to you from your payroll service provider).
TIME & ATTENDANCE SYSTEM To obtain a COMPANY NUMBER, do the following: 1. In the QuickBooks Tool Bar go into: FILE TIMER EXPORT LISTS FOR TIMER 2. Click OK when the EXPORTS LISTS FOR TIMER SCREEN appears. 3. Save in whatever drive you choose to use. 4. Change the file name to something easily identifiable such as myqbcompany.if. The name does not matter as long as the ending is .if. 5. Click on SAVE. You will get a message showing that your data has been exported successfully. 6.
TIMETRAX EZ QUICKBOOKS PRO TIMER EXPORT USERS The following are instructions for setting up and using the QUICKBOOKS PRE-2002 LINK EXPORT contained in the TimeTrax EZ. You will have to go into the REPORTS/EXPORTS tab to proceed with the export. It may also be necessary for you to setup the CATEGORY CODES within the SETUP – PAYROLL GROUPS – SETUP PAY CATEGORIES. (These codes will be provided to you from your payroll service provider).
TIME & ATTENDANCE SYSTEM To obtain a CREATE TIME, do the following: 1. In the QuickBooks Tool Bar go into: FILE TIMER EXPORT LISTS FOR TIMER 2. Click OK when the EXPORTS LISTS FOR TIMER SCREEN appears. 3. Save in whatever drive you choose to use. 4. Change the file name to something easily identifiable such as myqbcompany.if. The name does not matter as long as the ending is .if. 5. Click on SAVE. You will get a message showing that your data has been exported successfully. 6.
TIMETRAX EZ TROUBLESHOOTING GUIDE GENERAL TROUBLESHOOTING TIPS Software is acting in an unexpected manner: • Restart TimeTrax and see if that corrects the problem. • Reboot your computer and re-launch TimeTrax. • Make sure you meet the minimum system requirements listed in the MINIMUM SYSTEM REQUIREMENTS section of this manual. Software cannot locate the time recorder Following is an example of one of the messages you may see in TimeTrax EZ: STEP 1: Verify that the hardware is set up correctly.
TIME & ATTENDANCE SYSTEM If the DB9 does not fit into a port on the computer, you will need a USB to RS232 adapter to connect the DB9 to your computer. You can purchase this adapter through Pyramid, P/N 41685. STEP II: Test that Windows, COM Port and DB9 are working properly. • If the hardware is setup correctly, you will need to connect the loop-back plug included in the shipment to the DB9 that is plugged into your computer. • Click the Reconnect Button on your screen.
TIMETRAX EZ Choose RESTORE FROM CURRENT BACKUP. • This will restore all data from the last backup. If you have punches in the TimeTrax EZ unit that have not been downloaded, download them as described in the PAYROLL TAB, GET PUNCHES SECTION of this manual. • If you do not have a backup, you will need to reinstall your software and go thru the entire setup process beginning with the TimeTrax EZ Setup Wizard.
TIME & ATTENDANCE SYSTEM For each employee, go to edit button and uncheck the INACTIVE check box located under HOURLY PAY RATE. From the PAYROLL ICON on the VERTICAL ICON BAR, click GET PUNCHES. Press the F12 key on your keyboard and the screen below will appear. Click EMERGENCY DOWNLOAD ALL STORED PUNCHES. Once the emergency download is complete, make sure you go back and make the employees that you activated, inactive again. Click HIDE THE INACTIVE EMPLOYEES Tab.
TIMETRAX EZ 5. Select TYPE TO SORT by type of file. 6. Select pyramid.ini and all .mdb files. 7. Right-click and copy files. Click VIEW TAB. Make sure this box is unchecked. Click APPLY then click OK. For Non-Network PC users: 1. Right-click on your desktop. 2. Select NEW and FOLDER. 3. Open the folder, right-click and paste files. 4. Transfer files to the new computer. 5. Navigate to the TimeTrax directory and paste the files.
TIME & ATTENDANCE SYSTEM QuickBooks Does Not Display Punch Information After Export Time tracking data is missing for ALL employees: From QuickBooks Program: 1. Choose EDIT. 2. PREFERENCES 3. TIME TRACKING 4. Tab to COMPANY PREFERENCES 5. DO YOU TRACK TIME? Check YES 6. Go to EMPLOYEES 7. Click on (any) 1 Employee 8. Change the Drop Down Box to PAYROLL AND COMPENSATION INFORMATION 9. Make sure all of the EARNINGS are set up 10.
TIMETRAX EZ STEP 2: Copy new QuickBooks 2003+Link_.exe from the original CD provided in shipment to C:\Program Files\Pyramid\TimeTrax. STEP 3: Re-launch TimeTrax program. The QuickBooks – Application Certificate Screen appears. Make sure YES, always allow access even if QuickBooks is not running is checked, and optionally ALLOW this application to access personal data such as Social Security Number and customer credit card information box is checked.
TIME & ATTENDANCE SYSTEM WARRANTY INFORMATION RETURNS Returns on non-defective equipment can be made within 30-days of purchase for a full refund after inspection. Returns on non-defective equipment made after 30-days, but within 60-days of shipping will be accepted after inspection and are subject to a 15% restocking fee. Returns after 60-days will not be accepted.
TIMETRAX EZ PARTS LIST 40 PART NUMBER QTY DESCRIPTION TIMETRAXEZ 1 TimeTrax EZ Master Kit TIMETRAXEZW1H 1 1-Year Extended Hardware Warranty TIMETRAXEZW1S 1 1-Year Extended Technical Support 41400 1 Adapter RJ45f to DB9 41685 1 Converter USB to RS232 500-4 1 Badge Card Rack Capacity 40 41269 1 50’ White Flat RJ45 Cable 41314 1 100’ White Flat RJ45 Cable 41313 1 Splice RJ45 STE111 In-Line 41287 1 Mounting Bracket Release Key 41302S 1 Swipe Cards & Software #1-25 41303S
TIME & ATTENDANCE SYSTEM INDEX H 7 Hardware . . . . . . . . . . . . . . . . . . . . 32 Hired . . . . . . . . . . . . . . . . . . . . . . . . 11 Home Phone . . . . . . . . . . . . . . . . . . 11 Hourly Pay Rate . . . . . . . . . . . . . . . 11 Hours Summary Report . . . . . . . . . 19 7th Day Worked Overtime . . . . . . . 10 A Address . . . . . . . . . . . . . . . . . . . . . . 11 ADP . . . . . . . . . . . . . . . . . . . . . . . . . 22 Advanced Employee Groups . . . . . 10 Anniversary . . . . . . . .