INTEGRATED OVEN H10-20-220-105 Rev 001 60 cm USER MANUAL GB BEDIENUNGSANLEITUNG DE
GB Dear Customer, Thank you for relying on this product. We aim to allow you to optimally and efficiently use this environment-friendly product produced in our modern facilities under precise conditions with respect to sense of quality in total. We advise you to read these operating manual thoroughly before using the oven and keep it permanently so that the features of the built-in oven you have purchased will stay the same as the first day for a long time.
GB CONTENTS Important Warnings Introducing The Appliance Technical Specifications Installation Of Appliance Installation Of Cooktop Correct Place For Installation Electrical Connection Scheme Electrical Connection Of Cooking Zones Important Warnings Program Types Cooking Recommendations Cooking Table Using The Oven Replacing Oven Lamp Cleaning Oven Glass Cleaning And Mounting Oven Door Steam Cleaning Usage Of Your Cooktop Maintenance And Cleaning Accessories Troubleshooting Environmentally-Friendly Disposa
GB IMPORTANT WARNINGS 1. WARNING: To avoid electric shock, ensure that the appliance circuit is open before changing the lamp. 2. WARNING: All supply circuit connections must be disconnected before accessing terminals. 3. WARNING: The accessible parts may be hot during use of grid. Children must be kept away. 4. WARNING: Fire hazard; do not store materials on cooking surface. 5. WARNING: If the surface is cracked, open the appliance circuit to avoid risk of electric shock. 6.
GB 13. Hard and abrasive cleaners or hard metal scrapers should not be used to clean the oven glass door, as these can scratch the surface and cause breaking. 14. Ensure that door is fully closed after food is placed. 15. Children under 8 years of age should be kept away, if they cannot be monitored continuously. 16. Touching the heating elements should be avoided. 17.
GB 23. Keep curtains, tissue paper or combustible (inflammable) materials away from appliance before starting to use it. Do not place inflammable or combustible materials in or on the appliance. 24.This appliance can be used by children aged from 8 years and above and persons with reduced physical, sensory or mental capabilities or lack of experience and knowledge if they have been given supervision or instruction concerning use of the appliance in a safe way and understand the hazards involved.
GB 26. WARNING: The appliance and the accessible part may become hot during use. Please make sure of not to touch the heating element inside the baking compartment.Children of less than 8 years of age shall be kept away from the device unless they are continuously supervised. 27. WARNING: Please make sure that appliance is disconnected from the mains power supply, before starting any cleaning works at the device or replacing the lamp inside the baking oven, in order to prevent any risk of electric shocks.
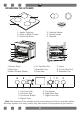
GB INTRODUCING THE APPLIANCE 1 2 4 5 3 6* 1- Heater Positions 2- Glass or Metal Surface 3- Control Switches 4- Ovaldual Heater 5- Double Heater 6- Hotplate 1 7 2 3 4 5 8 9 6 1.Control Panel 2.Deep Tray * 3.Roast Chicken Skewer 0 0 1 2 9 4.In Tray Wire Grill 5.Standard Tray 6.Oven door 0 1 2 9 7 3 4 6 5 7 4 6 3 4 6 3 4 Left Front Hob Left Rear Hob Functional Button Digital Timer 5 1 2 9 8 7 3 2 1. 2. 3. 4. 2 8 5 1 0 1 9 8 8 7. Lamp 8. In Tray Wire Grill 9.
GB TECHNICAL SPECIFICATIONS SPECIFICATIONS 60 cm Integrated Oven Lamp Power 15-25W Thermostat 40-240 / Max °C Lower Heater 1200W Upper Heater 1000W Turbo Heater 1800W Grill Heater Supply Voltage Small Grill 1000W Big Grill 2000W 220V-240V 50/60 Hz Technical specifications can be changed without prior notice to improve product quality. The values provided with the appliance or its accompanying documents are laboratory readings in accordance with the respective standards.
GB Important Warnings for Installation: Cooling fan shall take extra steam out and prevent outer surfaces of appliance from overheating during operation of oven. This is a necessary condition for better appliance operation and better cooking. Cooling fan shall continue operation after cooking is finished. Fan shall automatically stop after cooling is completed. Figure 1 A clearance must be left behind the enclosure where you'll place the appliance for efficient and good operation.
GB Built-In Oven Integrated Installation and Mounting Place of use for product must be located before starting installation. Product mustn't be installed in places which are under the effect of strong air flow. Carry the product with minimum two people. Do not drag the product so that floor isn't damaged. Remove all transportation materials inside and outside the product. Remove all materials and documents in the product. Installation Under Counter Cabin must match the dimensions provided in Figure 2.
GB Network voltage must be compatible with the values provided on type label of product. Product connection must be made in accordance with local and national electrical requirements. Before starting the mounting disconnect network power. Do not connect the product to network until its mounting is completed.
GB A Figure 4 Cooktop Counter Cutting Sizes: 59 m Pay attention to the drawing and dimensions given while making cooktop installation and adjusting counter cutting sizes. 0m 0m 52 m min. 60 mm 56 0m m m 0m 49 min. 60 mm min.
GB INSTALLATION OF COOKTOP 1. Turn the cooktop down and place on smooth ground. 2. In order to prevent entrance of foreign substances and liquids between cooktop and counter, apply the paste given in package to the sides of lower guard of counter. For corners, curl paste and increase curls till filling corner gaps. 3. Turn cooktop again and align with and place on counter. 4. Fasten up your cooktop on counter by using the clamp and screws supplied.
GB 5. When product is mounted on a drawer, if it is possible to touch lower side of product, this section should be separated with a wooden shelf. min. 15 mm Figure 7 6. While mounting cooktop on a closet, as shown in the figure above, in order to separate between closet and cooktop, a shelf should be mounted. If it is mounted on a built-in oven, there is no need to do that. 7. If your cooktop will be mounted next to right or left wall, the minimum distance between wall and cooktop should be 50 mm.
GB ELECTRICAL CONNECTION SCHEME Live Phase 220-240V~50/60Hz Neutral Neutre Earth Terre Erdung H05 VV-F 3G 4 mm² 380-415 3N~50/60Hz L3 L2 L1 Get electrical connection of your appliance done to authorized person in line with the following scheme.
GB IMPORTANT WARNINGS Electrical Connection and Safety This oven must be installed and connected to its place correctly according to manufacturer instructions and by an authorized service. Appliance must be installed in an oven enclosure providing high ventilation. Electrical connections of the appliance must be made only via sockets having earth system furnished in compliance with rules.
GB Make sure that button is popped by pressing on the button as shown in the figure at left side. Figure 11* You can make necessary adjustments by turning right or left when button is popped enough. Figure 12* Thermostat Button: Helps to set cooking temperature of the food to be cooked in the oven. You can set the desired temperature by turning the button after placing the food into the oven. Check cooking table related to cooking temperatures of different foods.
GB PROGRAM TYPES Heating program types in your appliance and important explanations of them are provided below for you can cook different foods appealing to your taste.
GB Multi Functional Cooking: Suitable for baking and roasting. Lower and upper heaters operate as well as quick transmission of heat via air flow. Suitable for cooking requiring single tray and intense heat. COOKING RECOMMENDATIONS You can find in the following table the information of food types which we tested and identified their cooking values in our labs. Cooking times can vary depending on the network voltage, quality of material to be cooked, quantity and temperature.
GB USING THE OVEN Initial Use of Oven Here are the things you must do at first use of your oven after making its necessary connections as per instructions: 1. Remove labels or accessories attached inside the oven. If any, take out the protective folio on front side of the appliance. 2. Remove dust and package residues by wiping inside of the oven with a damp cloth. Inside of oven must be empty. Plug the cable of appliance into the electrical socket. 3.
GB REPLACING OVEN LAMP WARNING: To avoid electric shock, ensure that the appliance circuit is open before changing the lamp. (having circuit open means power is off) First disconnect the power of appliance and ensure that appliance is cold. Remove the glass protection by turning as indicated in the figure on the left side. If you have difficulty in turning, then using plastic gloves will help you in turning. Then remove the lamp by turning, install the new lamp with same specifications.
GB CLEANING AND MOUNTING OVEN DOOR Figure 22 Figure 22.1 Open the door fully by pulling the oven door toward yourself. Then perform unlock operation by pulling the hinge lock upwards with the aid of screwdriver as indicated in figure 22.1. Figure 23 Figure 22.2 Figure 23.1 Set the hinge lock to the widest angle as in figure 22.2. Adjust both hinges connecting oven door to the oven to the same position.
GB STEAM CLEANING* It enables cleaning the soils softened thanks to the steam to be generated in the oven. 1.Remove all the accessories in the oven. 2.Pour a half litre of water into the tray and Place the tray at the bottom of the boiler. 3. Set the switch to the steam cleaning mode. 4.Set the thermostat to 70° C degrees Figure 24 and operate the oven for 30 minutes. 5. After operating the oven for 30 minutes, open the oven door and wipe the inner surfaces with a wet cloth. 6.
GB Electrical Heater Power Values Quick LEVEL 1 LEVEL 2 LEVEL 3 LEVEL 4 LEVEL 5 LEVEL 6 LEVEL 7 LEVEL 8 LEVEL 9 MAK.
GB ACCESSORIES (Optional) Deep Tray * Used for pastry, big roasts, watery foods. It can also be used as oil collecting container if you roast directly on grill with cake, frozen foods and meat dishes. Tray Used for pastry (cookie, biscuit etc.), frozen foods. Wire Grill Used for roasting or placing foods to be baked, roasted and frozen into desired rack. Telescopic Rail* Trays and wire racks can be removed and installed easily thanks to telescopic rails.
GB TROUBLESHOOTING You can solve the problems you can face with your product by checking the following points before calling the technical service. If Oven Doesn’t Work; • Check that the hob connection cables are installed. • Safely check if there is power in the network. • Check the fuses. • Check if electrical cable of the oven is damaged. If cooktop does not operate; • Check if power cable of cooktop is plugged in. • Examine with safe ways if electric exists on network. • Audit fuses.
DE Sehr Geehrter Kunde, Vielen Dank, dass Sie auf dieses Produkt vertrauen. Wir haben das Ziel, Ihnen einen optimalen und effizienten Einsatz dieses umweltfreundlichen Produktes zu ermöglichen, das unter Berücksichtigung eines ganzheitlichen Qualitätsansatzes unter strengen Bedingungen in unseren modernen Anlagen hergestellt wurde.
DE INHALT Wichtige Warnhinweise Vorstellung Des Gerätes Technische Daten Installation Des Gerätes Installation Des Kochfeldes Der Richtige Aufstellungsort Elektrischer Anschluss Wichtige Warnhinweise Programmarten Zubereitungsempfehlungen Zubereitungstabelle Ofen Verwenden Ofenbeleuchtung Auswechseln Ofenglas Reinigen Ofentür Reinigen Und Montieren Dampfreinigung Kochfeld Verwenden Wartung Und Reinigun Zubehör Problemlösung Umweltgerechte Entsorgung Informationen Zur Verpackung 29 30 34 35 35 40 41 42 43
DE Wichtige Warnhinweise 1. Warnung: Stellen Sie zur Vermeidung von Stromschlägen sicher, dass der Geräteschaltkreis offen ist, bevor Sie das Leuchtmittel auswechseln. 2. Warnung: Alle Verbindungen des Versorgungsschaltkreises müssen getrennt werden, bevor Sie auf die Anschlüsse zugreifen. 3. Warnung: Zugängliche Teile können sich beim Einsatz des Rosts erhitzen. Kinder müssen ferngehalten werden. 4. Warnung: Brandgefahr; bewahren Sie nichts auf der Herdfläche auf. 5.
DE 13. Reinigen Sie das Glas der Ofentür nicht mit rauen oder scheuernden Reinigern bzw. harten Metallschabern, da diese die Oberfläche verkratzen und Sprünge verursachen können. 14. Stellen Sie sicher, dass die Tür vollständig geschlossen ist, nachdem Sie Lebensmittel in den Ofen gegeben haben. 15. Kinder unter 8 Jahren sollten ferngehalten werden, sofern keine lückenlose Beaufsichtigung gewährleistet ist. 16. Berühren Sie keine Heizelemente. 17.
DE 23. Stellen Sie vor Inbetriebnahme des Gerätes sicher, dass sich keine Vorhänge, Papiertücher oder brennbaren (entflammbaren) Materialien in seiner Nähe befinden. Platzieren Sie entflammbare oder brennbare Materialien nicht im oder auf dem Gerät. 24.
DE 26. WARNUNG: Das Gerät und zugängliche Teile können sich beim Einsatz erhitzen. Achten Sie darauf, das Heizelement im Garraum nicht zu berühren. Kinder unter 8 Jahren sollten vom Gerät ferngehalten werden, sofern keine lückenlose Beaufsichtigung gewährleistet ist. 27. WARNUNG: Bitte stellen Sie sicher, dass das Gerät von der Stromversorgung getrennt ist, bevor Sie mit Reinigungsarbeiten am Gerät oder der Auswechslung der Ofenbeleuchtung beginnen. Andernfalls besteht Stromschlaggefahr. 28.
DE VORSTELLUNG DES GERÄTES 1 2 4 5 3 6* 1. Positionen der Heizelemente 2- Glas- oder Metallfläche 3- Steuerschalter 4- Ovaldual-Heizelement 5- Doppeltes Heizelement 6- Kochplatte 1 7 2 3 4 5 8 9 6 1. Bedienfeld 2. Tiefes Blech * 3. Bratspieß 0 4. Bratenrost 5. Standardblech 6. Ofentür 0 1 2 9 7. Beleuchtung 8. Bratenrost 9.
DE TECHNISCHE DATEN TECHNISCHE DATEN 60-cm-Einbauofen Beleuchtungsleistung 15 – 25 W Thermostat 40 – 240 / max. °C Unteres Heizelement 1200 W Oberes Heizelement 1000 W Turboheizelement 1800 W Grillheizelement Versorgungsspannung Kleiner Grill 1000 W Großer Grill 2000 W 220 – 240 V, 50/60 Hz Technische Daten können zur Verbesserung der Produktqualität ohne Ankündigung geändert werden.
DE Wichtige Warnhinweise zur Installation: Der Lüfter soll überschüssigen Dampf ableiten und verhindern, dass die Außenflächen des Ofens während des Betriebs überhitzen. Dies ist eine notwendige Bedingung zur Verbesserung des Gerätebetriebs und der Garergebnisse. Der Lüfter arbeitet nach dem Garen noch einige Zeit weiter. Nach Abschluss der Kühlung stoppt er automatisch.
DE Einbauofen installieren und montieren Entscheiden Sie sich vor Beginn der Installation für einen Aufstellungsort. Das Produkt darf nicht an Orten installiert werden, die einem starken Luftstrom ausgesetzt sind. Das Produkt muss von mindestens zwei Personen getragen werden. Ziehen Sie das Produkt nicht über den Boden, da dieser andernfalls beschädigt werden könnte. Entfernen Sie alle Transportmaterialien inner- und außerhalb des Produktes. Entfernen Sie alle Materialien und Dokumente im Produkt.
DE Elektrischer Anschluss Der Aufstellungsort des Produktes muss über eine angemessene Elektroinstallation verfügen. Die Netzspannung muss mit den am Typenschild des Produktes angegebenen Werten übereinstimmen. Der Produktanschluss muss in Übereinstimmung mit den lokalen und nationalen elektrischen Anforderungen erfolgen. Trennen Sie vor Beginn der Montage die Stromversorgung. Schließen Sie das Produkt erst nach Abschluss der Montage an.
DE A Abbildung 4 Abmessungen zum Aussägen der Arbeitsplatte: 59 m 0m 0m 52 m Beachten Sie bei Installation des Kochfeldes die Abbildung und Abmessungen zum Aussägen der Arbeitsplatte. min. 60 mm 56 0m m m 0m 49 min. 60 mm min.
DE INSTALLATION DES KOCHFELDES 1. Drehen Sie das Kochfeld um und legen Sie es auf einen ebenen Untergrund. 2. Tragen Sie die mitgelieferte Dichtmasse auf die Seiten des unteren Schutzes der Arbeitsplatte auf, damit keine Fremdsubstanzen oder Flüssigkeiten zwischen Arbeitsplatte und Kochfeld gelangen. Achten Sie darauf, auch die Ecken mit der Dichtmasse zu füllen, damit sich keine Lücken bilden. 3. Drehen Sie das Kochfeld um, richten Sie es an der Arbeitsplatte aus und setzen Sie es ein. 4.
DE 5. Wenn das Produkt auf eine Schublade montiert wird und die Unterseite des Produktes zugänglich ist, muss dieser Bereich durch eine Holzplatte abgetrennt werden. Min. 15 mm Abbildung 7 Min. 650 mm 6. Bei Montage des Kochfeldes auf einem Schrank sollte zur Trennung von Schrank und Kochfeld eine Platte montiert werden. Beachten Sie dazu die obige Abbildung. Wenn es über einem Einbauofen montiert wird, ist dies nicht erforderlich. 7.
DE ELEKTRISCHER ANSCHLUSS Live Phase 220-240V~50/60Hz Neutral Neutre Earth Terre Erdung H05 VV-F 3G 4 mm² 380-415 3N~50/60Hz L3 L2 L1 Lassen Sie das Gerät in Übereinstimmung mit dem folgenden Plan von einer autorisierten Person anschließen.
DE WICHTIGE WARNHINWEISE Elektrischer Anschluss und elektrische Sicherheit Dieser Ofen muss von einem autorisierten Serviceanbieter sachgemäß in Übereinstimmung mit den Anweisungen des Herstellers installiert und angeschlossen werden. Das Gerät muss in einem Ofengehäuse installiert werden, das eine angemessene Belüftung bereitstellt. Der elektrische Anschluss des Gerätes muss über Schutzkontaktstecker (Schukostecker) mit Schutzerde und gemäß elektrotechnischen Vorgaben erfolgen.
DE Drücken Sie dazu wie in der Abbildung links gezeigt auf den jeweiligen Knopf. Abbildung 11* Drehen Sie den herausgesprungenen Knopf zur Durchführung der erforderlichen Anpassungen nach rechts oder links. Abbildung 12* Abbildung 13 Thermostatknopf: Dient der Einstellung der Gartemperatur der im Ofen zuzubereitenden Lebensmittel. Stellen Sie die gewünschte Temperatur durch Drehen des Knopfes ein, nachdem Sie die Lebensmittel in den Ofen gegeben haben.
DE PROGRAMMTYPEN Nachstehend erfahren Sie mehr über die Programmtypen sowie wichtige Erläuterungen zu diesen, damit Sie verschiedene Lebensmittel ganz nach Geschmack zubereiten können.
DE Multifunktionsgaren: Zum Backen und Braten geeignet. Oberes und unteres Heizelement sind in Betrieb, der Luftstrom sorgt für eine schnelle Hitzeübertragung. Geeignet zum Garen von Speisen, die ein einzelnes Blech und intensive Hitze erfordern. ZUBEREITUNGSEMPFEHLUNGEN Die nachstehende Tabelle enthält Informationen zu Lebensmittelarten, die wir in unseren Labors getestet und hinsichtlich ihrer Zubereitungswerte untersucht haben.
DE OFEN VERWENDEN Erste Inbetriebnahme des Ofens Bitte befolgen Sie vor der ersten Benutzung Ihres Ofens die nachstehenden Anweisungen: 1. Entfernen Sie die im Ofen angebrachten Etiketten und Zubehörteile. Lösen Sie außerdem jegliche Schutzfolie an der Vorderseite des Gerätes, falls vorhanden. 2. Beseitigen Sie Staub und Verpackungsreste, indem Sie die Innenseite des Ofens mit einem feuchten Tuch abwischen. Das Innere des Ofens muss leer sein. Schließen Sie das Gerätekabel an eine Steckdose an. 3.
DE OFENBELEUCHTUNG AUSWECHSELN Warnung: Stellen Sie zur Vermeidung von Stromschlägen sicher, dass der Geräteschaltkreis offen ist, bevor Sie das Leuchtmittel auswechseln. (Ein offener Schaltkreis bedeutet, dass die Stromversorgung unterbrochen ist.) Trennen Sie zunächst die Stromversorgung des Gerätes und stellen Sie sicher, dass das Gerät abgekühlt ist. Entfernen Sie den Glasschutz, indem Sie ihn wie links abgebildet drehen.
DE OFENTÜR REINIGEN UND MONTIEREN Abbildung 23 Abbildung 22 Abbildung 22.1 Abbildung 22.2 Abbildung 23.1 Abbildung 23.2 Öffnen Sie die Ofentür vollständig, indem Sie sie zu sich ziehen. Ziehen Sie den Scharnierverschluss zum Entriegeln mit Hilfe eines Schraubendrehers nach oben; beachten Sie dazu Abbildung 22.1. Stellen Sie den Scharnierverschluss, wie in Abbildung 22.2 gezeigt, auf den breitesten Winkel ein.
DE DAMPFREINIGUNG* Durch den im Ofen erzeugten Dampf lassen sich hartnäckige Verschmutzungen aufweichen. 1.Entfernen Sie jegliches Zubehör aus dem Ofen. 2.Gießen Sie einen halben Liter Wasser in das Blech und platzieren Sie das Blech auf dem Ofenboden. 3. Stellen Sie den Schalter auf den Dampfreinigungsmodus ein. 4.Stellen Sie die Temperatur über Abbildung 24 den Thermostatknopf auf 70 °C ein und lassen Sie den Ofen 30 Minuten arbeiten. 5.
DE Elektrisches Heizelement, Leistungswerte, Schnellheizen STUFE 1 STUFE 2 STUFE 3 STUFE 4 STUFE 5 STUFE 6 STUFE 7 STUFE 8 STUFE 9 MAX.
DE ZUBEHÖR (optional) Tiefes Blech* Für Feingebäck, große Braten, wässrige Lebensmittel. Kann auch als Sammelbehälter verwendet werden, wenn Sie Kuchen, gefrorene Lebensmittel oder Fischgerichte direkt auf dem Rost zubereiten. Blech Für Feingebäck (Kekse, Biskuit usw.), gefrorene Lebensmittel. Grillrost Zum Braten oder Erwärmen (gefrorener) Lebensmittel im gewünschten Einschub. Teleskopschiene* Bleche und Grillroste können dank der Teleskopschienen mühelos entfernt und installiert werden.
DE PROBLEMLÖSUNG Prüfen Sie bei Problemen mit Ihrem Produkt die nachstehenden Punkte, bevor Sie sich an den technischen Support wenden. Wenn der Ofen nicht funktioniert • Prüfen Sie, ob die Anschlusskabel des Kochfeldes richtig angeschlossen sind. • Stellen Sie sicher, dass die Stromversorgung funktioniert. • Prüfen Sie die Sicherungen. • Prüfen Sie das Netzkabel des Ofens auf Schäden. Wenn das Kochfeld nicht funktioniert • Prüfen Sie, ob das Netzkabel des Kochfeldes angeschlossen ist.