
User's Manual
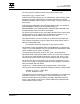

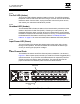
Table Of Contents
- Table of Contents
- Section 1 Introduction
- 1.1 Intended Audience
- 1.2 Related Materials
- 1.3 New in this Release
- 1.4 Safety Notices
- 1.5 Sicherheitshinweise
- 1.6 Notes informatives relatives à la sécurité
- 1.7 Communications Statements
- 1.8 Laser Safety Information
- 1.9 Electrostatic Discharge Sensitivity (ESDS) Precautions
- 1.10 Accessible Parts
- 1.11 Pièces Accessibles
- 1.12 Zugängliche Teile
- 1.13 General Public License
- 1.14 Technical Support
- Section 2 General Description
- Section 3 Planning
- Section 4 Installation
- 4.1 Site Requirements
- 4.2 Installing a Switch
- 4.2.1 Mount the Switch
- 4.2.2 Install SFP Transceivers
- 4.2.3 Connect the Workstation to the Switch
- 4.2.4 Configure the Workstation
- 4.2.5 Install SANsurfer Switch Manager
- 4.2.5.1 SANsurfer Management Suite Disk - Windows Installation
- 4.2.5.2 SANsurfer Management Suite Disk - Linux Installation
- 4.2.5.3 SANsurfer Management Suite Disk - Solaris Installation
- 4.2.5.4 SANsurfer Switch Manager Installation Disk - Windows Installation
- 4.2.5.5 SANsurfer Switch Manager Installation Disk - Linux Installation
- 4.2.5.6 SANsurfer Switch Manager Installation Disk - Solaris Installation
- 4.2.6 Start SANsurfer Switch Manager
- 4.2.7 Connect the Switch to AC Power
- 4.2.8 Configure the Switch
- 4.2.9 Cable Devices to the Switch
- 4.3 Install Firmware
- 4.4 Powering Down a Switch
- Section 5 Diagnostics/Troubleshooting
- 5.1 POST Diagnostics
- 5.2 Chassis Diagnostics
- 5.3 Recovering a Switch
- 5.3.1 Maintenance - Exit
- 5.3.2 Maintenance - Image Unpack
- 5.3.3 Maintenance - Reset Network Config
- 5.3.4 Maintenance - Reset User Accounts to Default
- 5.3.5 Maintenance - Copy Log Files
- 5.3.6 Maintenance - Remove Switch Config
- 5.3.7 Maintenance - Remake Filesystem
- 5.3.8 Maintenance - Reset Switch
- 5.3.9 Maintenance - Show Firmware Versions
- 5.3.10 Maintenance - Set Active Image
- Appendix A Specifications
- Appendix B Command Line Interface
- B.1 Logging On to a Switch
- B.2 User Accounts
- B.3 Working with Switch Configurations
- B.4 Commands
- Admin Command
- Alias Command
- Config Command
- Date Command
- Fallback Command
- Hardreset Command
- Help Command
- History Command
- Hotreset Command
- Image Command
- Lip Command
- Passwd Command
- Ping Command
- Ps Command
- Quit Command
- Reset Command
- Set Command
- Set Config Command
- Set Log Command
- Set Port Command
- Set Setup Command
- Show Command
- Show Config Command
- Show Log Command
- Show Perf Command
- Show Setup Command
- Shutdown Command
- Test Command
- Uptime Command
- User Command
- Whoami Command
- Zone Command
- Zoneset Command
- Zoning Command
- Glossary
- Index
2 – General Description
Fibre Channel Ports
59042-06 A 2-5
0
2.2.1
Port LEDs
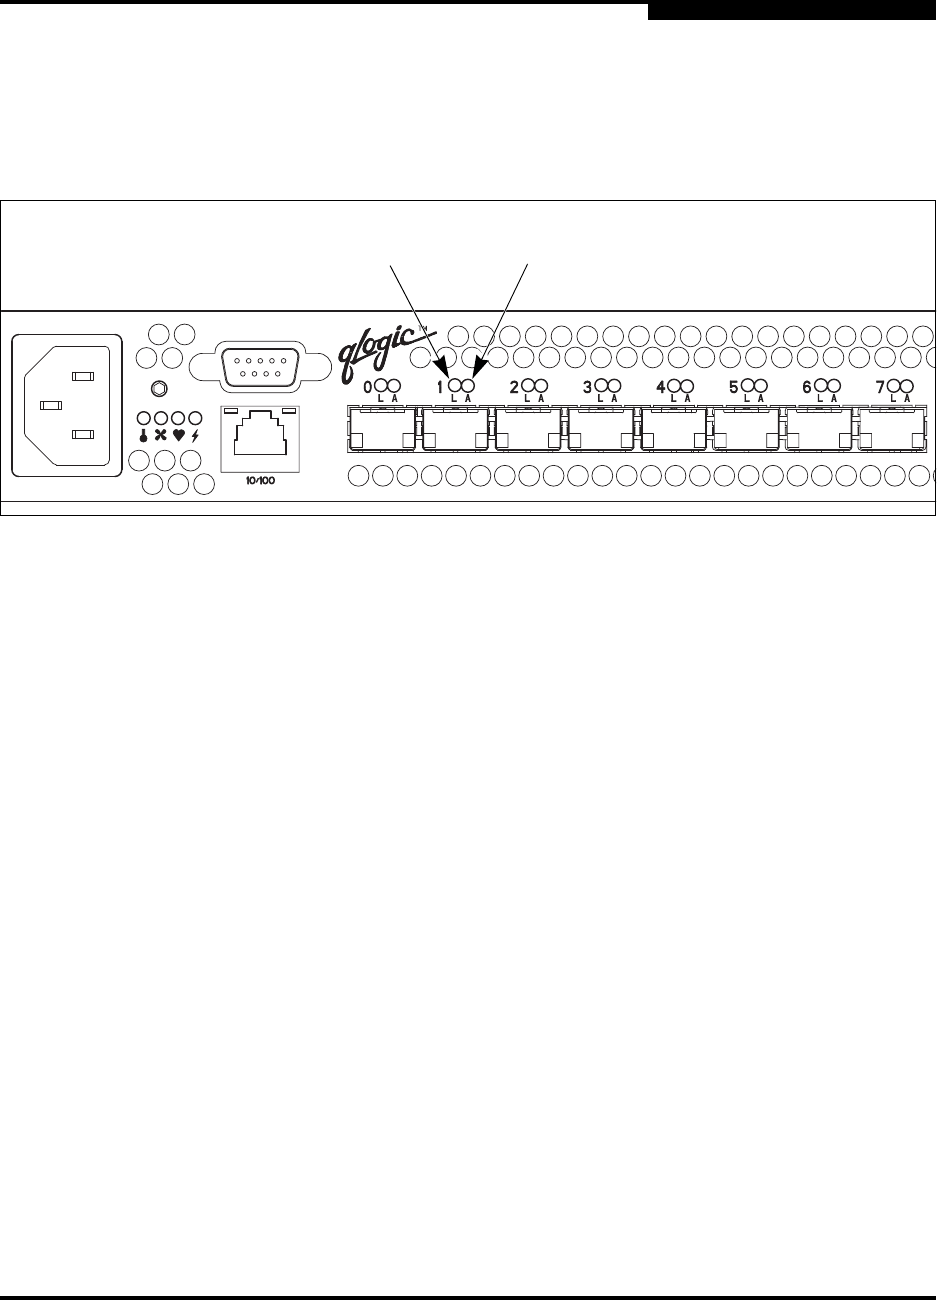
Each Fibre Channel port has its own Logged-In LED and Activity LED as shown in
Figure 2-5.
Figure 2-5. Port LEDs
2.2.1.1
Port Logged-In LED
The Logged-in LED indicates the logged-in or initialization status of the connected
devices. After successful completion of the POST, the switch extinguishes all
Logged-In LEDs. Following a successful loop initialization or port login, the switch
illuminates the corresponding logged-in LED. This shows that the port is properly
connected and able to communicate with its attached devices. The Logged-In
LED remains illuminated as long as the port is initialized or logged in. If the port
connection is broken or an error occurs that disables the port, the Logged-In LED
will flash. Refer to ”Logged-In LED Indications” on page 5-6 for more information
about the Logged-In LED.
2.2.1.2
Port Activity LED
The Activity LED indicates that data is passing through the port. Each frame that
the port transmits or receives causes this LED to illuminate for 50 milliseconds.
This makes it possible to observe the transmission of a single frame. When
extending credits, the Activity LED for a donor port will reflect the traffic of the
recipient port. Refer to ”Distance” on page 3-4 for more information about
extended credits and donor ports.
Logged-In
LED (Green)
Activity LED
(Green)