
- QLogic Network Router User Manual


2
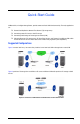
Installation Instructions
This Quick Start Guide describes how to install and configure your new QLogic SANbox
®
router by following these steps:
❑ Step 1. Verify the package contents.
❑ Step 2. Pre-installation checklist
❑ Step 3. Mount the router.
❑ Step 4. Install the SFPs.
❑ Step 5. Apply power to the SANbox 6142 Router.
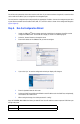
❑ Step 6. Install the SANsurfer
®
Router Manager.
❑ Step 7. Configure SANbox 6142 management port IP address.
❑ Step 8. Run the configuration wizard.
❑ Step 9. Configuring SANbox 6142s for connecting remote SANs
❑ Step 10. Configuring SANbox 6142s for connecting FC/iSCSI initiators to FC/iSCSI targets
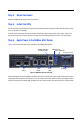
Step 1. Verify the Package Contents
The QLogic SANbox 6142 Router is shipped with the following items:
❑ SANbox 6142 Router (1)
❑ Small Form Factor Pluggable (SFP) transceivers (2)
❑ AC power cord (1), CD (1), and Serial adapter (1)
Optional equipment:
❑ Shelf for Rack Mount
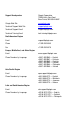
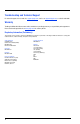
Step 2. Pre-installation Checklist
During the initial configuration process, the user will be requested to input the following parameters. Please write down
the IP addresses in the space provided.
Parameter Value
Symbolic Name of this SANbox 6142
IP address (if not using DHCP) for the management
port in the SANbox 6142
IP address, subnet mask & gateway (if applicable)
for the
GE 1 (iSCSI port 1)
IP address of the iSNS server for iSCSI Port 1
(if iSNS will be enabled)
IP address, subnet mask & gateway (if applicable)
for the GE 2 (iSCSI port 2)
IP address of the iSNS server for iSCSI port 2
(if iSNS will be enabled)