Quick Internet Installation Guides Remote Monitoring Guide MYQ-SEE DDNS Setup Guide iPhone Access Setup Guide Android Access Setup Guide Blackberry Access Setup Guide E-mail Notification Setup Guide QT4 SERIES DVRS ~1~
TABLE OF CONTENTS REMOTE MONITORING GUIDE ………………………………3 MYQ-SEE DDNS SETUP GUIDE …………………………….14 IPHONE ACCESS SETUP GUIDE …………………………...18 ANDROID ACCESS SETUP GUIDE ………………………….23 BLACKBERRY ACCESS SETUP GUIDE ……………………28 EMAIL NOTIFICATION SETUP GUIDE ………………………33 CONTACT INFORMATION …………………………………….
REMOTE MONITORING GUIDE FOR QT4 SERIES DVRS Accessing the DVR from a computer attached to the same router: If you are only going to access the DVR from a computer that is attached to the same router as the DVR you only need to setup the information in the NETWORK settings using either the DHCP option or assigning a static IP following the instructions below. Since you are just going from one location to another on the same network port forwarding and knowing the public IP address are not necessary.
Fig 3 DHCP Static IP: You will need to setup the network settings on the DVR to match the settings of the router that you attach the DVR to. To get the router settings you would go to the run option on a computer attached to the same router as the DVR and type cmd and hit OK to bring up a command prompt (Fig 4), then type ipconfig at the prompt (RED arrow on Fig 4) to access the router settings.
Fig 5 Static IP For the DVRs IP address you would enter the same first 3 sets of numbers as the gateway and select a fourth set of numbers that is different then any other device attached to the same router. If the IP address of your computer in the ipconfig (BLUE arrow in Fig 4) was a single or two digit number you should be ok with any three digit number, if the computer IP address ends with a number in the 100s then you should go with a 200 number (Blue arrow in Fig 5).
Fig 6 PPPoE DDNS: You can access the DVR through a static or dynamic IP address; however a dynamic address can change from time to time. How often depends on your service provider. When it changes you need to go to a website such as www.myipaddress.com from a computer attached to the same router as the DVR to find out what the new IP address is. There are two solutions to this problem.
Fig 7 DDNS PORT FORWARDING To access the DVR from a remote computer you need to forward ports 80 and 6036 from the router the DVR is attached to, to the IP address of the DVR. 1. Connect your DVR to the Router and power on DVR 2. Configure your DVR and Set up port forwarding on your router a. Go to www.portforward.com/qsee b.
c. Select the make and model of your router from the list d. Click on the ‘Click here to skip this advertisement…’ link in the upper right corner of the screen. Notice: When you go to the www.portforward.com website you will see an ad for a software program that will setup port forwarding for you. You do not need to buy this software. Above the ad there is a link to skip the ad, if you click on the link it will take you to the instructions which are free.
f. Verify the ports are open and traffic is allowed a. Go to www.canyouseeme.org b. Type the port number that your DVR requires in the box.(See picture) The default ports are 80 and 6036. c. Verify that the port(s) is open. i. If the port is open, you will see the following message:”Success.
ii. Go to the section below: To access the DVR through Internet Explorer iii. Otherwise, if the ports are not open, you will get the following message: “Error: I could not see your service on 64.206.234.34 on port (80) - Reason: Connection refused”. If you get this error, call your Internet Service Provider (ISP) and ask them to unblock those ports for you. iv. After your ISP unblocks those ports for you, repeat steps i and ii.
To access the DVR through Internet Explorer: once you have setup the network settings on the DVR to match the settings of your router and forwarded the ports needed by the DVR (for remote access over the internet), you need to modify your browser controls. You need to allow Pop-ups. To do so go to the Internet Explorer tool bar and select the "tools" option (RED box in Pic 1), then select the "Pop up Blocker" option and select "Turn Off Pop-up Blocker” (BLUE arrows in Pic 1).
Click on Custom Level On “Reset to” pull down menu, select “LOW” then click on “RESET” button. Click ‘Yes’ when asked: ‘Are you sure you want to change the setting for this zone?’ Click OK. Click Apply. Click OK. Close Internet Explorer.
To connect to the DVR from the remote computer you would then open an Internet Explorer browser window and enter the internet IP of your router that you got by going to www.myipaddress.com (you have to do this from a PC that connect to same Router as your DVR). Notice: If you cannot use HTTP port 80 or 6036 because the port is being used by another program, or it is being blocked by your service provider, you can use another port in the same range.
MYQ-SEE DDNS SETUP GUIDE FOR QT4 SERIES DVRS NOTE: Before you setup DDNS you must first set up Port Forwarding as directed in the PORT FORWARDING section of the Remote Access Quick Start Guide. Once you have enabled Port Forwarding, you can configure your DDNS information by following these steps: a. Using a computer that is connected to the same network as your Q-See DVR, use your IE Browser to go to http://myqsee.com. b. Click on the New User? Link at the bottom of the page (http://myq-see.com/reg.asp).
d. The next screen will ask you to create a domain name. Domain names must start with an (a-z) or (0-9) and cannot contain a hyphen. Once you choose your domain name, click on the [Request Domain] button. This will generate a confirmation screen which tells you if your Domain name is available and list an IP address (Fig 2). Verify that this is your current IP Address by going to www.myipaddress.com and checking that it is the same address listed in your confirmation screen (Fig 2).
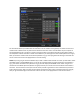
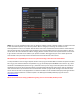
e. Once you have completed steps a-d, go to the Main Menu and select the Setup icon (Red box in Fig 3), then select the Network icon (Red box in Fig 4), this will display the NETWORK screen shown in Fig 5. Fig 3 Main Menu f. Fig 4 Setup Put a checkmark in the DDNS option (Red Box in Fig 5), then select the MYQ-SEE option from the drop down box, and enter the account information you setup on the myq-see.com site into the boxes under the drop down box (see Fig 6).
g. After you enter the information click on the Test button (Green box in Fig 6) and wait until you see the OK message in the bottom left hand corner of the screen. h. Click the [APPLY] button and then the [EXIT] button at the bottom of the NETWORK screen and your DDNS setup is complete. Fig 6 myq-see DDNS Server: Select MYQ-SEE from the drop down menu. Username: The email address you entered on the myq-see site. Password: Enter the password you setup on the myq-see site.
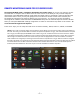
IPHONE ACCESS SETUP GUIDE FOR QT4 SERIES DVRS 1. Installing through iphone/iPad. Step 1. Open App Store function of iphone Step 2. Select “search” function to search for “SuperCam” Step 3: Click SuperCam, enter into “introduce” interface and then click “FREE”, it will change into “INSTALL” Step 4: Input iTunes Store password and then click “OK”, the software will be installed automatically.
2. Installing through PC.
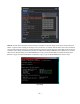
Step 6: Checkmark “synchronously apply program” and “SuperCam”, and then click “apply” button Operation Instructions for iphone/iPad 1. Login interface Enter server’s IP address (or domain name), user name and password Click “Remember server” to save the setting; clicking button can quickly input saved server address, user name and password. 2. Main Interface NOTE: If you click on the Help icon you will bring up a help menu with a list of the functions of the different buttons and how to use them.
Symbol Group H-Reserve Current viewing channel Symbol Channel status Switch channels PTZ, click to switch to Fig 2 interface Snap picture Record Close the video of the current channel Switch to the single image Switch to four images Move the PTZ Up Rotate the PTZ Down Move the PTZ to the Left Move the PTZ to the Right Stop rotating the PTZ Zoom In/Focus In/Iris Add Live audio Zoom Out/Focus Out/Iris Sub Preset Select the preset point Set the cruise line Speed Rotate speed of the PTZ
5. Server list Interface 6. Configuration interface Main parameters for mobile phone video configuration: Record file clip size: Single video size. When the video size is greater than setup value, change to another video file size setting.
ANDROID ACCESS SETUP GUIDE FOR QT4 SERIES DVRS Software Installation Step 1: run Google Market program Step 2: search for ”SuperCam” Step 3: press “Install” button Step 4: click “OK” button Step 5: user can view the download and install process in notifications; finished download, the software will install automatically.
Login Enter into server’s IP address (or domain name), user’s ID and password. Click “Remember server” to save the setting; click button can quick input saved server address, user name and password.
Live view Fig 1 Mark 1 Current viewing channel Switch channels Snap talk Full screen Move PTZ up Move PTZ left Stop rotates the PTZ Zoom Out/Focus Out/Iris Sub Set the cruise line Group Mark 2 Fig 2 Channel status PTZ, click to switch to Fig 2 interface record Live audio Return Move PTZ down Move PTZ right Zoom In/Focus In/Iris Add Preset Select the preset point Image view Previous Zoom out next delete Zoom in Return to main menu ~ 25 ~
Record playback Fig 3 Fig 4 Click the record file (Fig 3) to playback (Fig 4) Play/pause Full screen stop Return to record file interface (Fig 3) Server list Add a server to list Delete a server from list Modify a server on list Return to main menu ~ 26 ~
Config interface Alarm setting Storage setting Path Reserved disk space Video clip size Remove all recorder files before Tick off Sound Alarm,whenVideo Loss/Sensor/Motion happen, trigger sound alarm; Tick off Vibrate Alarm, when Video Loss/Sensor/Motion happen,trigger vibrate alarm User can setup the relevant parameters of mobile video. This function can be valid only insert SD card. Save path for mobile video files, the default catalog is /SDCard/. Click button to change path.
BLACKBERRY ACCESS SETUP GUIDE FOR QT4 SERIES DVRS 1. You need to setup the DVR for remote access, please refer to the Remote Access Guide. 2. Open the browser of BlackBerry phone and enter public IP address of router to access DVR 3. Click “SuperCam” to connect to software 4. Click “Download” button on the popup interface and the download progress will be shown. 5. Once finished downloading, the software will be installed automatically.
If the software fails to download, please check the following: 1. Verify that the network of mobile phone is working correctly. 2. Verify that you can connect to the DVR from a remote computer. 3. Modify the Browser Configuration. 1) Enter into Menu->Option->Browser Configuration; set to the following figuration: 2) Enter into Menu->Option->Cache Operations, clear up browser cache. If the SuperCam software is used in mobile phone with touch screen, there will be a compatibility problem.
Enter IP address to access DVR (or domain name), user’s ID and password. Click “Remember server” to save the setting; click button can quick input saved server address, user name and password. 2. Main interface Image Settings Help image view software settings Software help center Log Live Logoff Record log live view logoff and return to login interface 3.
Mark 1 Preset Current viewing channel Mark 2 Channel status Switch channels PTZ, click to switch to Fig 2 interface Snap picture Full screen Background alarm Stop rotating the PTZ Move the PTZ up Move the PTZ down Zoom In/Focus In/Iris open Zoom Out/Focus Out/Iris close Select the preset point Group Set the cruise line 3.
4. Software configuration Alarm type: Setup the type of background alarm (Video Loss/Sensor/Motion) Alarm output type: Setup prompt type of background alarm(sound alarm/ vibrate alarm) 5. Information view Device: Device Name: name of the current device.
EMAIL NOTIFICATION SETUP GUIDE FOR QT4 SERIES DVRS Enter into Main Menu and select Setup (Red box in Pic 1)then select network configuration (Red box in Pic 2)email; refer to Pic 3: Pic 1 Pic 2 Pic 3 network configuration-email SMTP Server/Port: the name and port number of SMTP server.
If you have questions: Contact Us: Mailing Address: DPS Inc. 8015 E. Crystal Dr Anaheim, CA 92807 Customer Service: Phone: 877-998-3440 x 538 Email: cs@dpsi-usa.com Live Chat Link on our website Website: http://www.q-see.com Fax: 714-998-3509 Tech Support: Phone: 877-998-3440 x 539 Email: ts@dpsi-usa.