Error! Use the Home tab to apply 标题 1 to the text that you want to appear here. Error! Use the Home tab to apply 标题 1 to the text that you want to appear here. SuperDVR & H.264 Series Cards User Manual CONTENTS 1.1 Summarization............................................................................................... 5 1.2 System Requirements ................................................................................... 7 1.2.1 QSDT4PCRC/QSDT4PCRP Card System Requirements .......................
SuperDVR & H.264 Series Cards User Manual Error! Use the Home tab to apply 标题 1 to the text that you want to appear here. Error! Use the Home tab to apply 标题 1 to the text that you want to appear here. 4.8.3 Delete User ................................................................................................................. 44 5.1 P.T.Z Control …………………………………………………………………… Error! Bookmark not defined. 6.1 Record Search.................................................................................
Error! Use the Home tab to apply 标题 1 to the text that you want to appear here. Error! Use the Home tab to apply 标题 1 to the text that you want to appear here. SuperDVR & H.264 Series Cards User Manual Appendix 2.3.4 Why can’t I see the images?......................................................................... 92 Appendix 2.3.5 What should I do if the Internet speed is quite slow?..................................... 93 Appendix 2.3.6 Why can’t I start Webcam server or RPB server? ..................
SuperDVR & H.264 Series Cards User Manual Error! Use the Home tab to apply 标题 1 to the text that you want to appear here. Error! Use the Home tab to apply 标题 1 to the text that you want to appear here. 1 Introduction 1.1 Summarization Thank you for choosing our digital video capture cards. 4 Channel, 8 Channel and 16 Channel cards adopt H.264 compression format, and enable a maximum of 16 channels real-time surveillance in CIF resolution.
Error! Use the Home tab to apply 标题 1 to the text that you want to appear here. Error! Use the Home tab to apply 标题 1 to the text that you want to appear here. SuperDVR & H.264 Series Cards User Manual space is less then the minimum storage and recycling record mode is not enabled, recording will automatically stop. • P.T.Z control function Supports a number of protocols. Users can control multiple speed domes and integrative cameras, including pan, tilt, zoom, focus and iris adjustment for P.T.
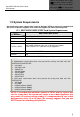
Error! Use the Home tab to apply 标题 1 to the text that you want to appear here. Error! Use the Home tab to apply 标题 1 to the text that you want to appear here. SuperDVR & H.264 Series Cards User Manual 1.2 System Requirements Our H.264 series cards support video cards on Windows VISTA as long as the computer that the card is installed in supports Vista, and Vista supports the video card being used. 1.2.
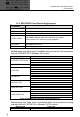
Error! Use the Home tab to apply 标题 1 to the text that you want to appear here. Error! Use the Home tab to apply 标题 1 to the text that you want to appear here. SuperDVR & H.264 Series Cards User Manual 1.2.2 QSDT8PCRP Card System Requirements Card QSDT8PCRP PC Module CPU Intel P4 processor 2.0G minimum HDD 200GB minimum free space RAM VIDEO CARDS 512M minimum Supports MOST* AGP and PCI-E Video Cards with 64MB of RAM or more with full Direct Draw support.
Error! Use the Home tab to apply 标题 1 to the text that you want to appear here. Error! Use the Home tab to apply 标题 1 to the text that you want to appear here. SuperDVR & H.264 Series Cards User Manual Motherboard Video card ATI HD2400 ATI X300 ATI HD2400 GA-965P-S3 ATI X300 ATI HD2400 ASUS P5L-1394 ATI X300 ATI HD2400 ASUS P5GD1-VM ATI X300 ATI X700 Table1-4 Motherboards and Video Cards Support VISTA ASUS P5LD2-X 1.2.
Error! Use the Home tab to apply 标题 1 to the text that you want to appear here. Error! Use the Home tab to apply 标题 1 to the text that you want to appear here. SuperDVR & H.
Error! Use the Home tab to apply 标题 1 to the text that you want to appear here. Error! Use the Home tab to apply 标题 1 to the text that you want to appear here. SuperDVR & H.264 Series Cards User Manual 2 Hardware Installation 2.1 Video Capture Card Hardware 2.1.
Error! Use the Home tab to apply 标题 1 to the text that you want to appear here. Error! Use the Home tab to apply 标题 1 to the text that you want to appear here. SuperDVR & H.264 Series Cards User Manual 2.1.
SuperDVR & H.264 Series Cards User Manual Error! Use the Home tab to apply 标题 1 to the text that you want to appear here. Error! Use the Home tab to apply 标题 1 to the text that you want to appear here.
Error! Use the Home tab to apply 标题 1 to the text that you want to appear here. Error! Use the Home tab to apply 标题 1 to the text that you want to appear here. SuperDVR & H.264 Series Cards User Manual 2.1.
Error! Use the Home tab to apply 标题 1 to the text that you want to appear here. Error! Use the Home tab to apply 标题 1 to the text that you want to appear here. SuperDVR & H.264 Series Cards User Manual When there are multiple QSDT8PCRP cards connected together, please connect the line as in the following figure: Figure2-9 Multi-Card Connection 2.1.
Error! Use the Home tab to apply 标题 1 to the text that you want to appear here. Error! Use the Home tab to apply 标题 1 to the text that you want to appear here. SuperDVR & H.
Error! Use the Home tab to apply 标题 1 to the text that you want to appear here. Error! Use the Home tab to apply 标题 1 to the text that you want to appear here. SuperDVR & H.264 Series Cards User Manual 2.1.5 Alarm Board Hardware Figure2-13 Alarm Board Figure2-14 Pins Definition of Alarm Board Connect J2 to PC serial port and you can use alarm board on SuperDVR system. 2.1.6 Connect Audio Signal For QSDT4PCRP, connect the audio input device to the microphone connector on the motherboard.
Error! Use the Home tab to apply 标题 1 to the text that you want to appear here. Error! Use the Home tab to apply 标题 1 to the text that you want to appear here. SuperDVR & H.264 Series Cards User Manual NOTICE: If you get the error message “Can’t find card” when running the SuperDVR software, try restarting the computer. 2.2 Install Video Capture Card Driver STEP1: Run Setup.exe, and the installation interface appears as shown below: Figure2-15 H.
Error! Use the Home tab to apply 标题 1 to the text that you want to appear here. Error! Use the Home tab to apply 标题 1 to the text that you want to appear here. SuperDVR & H.264 Series Cards User Manual Figure2-17 Select Video Format STEP3: Install driver first.
Error! Use the Home tab to apply 标题 1 to the text that you want to appear here. Error! Use the Home tab to apply 标题 1 to the text that you want to appear here. SuperDVR & H.264 Series Cards User Manual STEP5: Select a folder or use the default SuperDVR, and click ‘Next’. Figure2-20 Selecting program folder STEP6: Click ‘Next’. Figure2-21 Driver and Application Installation Finished STEP7: Click ‘Finish’. STEP8: After all the processes are finished, it will create a shortcut on the desktop.
SuperDVR & H.264 Series Cards User Manual Error! Use the Home tab to apply 标题 1 to the text that you want to appear here. Error! Use the Home tab to apply 标题 1 to the text that you want to appear here. installing the driver software on Microsoft VISTA systems are the same as on Microsoft XP systems. Figure2-23 Installing the Software on VISTA In cases where users cannot run the SuperDVR program, restart the computer. You also need to disable the new user access control function in Vista.
Error! Use the Home tab to apply 标题 1 to the text that you want to appear here. Error! Use the Home tab to apply 标题 1 to the text that you want to appear here. SuperDVR & H.264 Series Cards User Manual 3 Main Display Interface Run the SuperDVR program and the main display appears as shown below: Figure3-1 SuperDVR Main Display Interface 3.1 Display Control Panel 3.1.
Error! Use the Home tab to apply 标题 1 to the text that you want to appear here. Error! Use the Home tab to apply 标题 1 to the text that you want to appear here. SuperDVR & H.264 Series Cards User Manual 3.1.4 Auto Dwell Display Mode If users want to see all the channels in sequence, then click Auto Dwell display mode. to enter 3.1.5 Capture If users want to capture a picture from the screen they can click , the system will save 32 pictures to the default folder on the disk, c:\ path. 3.1.
Error! Use the Home tab to apply 标题 1 to the text that you want to appear here. Error! Use the Home tab to apply 标题 1 to the text that you want to appear here. SuperDVR & H.264 Series Cards User Manual 3.3 Record 3.3.
SuperDVR & H.264 Series Cards User Manual Error! Use the Home tab to apply 标题 1 to the text that you want to appear here. Error! Use the Home tab to apply 标题 1 to the text that you want to appear here. 4. Manual Recording Frame Rate Select the recording frame rate for manual record mode. 5. Schedule Record This option allows you to record on a set schedule. 6. Schedule Record Frame Rate Select Schedule Recording frame rate. 7.
Error! Use the Home tab to apply 标题 1 to the text that you want to appear here. Error! Use the Home tab to apply 标题 1 to the text that you want to appear here. • Red light: Sensor Alarm Record State • Blue light: Video Loss State When the indicator light color turns into red an alarm output. SuperDVR & H.264 Series Cards User Manual in row two, it means there is 3.3.4 Manual Record Mode Manual Record mode is the most commonly used recording mode.
Error! Use the Home tab to apply 标题 1 to the text that you want to appear here. Error! Use the Home tab to apply 标题 1 to the text that you want to appear here. SuperDVR & H.264 Series Cards User Manual 3.3.7 Schedule Recording Users can set working schedule for all of the recording modes in ‘Schedule in record status panel shows the Configuration’. The dark green light corresponding channel is in Schedule Record mode.
Error! Use the Home tab to apply 标题 1 to the text that you want to appear here. Error! Use the Home tab to apply 标题 1 to the text that you want to appear here. SuperDVR & H.264 Series Cards User Manual 4 Click System Setup to enter the main setup interface. Figure4-1 Basic Configuration The definitions of the buttons in Figure4-1 are shown below: Basic Configuration Schedule configuration Video configuration Motion Detection Configuration Alarm Configuration P.T.
SuperDVR & H.264 Series Cards User Manual Error! Use the Home tab to apply 标题 1 to the text that you want to appear here. Error! Use the Home tab to apply 标题 1 to the text that you want to appear here. Figure4-2 Caption and General Configuration 1. Dwell Interval. If users enable Auto Dwell function on the main interface page, users can set the dwell time, in seconds, of a screen here. 2. Caption There are four options, None, ID, Name, and ID/Name for users to select for all the channels.
Error! Use the Home tab to apply 标题 1 to the text that you want to appear here. Error! Use the Home tab to apply 标题 1 to the text that you want to appear here. SuperDVR & H.264 Series Cards User Manual In the following area in the basic configuration page, users can input the computer user name and password in the relative boxes. Then when restarting the computer system, it will give access to the system with the user name and password that was put in the boxes.
Error! Use the Home tab to apply 标题 1 to the text that you want to appear here. Error! Use the Home tab to apply 标题 1 to the text that you want to appear here. SuperDVR & H.264 Series Cards User Manual Figure4-5 Video Configuration Definitions of the setup items: 1. Contrast Set image color contrast. 2. Brightness Set image brightness. 3. Hue Set image hue. 4. Saturation Set image Saturation 5. Default Load defaults, i.e. reset the value of the first four items. The range of values is from 0—255. 4.
Error! Use the Home tab to apply 标题 1 to the text that you want to appear here. Error! Use the Home tab to apply 标题 1 to the text that you want to appear here. SuperDVR & H.264 Series Cards User Manual Figure4-6 Motion Detection Configuration Definition of the setup items: 1. Sensitivity Users can set motion detection sensitivity here. 2. Speed Motion detection speed 3. Block Number Set grid’s number. 4. Defaults Reset to default settings. 5.
SuperDVR & H.264 Series Cards User Manual Error! Use the Home tab to apply 标题 1 to the text that you want to appear here. Error! Use the Home tab to apply 标题 1 to the text that you want to appear here. 4.4 Schedule Configuration Click to enter the Schedule Configuration page as shown below: Figure4-7 Schedule Configuration Our H.264 series cards have powerful schedule configuration options. Every channel has three kinds of recording modes, i.e.
Error! Use the Home tab to apply 标题 1 to the text that you want to appear here. Error! Use the Home tab to apply 标题 1 to the text that you want to appear here. SuperDVR & H.264 Series Cards User Manual Figure4-8 Edit Schedule 4.5 Motion Detection Alarm Configuration 4.5.1 Alarm Triggering Conditions Configuration The system can receive alarms from both local place and network. Local Alarm Record Triggering Configuration Figure4-9 Local Alarm Triggering Configuration Explanation of options: 1.
SuperDVR & H.264 Series Cards User Manual Error! Use the Home tab to apply 标题 1 to the text that you want to appear here. Error! Use the Home tab to apply 标题 1 to the text that you want to appear here. 4.5.2 Alarm Record Figure4-10 Alarm Trigger Method Configuration Every sensor can trigger multiple channels to record. For example, if users select CAM1, CAM4 and CAM5 for Sensor2, then once the sensor is activated, CAM1, CAM4 and CAM5 will begin to record.
Error! Use the Home tab to apply 标题 1 to the text that you want to appear here. Error! Use the Home tab to apply 标题 1 to the text that you want to appear here. SuperDVR & H.264 Series Cards User Manual HDD space shortage alarm. 1. Video Loss Users can select alarm output for this option. For example, users select alarm_out1 and alarm_out3 for video loss.
Error! Use the Home tab to apply 标题 1 to the text that you want to appear here. Error! Use the Home tab to apply 标题 1 to the text that you want to appear here. SuperDVR & H.264 Series Cards User Manual Figure4-12 Auto Mail Setup Interface In this area, users can set receiver and sender’s E-mail SMTP server and address. Note: the address of receiver and sender can be the same.
Error! Use the Home tab to apply 标题 1 to the text that you want to appear here. Error! Use the Home tab to apply 标题 1 to the text that you want to appear here. SuperDVR & H.264 Series Cards User Manual Figure4-14 Attachment Setup NOTICE: For every alarm event, only one picture will be sent. 4.6 E-map Configuration E-map is used to show full geographic range covered by the whole monitoring system in the form of map.
Error! Use the Home tab to apply 标题 1 to the text that you want to appear here. Error! Use the Home tab to apply 标题 1 to the text that you want to appear here. SuperDVR & H.264 Series Cards User Manual Figure4-15 E-Map Edit Drag the icon of a camera to the corresponding position on the map, a maximum of 32 cameras can be set simultaneously, Click ‘change icon’ of camera by right key to change icon and click ‘Delete’ to cancel camera.
Error! Use the Home tab to apply 标题 1 to the text that you want to appear here. Error! Use the Home tab to apply 标题 1 to the text that you want to appear here. SuperDVR & H.264 Series Cards User Manual Figure4-16 View Cameras When a channel alarm is triggered, the camera icon will flash a yellow alarm signal. Select ‘Auto Show’, in case of an accidental alarm, an alarming screen will pop out automatically and you can know about the alarming position immediately.
Error! Use the Home tab to apply 标题 1 to the text that you want to appear here. Error! Use the Home tab to apply 标题 1 to the text that you want to appear here. SuperDVR & H.264 Series Cards User Manual 4.7 P.T.Z Control Configuration Click and enter PTZ Configuration: Figure4-17 PTZ Configuration Panel 4.7.1 Protocol Setup Users can select different protocols, serial port number for P.T.Z devices. The settings you enter here must match the setting on the PTZ camera. Figure4-18 P.T.Z Protocol Setup 1.
Error! Use the Home tab to apply 标题 1 to the text that you want to appear here. Error! Use the Home tab to apply 标题 1 to the text that you want to appear here. SuperDVR & H.264 Series Cards User Manual DSCP, DH-SD, Lilian, Minking, Neon, PelcoD, PelcoP, Star, VIDO, VISCA 3. Address Communication address of P.T.Z device (ID number) 4.7.2 Serial Ports Setup Users should first enable the P.T.Z control function of a certain camera and select a port number in P.T.
Error! Use the Home tab to apply 标题 1 to the text that you want to appear here. Error! Use the Home tab to apply 标题 1 to the text that you want to appear here. SuperDVR & H.264 Series Cards User Manual 4.8 Users Configuration Click to access the User’s Configuration area: Figure4-20 User configuration After installing the SuperDVR program, it will automatically create an administrator user with the user name SYSTEM with no password.
Error! Use the Home tab to apply 标题 1 to the text that you want to appear here. Error! Use the Home tab to apply 标题 1 to the text that you want to appear here. SuperDVR & H.264 Series Cards User Manual • Administrator: this user has the right to change all the settings and playback. This user also has the right to assign users power user rights and normal user rights. • Power User: This type of user is authorized by the administrator.
SuperDVR & H.264 Series Cards User Manual Error! Use the Home tab to apply 标题 1 to the text that you want to appear here. Error! Use the Home tab to apply 标题 1 to the text that you want to appear here.
Error! Use the Home tab to apply 标题 1 to the text that you want to appear here. Error! Use the Home tab to apply 标题 1 to the text that you want to appear here. SuperDVR & H.264 Series Cards User Manual 5 P.T.Z Control Click in the SuperDVR main display interface (refer to Figure3-1) to access the P.T.Z control area: Figure5-1 P.T.Z Control Interface Users can control P.T.Z. devices by the function buttons on the right side, shown below: Figure5-2 P.T.Z.
Error! Use the Home tab to apply 标题 1 to the text that you want to appear here. Error! Use the Home tab to apply 标题 1 to the text that you want to appear here. SuperDVR & H.264 Series Cards User Manual camera. NOTICE: After pressing left mouse button on any function button in P.T.Z Control Function Panel (refer to Figure5-2), PTZ camera starts moving, when user releases it, PTZ camera stops moving.
Error! Use the Home tab to apply 标题 1 to the text that you want to appear here. Error! Use the Home tab to apply 标题 1 to the text that you want to appear here. SuperDVR & H.264 Series Cards User Manual Figure5-4 Preset and Group Select Click to set Preset point and change Preset point name. Every Group includes multiple Preset points. If users select preset1, preset2 and preset3 for group1, preset1, preset2 and preset3 will be automatically accessed in sequence after users select group1 for auto scout.
Error! Use the Home tab to apply 标题 1 to the text that you want to appear here. Error! Use the Home tab to apply 标题 1 to the text that you want to appear here. SuperDVR & H.264 Series Cards User Manual 6 Record Search & Playing Back Click in the SuperDVR Main Display Interface (refer to Figure3-1) and access the following areas: Figure6-1 Search and Playback Interface This interface is divided into 4 parts, record search area, record playback area, record play area, and other functions area.
Error! Use the Home tab to apply 标题 1 to the text that you want to appear here. Error! Use the Home tab to apply 标题 1 to the text that you want to appear here. SuperDVR & H.264 Series Cards User Manual 6.1 Record Search Figure6-2 Record Search Area A, B and C marks the areas of the three search methods. • A: Search by date • B: Search in backup file and original file • C: Search by recording mode. This is useful when user wants to look through some important events.
SuperDVR & H.264 Series Cards User Manual Error! Use the Home tab to apply 标题 1 to the text that you want to appear here. Error! Use the Home tab to apply 标题 1 to the text that you want to appear here. Explaination of the button functions: • : Play / Pause • : Stop • : Reverse. This button is valid when playing back by single channel • : Previous Section. This button is valid when playing back by single channel : Next Section.
Error! Use the Home tab to apply 标题 1 to the text that you want to appear here. Error! Use the Home tab to apply 标题 1 to the text that you want to appear here. SuperDVR & H.264 Series Cards User Manual are the definitions of the color bars: • • • • Blue: Manual Record Events Green: Schedule Record Events Yellow: Motion Detection Record Events Red: Sensor Alarm Record Events Click to play selected recorded files. The system offers playback in 1 Ch, 4CH, 9 CH, and 16CH.
SuperDVR & H.264 Series Cards User Manual Error! Use the Home tab to apply 标题 1 to the text that you want to appear here. Error! Use the Home tab to apply 标题 1 to the text that you want to appear here. ‘Third 4 Channels’ , Camera9, Camera10, Camera11, and Camera12 will be quickly be selected simultaneously.
Error! Use the Home tab to apply 标题 1 to the text that you want to appear here. Error! Use the Home tab to apply 标题 1 to the text that you want to appear here. SuperDVR & H.264 Series Cards User Manual Figure6-11 Recorded Files Backup Users can select corresponding cameras and copy the recorded files to another path in this area. This is the file backup function of the system.
Error! Use the Home tab to apply 标题 1 to the text that you want to appear here. Error! Use the Home tab to apply 标题 1 to the text that you want to appear here. SuperDVR & H.264 Series Cards User Manual 6.3.3 Capture Pictures The definitions of the function buttons are shown below: : Capture picture : Print setup : Print captured picture NOTICE: This single channel.
Error! Use the Home tab to apply 标题 1 to the text that you want to appear here. Error! Use the Home tab to apply 标题 1 to the text that you want to appear here. SuperDVR & H.264 Series Cards User Manual Select path and click ‘Save’ to save the picture. User can also print the images that have been captured.
Error! Use the Home tab to apply 标题 1 to the text that you want to appear here. Error! Use the Home tab to apply 标题 1 to the text that you want to appear here. SuperDVR & H.264 Series Cards User Manual 6.3.4 Image Zoom in/out When in single channel playback mode, the zoom control icons will appear. Select and click on the channel, it will zoom out the image. By clicking continuously, the image will be zoomed out continuously. Select and do the some operation to get the opposite effect.
Error! Use the Home tab to apply 标题 1 to the text that you want to appear here. Error! Use the Home tab to apply 标题 1 to the text that you want to appear here. SuperDVR & H.
SuperDVR & H.264 Series Cards User Manual 7 Error! Use the Home tab to apply 标题 1 to the text that you want to appear here. Error! Use the Home tab to apply 标题 1 to the text that you want to appear here. Remote Surveillance & Playback Remote Live Surveillance Surveillance system supports Remote Surveillance through LAN, Internet, and Intranet. Simply enable the Webcam function of the system on a computer which is connected to the Internet, and the computer system will become an Internet Webcam server.
Error! Use the Home tab to apply 标题 1 to the text that you want to appear here. Error! Use the Home tab to apply 标题 1 to the text that you want to appear here. SuperDVR & H.264 Series Cards User Manual higher quality setting. 7.2 Setting up Router for Internet Access To access the dvr card over the internet you would need to forward ports 80, 1159, and 1160 on the router that you have the PC with the DVR card installed attached to, to the IP address of the PC that has the card installed.
SuperDVR & H.264 Series Cards User Manual Error! Use the Home tab to apply 标题 1 to the text that you want to appear here. Error! Use the Home tab to apply 标题 1 to the text that you want to appear here. Fig 7.2 ipconfig window 7.2.1 Port Forwarding To forward the ports you would need to access the router program by opening an internet browser and typing the default gateway address into the address bar and hitting enter.
Error! Use the Home tab to apply 标题 1 to the text that you want to appear here. Error! Use the Home tab to apply 标题 1 to the text that you want to appear here. SuperDVR & H.264 Series Cards User Manual Fig 7.4 Port Forward Default Guide link and it will give you instructions for your router. 7.2.
SuperDVR & H.264 Series Cards User Manual Error! Use the Home tab to apply 标题 1 to the text that you want to appear here. Error! Use the Home tab to apply 标题 1 to the text that you want to appear here. 7.2.3 Dynamic Domain Name Services You can access the DVR card through Internet Explorer from a static or dynamic IP address; however a dynamic address can change from time to time. How often depends on your service provider. When it changes you need to go to back to a website such as www.myipaddress.
Error! Use the Home tab to apply 标题 1 to the text that you want to appear here. Error! Use the Home tab to apply 标题 1 to the text that you want to appear here. SuperDVR & H.264 Series Cards User Manual 7.6 Internet Explorer Tool Bar Fig 7.7 Internet Options Fig 7.8 Security Settings NOTICE: If you still cannot connect after enabling ActiveX, on many systems you many have another option.
SuperDVR & H.264 Series Cards User Manual Error! Use the Home tab to apply 标题 1 to the text that you want to appear here. Error! Use the Home tab to apply 标题 1 to the text that you want to appear here. check for signatures on downloaded programs. To connect to the DVR from the remote computer you would then open an Internet Explorer browser window and enter the internet IP of your router that you got by going to www.myipaddress.com. 7.2.
Error! Use the Home tab to apply 标题 1 to the text that you want to appear here. Error! Use the Home tab to apply 标题 1 to the text that you want to appear here. SuperDVR & H.264 Series Cards User Manual Input the IP address of the computer with the card if accessing from LAN, or the public IP address of the router if accessing from the internet, into the Internet Explorer window to reach the window that prompts you to install the ActiveX control, then the following window appears: Fig 7.
Error! Use the Home tab to apply 标题 1 to the text that you want to appear here. Error! Use the Home tab to apply 标题 1 to the text that you want to appear here. SuperDVR & H.264 Series Cards User Manual Fig 7.13 Webcam Main interface Feature Explanations: Icon Description Controls for PTZ Cameras: Move Up. Move Down. Move Left rotate left. Move Right. Stop Rotating. PTZ 'Focus' buttons. Click button 'Focus' farther away. Click button 'Focus' closer button Move camera in PTZ 'Zoom' buttons.
Error! Use the Home tab to apply 标题 1 to the text that you want to appear here. Error! Use the Home tab to apply 标题 1 to the text that you want to appear here. SuperDVR & H.
SuperDVR & H.264 Series Cards User Manual Error! Use the Home tab to apply 标题 1 to the text that you want to appear here. Error! Use the Home tab to apply 标题 1 to the text that you want to appear here. 7.4 Remote playback 7.4.1 Record playback and control button on the Webcam main interface, the remote playback Click interface will appear: Fig 7.14 Remote playback Explaination of the button functions: : Play/ Pause : Stop : Adjust the speed of playing back. Users can ajust play speed as needed.
Error! Use the Home tab to apply 标题 1 to the text that you want to appear here. Error! Use the Home tab to apply 标题 1 to the text that you want to appear here. SuperDVR & H.264 Series Cards User Manual Fig 7.15 Remote backup STEP1: Select the date, channel, then click Search button. It will list all files recorded for the day. STEP2: Click Browse button, set the saving path. STEP3: Select files in the search area.
Error! Use the Home tab to apply 标题 1 to the text that you want to appear here. Error! Use the Home tab to apply 标题 1 to the text that you want to appear here. SuperDVR & H.264 Series Cards User Manual channel configuration window will appear: Fig 7.16 Channel configuration window for 1 channel playback mode Users can select one channel from all the available channels for playing back. , users can playback in four channel mode. Four channel Click configuration window will display as shown below: Fig7.
Error! Use the Home tab to apply 标题 1 to the text that you want to appear here. Error! Use the Home tab to apply 标题 1 to the text that you want to appear here. SuperDVR & H.264 Series Cards User Manual : Manual Record Events : Schedule Record Events : Motion Detection Record Events : Sensor Alarm Record Events The ruler on top of the bar shows the hours of the day. Right-click the ruler, it will be magnified 10 times allowing users to see the time marks more clearly.
Error! Use the Home tab to apply 标题 1 to the text that you want to appear here. Error! Use the Home tab to apply 标题 1 to the text that you want to appear here. SuperDVR & H.264 Series Cards User Manual 7.5.1 Basic Configuration Fig 7.20 Basic setup 1. Caption There are four options: None, ID, Name and ID/Name to select from. ‘None’means no title or name. ‘ID’means camera numbers, i.e.1,2,3 and so on. ‘Name’means camera names,i.e.Cam1, Cam2 and so on.
Error! Use the Home tab to apply 标题 1 to the text that you want to appear here. Error! Use the Home tab to apply 标题 1 to the text that you want to appear here. SuperDVR & H.264 Series Cards User Manual The Alarm setup configuration is show below: Fig 7.22 Alarm triggering configuration Option Explanations: 1. Buzzer Users can select whether to sound the computer buzzer if the alarms have been triggered also select how long the buzzer sounds. 2.
Error! Use the Home tab to apply 标题 1 to the text that you want to appear here. Error! Use the Home tab to apply 标题 1 to the text that you want to appear here. SuperDVR & H.264 Series Cards User Manual Fig 7.23 Camera setup configuration 1. Title Channel name. Users can set the channel name from Cam1, Cam2, Cam3 and Cam4. 2. Camera security Users are divided into two standards: normal user and super admin. By selecting this option, only administrator can see corresponding channels. 3.
Error! Use the Home tab to apply 标题 1 to the text that you want to appear here. Error! Use the Home tab to apply 标题 1 to the text that you want to appear here. SuperDVR & H.264 Series Cards User Manual Fig 7.24 Schedule configuration There are three kinds of recording modes: manual record, schedule record, motion detection/Sensor alarm record. Users can set schedules from Sunday to Monday separately for all of the three recording modes. Sensor alarm recording mode has the highest priority of the options.
Error! Use the Home tab to apply 标题 1 to the text that you want to appear here. Error! Use the Home tab to apply 标题 1 to the text that you want to appear here. SuperDVR & H.264 Series Cards User Manual Enable buzzer on board for alarm 2. Auto mail When alarm is triggered, the system will send an email to users automatically. By clicking selected channel. , users can copy the setting of this channel to any other 7.5.
Error! Use the Home tab to apply 标题 1 to the text that you want to appear here. Error! Use the Home tab to apply 标题 1 to the text that you want to appear here. SuperDVR & H.264 Series Cards User Manual Users can use multiple cameras to record, every camera works separately and recorded files are also saved separately. a. Record quality There are five quality options to select from: lowest, lower, medium, higher and highest.
Error! Use the Home tab to apply 标题 1 to the text that you want to appear here. Error! Use the Home tab to apply 标题 1 to the text that you want to appear here. SuperDVR & H.264 Series Cards User Manual Fig 7.29 Motion configuration Definition of the setup items: 1. Sensitivity Users can set motion detection sensitivity here. 2. Speed Motion detection speed 3. Block number Set grid’s number 4. Select all Select all the areas of the channel as detection area 5.
Error! Use the Home tab to apply 标题 1 to the text that you want to appear here. Error! Use the Home tab to apply 标题 1 to the text that you want to appear here. SuperDVR & H.264 Series Cards User Manual Fig 7.30 Email configuration 1. Mail server setup Fig 7.31 Mail server setup In this area, users can set receiver and sender’s E-mail SMTP server and address. Note: the address of receiver and sender can be the same. Relative Definitions: Smtp server: Sender’s SMTP, such as smtp.yahoo.
Error! Use the Home tab to apply 标题 1 to the text that you want to appear here. Error! Use the Home tab to apply 标题 1 to the text that you want to appear here. SuperDVR & H.264 Series Cards User Manual Function Definitions: Send to: Receiver’s E-mail Address E-Mail from: Sender’s E-mail Address Subject: E-mail Subject Users can select‘Set Mail Internal’check box to set email send time, such as 5 seconds, 10 seconds and so on. 3. Attachment setup Fig 7.
Error! Use the Home tab to apply 标题 1 to the text that you want to appear here. Error! Use the Home tab to apply 标题 1 to the text that you want to appear here. SuperDVR & H.264 Series Cards User Manual 1. Protocol setup Fig 7.35 P.T.Z Protocol setup A. Protocol Communication protocol of P.T.Z device B. Port Users can set serial port number C. Address Communication address of P.T.Z device (ID number) 2. Serial port setup Users should first enable the P.T.
Error! Use the Home tab to apply 标题 1 to the text that you want to appear here. Error! Use the Home tab to apply 标题 1 to the text that you want to appear here. SuperDVR & H.264 Series Cards User Manual Set P.T.Z device Baud rate, default value is 9600, used value must match Baud rate on PTZ control board C.Data bits Default value is 8, used value much match Baud rate on PTZ control board. D.Parity Odd and even parity bit, default Null, used value must match Baud rate on PTZ control board E.
Error! Use the Home tab to apply 标题 1 to the text that you want to appear here. Error! Use the Home tab to apply 标题 1 to the text that you want to appear here. SuperDVR & H.264 Series Cards STEP3: Click on the software name. A dialog box will pop up. STEP4: Click “Yes” to download and install.
SuperDVR & H.264 Series Cards User Manual Error! Use the Home tab to apply 标题 1 to the text that you want to appear here. Error! Use the Home tab to apply 标题 1 to the text that you want to appear here. STEP5: PCam will be opened after installed. STEP6: Input the server’s address, ID, and password respectively in the columns of “Server”, “User”, and “Password”. Then click “Go” to login to the DVR. It will show the picture if accessed successfully. STEP7: Camera 1 is the default display after login.
Error! Use the Home tab to apply 标题 1 to the text that you want to appear here. Error! Use the Home tab to apply 标题 1 to the text that you want to appear here. SuperDVR & H.264 Series Cards User Manual Notice: User name and password here are the same as that used on the PC. The defaults are user name “SYSTEM” with no password. 7.8 By Smart Phone with Symbian Operating System Please use smart phones or PDAs with Symbian version supported by this unit.
SuperDVR & H.264 Series Cards User Manual Error! Use the Home tab to apply 标题 1 to the text that you want to appear here. Error! Use the Home tab to apply 标题 1 to the text that you want to appear here. STEP4: The security window will pop up after downloaded and ask if you want to install the package. Click YES to install. STEP5: A Scam shortcut icon appears on the system menu after finished. STEP6: Run Scam program.
Error! Use the Home tab to apply 标题 1 to the text that you want to appear here. Error! Use the Home tab to apply 标题 1 to the text that you want to appear here. SuperDVR & H.264 Series Cards User Manual STEP7: Click Options--->Settings to enter login interface. STEP8: Input the server’s address, ID and password respectively. Then click OK to login to the DVR. (See 4.1.
SuperDVR & H.264 Series Cards User Manual Error! Use the Home tab to apply 标题 1 to the text that you want to appear here. Error! Use the Home tab to apply 标题 1 to the text that you want to appear here. Frequently Asked Questions STEP9: It will show the camera after accessing successfully. Notice: User name and password here are the same with that used on the PC.
Appendix1 Frequently Asked SuperDVR & H.264 Series Cards Questions User Manual Appendix1 Frequently Asked Questions Appendix 2.1 Installation Appendix 2.1.1 Cannot Install the SuperDVR Driver Possible causes: • H.264 series capture card has not been installed. Before installing driver, users should install capture card hardware in the PCI slot in the computer case before installing the SuperDVR program. • H.264 series capture card has not been installed correctly.
SuperDVR & H.264 Series Cards User Manual Appendix1 Frequently Asked Questions Appendix 2.2.3 How to set recycling record mode on the system Select ‘Recycle’ in basic configuration, refer to Figure4-1. Users can select the percent of used disk space to set up “disk shortage alarm.” You can input percent manually or choose the selectable options such as, 25%, 50%, and 75% to set up. For example, if selecting 50%, an alarm will warn you when your disk space usage reaches 50%.
Appendix1 Frequently Asked Questions SuperDVR & H.264 Series Cards User Manual Appendix 2.3 How to Use Network Function Appendix 2.3.1 How to monitor on the client-side First enable ‘Web cameras service’ in basic configuration (refer to Figure4-1). Input the server Internet address in IE browser on the client-side, and the necessary webcam driver will be downloaded automatically, then users need to install the driver.
SuperDVR & H.264 Series Cards Appendix1 Frequently Asked User Manual Questions Appendix 2.3.5 What should I do if the Internet speed is quite slow? The more channels opened, and the slower the video transmission speed, therefore try to use one channel display mode when the network speed is slow. TIP There may be some surplus channels that have no video input. Switching off the channels will help to improve transmission speed. (Refer to ‘4.1 Basic Configuration’ about switching on/off channels.
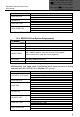
Appendix1 Frequently Asked SuperDVR & H.264 Series Cards Questions 30fps User Manual 640*480 lowest 10.92 Appendix 2.4 Other Questions Appendix 2.4.1 Why doesn’t the computer display work, or why can’t I access Window system? The capture card may not be well installed. Unplug the card and try it again. NOTICE: Please unplug the power plug of the computer before re-installing the card to avoid damaging the motherboard chip set. Appendix 2.4.
SuperDVR & H.264 Series Cards User Manual Appendix1 Frequently Asked Questions Appendix 2.4.5 Why can’t I play back? Windows Media Player has been damaged, or decoder has not been installed properly. It is suggested you reinstall the player program or download a codec pack from K-lite (http://www.free-codecs.com/download/K_lite_codec_pack.htm) or www.divx.com. Computer problem, recorded files have been damaged. It is suggested to fix these files using SuperAVIFix program. Appendix 2.4.
SuperDVR & H.264 Series Cards Appendix2 Quick Start for Using User Manual Appendix 2.4.9 If system time must be changed, please do following preparations first 1. If new time is later than current computer time (for example, change 2006/01/01 0:0:0 (current system time) to 2007/01/01 0:0:0 (target time)), the change can be made directly. 2.
SuperDVR & H.264 Series Cards User Manual Appendix2 Quick Start for Using Appendix 3.2 Troubleshooting Appendix3.2.1 When opening the SuperDVR program, it says ‘ Can’t find card ’. Reboot one more time. If you still have the same problem, click ‘Start Program - SuperDVR - Install’ and then uninstall the program. Reboot the computer. After reboot, go back to ‘Start - Program - SuperDVR - Install’. Now click on ‘Install’ to reinstall driver. Then Reboot.
SuperDVR & H.264 Series Cards Appendix2 Quick Start for Using User Manual unsigned ActiveX controls’ (see section 7.2.4). STEP3: In the IE textbox of the Internet explorer, input the router’s Public IP (see section 7.2.2). STEP4: Select ‘Live Surveillance’ and click ‘OK’ on displayed page. This will download the Webcam program. And then you can download Remote Playback as well. STEP5: On Desktop now you should see ‘Webcam’ and ‘Remote Playback’ icon. STEP6: Open up Webcam, click ‘Key’ symbol icon.
SuperDVR & H.264 Series Cards User Manual Appendix3 Function Tree Appendix3 Function Tree Appendix 4.
SuperDVR & H.264 Series Cards Appendix3 Function Tree User Manual Appendix 4.
SuperDVR & H.264 Series Cards User Manual Appendix3 Function Tree Appendix 4.
SuperDVR & H.264 Series Cards Appendix3 Function Tree User Manual Appendix 4.
SuperDVR & H.264 Series Cards User Manual Appendix3 Function Tree 8 Q-See Product Warranty Thank you for choosing our products. All of our products users have a conditional free warranty repair service for hardware within 12 months starting from purchase date, and a free exchange service within one month (valid for manufacturing defects). Permanent upgrading service is provided for the software.
SuperDVR & H.264 Series Cards Appendix3 Function Tree User Manual Customer Information Card User’s Name Mr./Mrs. Company Name Postal Address Postal code Phone Number E-mail Model Number of Product Serial Number of Product Purchase Date Distributor The material in this document is the intellectual property of our company. No part of this manual may be reproduced, copied, translated, transmitted, or published in any form or by any means without our company’s prior written permission. 1.