
Technical Manual


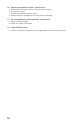

73
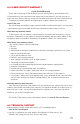
PICTURE A.2-3
PICTURE A.2-4
PICTURE A.2-5
PICTURE A.2-7
PICTURE A.2-6
PICTURE A.2-8
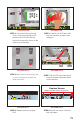
STEP 4
. Line up hard drive mounting
screws with mounting holes at the
bottom of the DVR and slide the
hard drive to move the screws to the
narrow part of the holes.
STEP 5. Carefully turn DVR over. Hold
onto the hard drive to keep it from
sliding out.
STEP 6.
Make sure that the mounting screws
are in the narrow part of the holes and
tighten them firmly.
STEP 7. Flip the DVR right side up and
connect the data and power cables
to the hard drive.
A/V
RATED
HARD
DRIVE
DATA
CABLE
POWER
CABLE
HARD DRIVE
HARD DRIVE
STEP 8. Replace the cover onto the
DVR.
STEP 9. Secure the screws in the rear
and side panels.
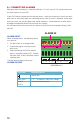
VGA
1
2
3
4
DC 12V
AB
VIDEO IN
AUDIO OUT
AUDIO IN
5
6
7
8
Replace Screws
Number and exact location vary by model
VGA
1
2
3
4
DC 12V
A B
VIDEO IN
AUDIO OUT
AUDIO IN
5
6
7
8
Changed this page.
3/31/14