
Technical Manual


39
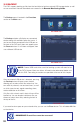
PICTURE 4.1-3
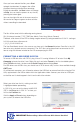
PICTURE 4.1-5
PICTURE 4.1-4
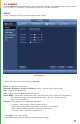
Overlay Tab
This window has controls for on-screen displays
from the camera as well as for masking sensitive
areas.
Cover Area - You can mask on-screen areas for
privacy by clicking the Preview or Monitor button.
•Preview hides areas on the DVR screen.
•Monitor hides areas on mobile devices or
computers that are logged in.
•Uptofourareaseachcanbeset.
•ClickingthePreview or Monitor box will reveal
four buttons, to allow you to turn the boxes on
or off.
•Themaskedareascanbemovedandresizedby
clicking the Set button.
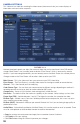
Channel - This is the channel you’ll be modifying.
Time Display - This is the on-screen clock that
appears in each camera’s vide.
Channel Display - This shows the camera’s
channel.
•ClickSet to move the time or channel display
with the mouse to another part of the screen.
•DeselecttheMonitorboxtohideeitherdisplay.
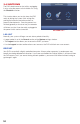
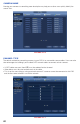
Snapshot Tab
Snapshots are still images captured either by
clicking on the Snapshot button in the Shortcut
Video Controls at the top of each screen, or
when triggered by an event or schedule.
Manual Snap - You may take 1-5 snapshots each
time the Snapshot button is pressed.
•Thelowerportionofthismenuisforsnapshots
taken on a schedule or when triggered.
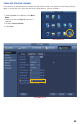
Channel - This is the one taking the snapshots.
Mode -
Timing - Snapshots will only be taken during
the times set up in Record Schedule >
Snapshot
Trigger - Snapshots will only be taken when triggered by an alarm or when motion is detected.
Image Size - Up to the maximum resolution of the camera.
Quality - From 1 to 5 with 5 being the best quality.
Frequency - The number of snapshots (up to 6) taken each time.
•SnapshotscanbesearchedforintheVideo Search window.