
Technical Manual


27
PICTURE 3.1-7
PICTURE 3.1-9
PICTURE 3.1-8
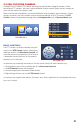
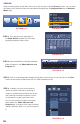
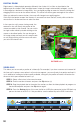
STEP 5. Once you have refined your search, click
on the File Search (Picture 3.1-7) button to
refresh your results.
STEP 6. The DVR will produce a list of recorded
events. The list will show start time and type of
recording.
M = Motion
A = Alarm
R = Regular
•Aboxatthebottomofthelistwillshowthestart
time, end time and file size of a selected video.
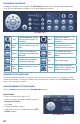
STEP 7. Double-click on a file to begin playback.
You can double click on another file in the list to
switch to that video.
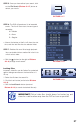
•Clickthe button (on the right of Picture
3.1-9) to begin a new search.
Locking Files
Important video files can be “locked” or protected
against being overwritten on the hard drive as it
fills up.
1. Select the file from the search list
2. Click the Lock button (on the left of Picture
3.1-9).
•ClicktheLock Search button (center of
Picture 3.1-9) to search for locked files only.
IMPORTANT! Critical video files should always be backed up and
stored in a safe location away from the DVR as soon as possible!