Q-See Q25DVR4ES User’s Manual Q25DVR4ES Economy Series User Manual Contact Us: Q-See Products 8015 E. Crystal Dr Anaheim, CA 92807 Website: http://www.q-see.com Customer Service: Phone: 877-998-3440 x 538 Email: cs@dpsi-usa.com Tech Support: Phone: 877-998-3440 x 539 Email: ts@dpsi-usa.
Q-See Q25DVR4ES User’s Manual Table of Contents 1. DVR Features..................................................................................................................... 3 2. 6.1 6.2 6.3 Layout ................................................................................................................................ 3 Front Panel..................................................................................................................... 3 Rear Panel..............................
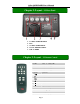
Q-See Q25DVR4ES User’s Manual Chapter 1: DVR Features 4 Channel BNC Camera Input. 1 Channel BNC Video Output. Video Source Option: NTSC / PAL. Motion Detection with Sensitivity and Area Settings. Time Schedule Recording / Motion Triggered Recording. One ATA-100 Hard Disk Interface. USB 2.0 Back up to computer. With Remote Control & Removable Hard Drive Tray. Chapter 2: Layout - 2.1 Front Panel 1. FUNCTION KEYS 2. REMOVABLE HARD DRIVE TRAY 3. SELECTION / DIRECTION KEYS 4.
Q-See Q25DVR4ES User’s Manual Chapter 2: Layout - 2.2 Rear Panel 1. 2. 3. 4. 5. 1 X BNC VIDEO OUTPUT FAN 4 X BNC VIDEO INPUT 12V DC POWER SUPPLY USB 2.0 PORT Chapter 2: Layout - 2.3 Remote Control 01. CH1 Select or enlarge CH1 02. CH2 Select or enlarge CH2 03. CH3 Select or enlarge CH3 04. CH4 Select or enlarge CH4 05. QUAD Quad View 06. Rewind 07. Play recording list 08. Forward 09. Record 10. Pause 11. Stop recording 13. MENU Enter or exit setup menu 14.
Q-See Q25DVR4ES User’s Manual Chapter 3: Installation - 3.1 Installing Hard Drive NOTE: This package comes with a 250GB hard drive. You would follow these instructions if you want or need to install a new hard drive. 1. Slide the HDD tray out of DVR body carefully. 2. Connect the power cord and data cable to hard disk drive carefully. 3. Insert the HDD tray into DVR body. 4. Lock the HDD tray. Make sure the HDD is set as MASTER.
Q-See Q25DVR4ES User’s Manual Chapter 3: Installation - 3.2 Connecting Cameras and TV Monitor There are 4 camera inputs and 1 video output with BNC connectors (Refer to Chapter 2: Layout2.2 Rear Panel). 1. Connect the camera cables from the camera to the 4 Video Inputs on the DVR. 2. Connect the 4 power feeds for the cameras to the power connectors on the cable near the video ports of the DVR, connect the other end to the power supply and plug the power supply into a surge protector. 3.
Q-See Q25DVR4ES User’s Manual Chapter 4: System Boot - 4.2 Recovering Lost Data RECOVER HDD? 04811-101735 (SELECT)YES/(MENU)NO The system will automatically recover lost data. A Power Error can cause data to be lost. Chapter 4: System Boot - 4.3 Restore Recording Feature Power Error Detected Restore Hard Disk (Master) OK Restore REC Mode………… OK If a Power Error occurs during recording process, the system will automatically resume recording after power is restored. Chapter 4: System Boot - 4.
Q-See Q25DVR4ES User’s Manual Chapter 5: DVR Setup - 5.1 Setup Menu MAIN MENU > > CAMERA SELECT RECORD SELECT RESOLUTION RECORD FRAME RECORD QUALITY SCHEDULE SET MISCELLANEOUS MENU HARD DISK SET MOTION SET FACTORY RESET 1234 1234 EACH 25 HIGH , PRESS (UP DOWN), ENTER (SELECT) Press [ Menu] to enter the setup menu; Use [ Up] and [ Down] to select item; Press [ Select] to modify settings and [ Menu] to exit.
Q-See Q25DVR4ES User’s Manual Chapter 5: DVR Setup - 5.2 Camera Select The DVR system can display 4 camera feeds in one picture (Quad Mode). Users can configure which camera is displayed. Press [ Select] to modify setting and press [ CH1], [ CH2], [ CH3],[ CH4] to set each channel separately. If the channel is disabled, the system will display “OFF” on the monitor. Chapter 5: DVR Setup - 5.3 Record Select Configure which channels are allowed to record.
Q-See Q25DVR4ES User’s Manual [QUAD] button and hold for three (3) seconds to make each video channel enlarge to full screen. The full screen will be displayed for three (3) seconds, including Quad view. The Loop Function will continue until any button is pushed. For example, [Stop] will stop the Loop function and may stop the recording depending on Record Schedule Settings. 2.
Q-See Q25DVR4ES User’s Manual Chapter 5: DVR Setup - 5.7 Schedule Set User can setup video recording method by Time, Motion Triggered and Continuous Recording. SCHEDULE SET -- TTTAAATTTTTTAATTTTT AAT │ │ │ │ │ │ │ │ │ 0 3 6 9 12 15 18 21 24 ,DOWN), PRESS (UP PRESS (MENU) TO ENTER (SELECT) “-” No Recording. “T” Continuous (System Default). “A” Motion Triggered. [ ] Up / [ ]Down: To move the prompt. [ ] Select: To select Method.
Q-See Q25DVR4ES User’s Manual Chapter 5: DVR Setup - 5.10 Sub Menu-Password Change System default password: Press [ CURRENT PASSWORD : ------ NEW PASSWORD : ------ CONFIRM PASSWORD : ------ CH1] button six times. User needs to enter six characters for the password. All keys can be used as password key except the [ Menu] key, which is used to exit. Note: To Reset the DVR. Press the [Pause] button 10 times. Resetting the DVR restores all values to system defaults and the DVR will reboot.
Q-See Q25DVR4ES User’s Manual Chapter 5: DVR Setup - 5.12 Sub Menu-Time Set TIME SET ∨ To configure the DVR’s time: 2008/08/08 20:08:08 PRESS (UP,DOWN), ENTER (SELECT) PRESS (MENU) TO EXIT Press [ Up] and [ Down] to move prompt. Press [ Select] to modify. Press [ Menu] to save and exit. Chapter 5: DVR Setup - 5.
Q-See Q25DVR4ES User’s Manual Chapter 5: DVR Setup - 5.14 Motion Setup MOTION RECORD TIME: This number indicates how long the triggered recording lasts after the DVR has been triggered by motion. MOTION ALARM TIME: This number indicates how long the buzzer inside the DVR will sound when a motion event has been detected. MOTION SET: User needs to have video record method set to Motion Trigger. (Refer to 5.
Q-See Q25DVR4ES User’s Manual Chapter 5: DVR Setup - 5.15 NTSC/PAL Output Selection Change the J10 jumper on the system board to select NTSC or PAL video output as marked on the silkscreen of the system board. NTSC/PAL Select Chapter 5: DVR Setup - 5.16 Factory Reset Press the [ SEL] Button to reload factory defaults, then the DVR will reboot, all custom settings (including password) will be restored to default.
Q-See Q25DVR4ES User’s Manual Chapter 6: Recording - 6.1 Start Recording Press [ Record] to start recording (As set in 5.7 Schedule Set). System will display information on Screen. NOTE: Only EACH Mode can enlarge single channel to full screen display. 1 10% 3 2 4 5 6 R R R R QUAD REC [M] (T) 1. 2. 3. 4. 5. 6. 7. 8.
Q-See Q25DVR4ES User’s Manual Chapter 6: Recording - 6.
Q-See Q25DVR4ES User’s Manual SEARCH TIME 1 2008/01/08 01 * 02 03 * 04 * 05 5 06 07 4 08 > 3 08:30:56 TIME TIME TIME TIME MOTION MOTION MOTION MOTION (UP,DOWN) MOVE 2 ┅ 2008/01/08 2008/01/08 2008/01/08 2008/01/08 4 2008/01/08 2008/01/08 2008/01/08 2008/01/08 2008/01/08 (PLAY) PLAY (FF) SELECT MODE 16:00:35 15:50:20 14:30:56 14:15:30 14:00:15 13:55:37 11:30:12 10:15:30 08:30:55 (MENU) EXIT (SELECT) CHANGE 1. Start Time. 3. TIME: Continuous record. 5. Un-played video recording. 2. End Time.
Q-See Q25DVR4ES User’s Manual Chapter 8: USB DVR Access - 8.
Q-See Q25DVR4ES User’s Manual 1. DVR Event List 2. Capture one frame picture 3. Save DVR’s Recorded Video to PC 4. Configuration 5. Load Video File Saved in PC 6. Play DVR Video File 7. Play PC Video File 8. Channel Selection Keys 9. Playing Scroll Bar 10. Fast backward 11. Previous Frame 12. Play Backward 13. Pause 14. Play 15. Next Frame 16. Fast Forward 17. Volume Scroll Bar (not used by this unit) 18. Exit Press to open the event video list.
Q-See Q25DVR4ES User’s Manual Press Press Press to configure the DVR play/record system. to print the picture of DVR’s playback to play the video .
Q-See Q25DVR4ES User’s Manual Chapter 9: Specifications DVR Specifications ITEM DESCRIPTION Video Format NTSC / PAL Operation System None Camera Input Channel 4 channel Composite BNC Video Output Channel 1 channel Composite BNC Display Frame Rate Recording Frame Rate (Quad) Recording Frame Rate (Each Mode) NOTE STAND-ALONE NTSC 120 frames/second 4 x 30 frames/second PAL 100 frames /second 4 x 25 frames/second NTSC Max.30 fps (Quad) Quad Mode PAL Max.
Q-See Q25DVR4ES User’s Manual Chapter 10: Appendix - 10.
Q-See Q25DVR4ES User’s Manual Chapter 10: Appendix - 10.
Q-See Q25DVR4ES User’s Manual Thank you for choosing our products. All of our products users have a conditional free warranty repair service for hardware within 12 months starting from purchase date, and a free exchange service within one month (valid for manufacturing defects). Permanent upgrading service is provided for the software. Liability Exclusions: Any product malfunction, abnormalities in operation or damage caused by following reasons are not within the free service scope of our company.