4 Channel Digital Video Recorder User Manual MODEL Q4DVR4RCM 4 Channel Digital Video Recorder Protect Your Investments. www.Q-See.
Directory 1.DVR Features-------------------------------------------------------------------------------------------------------------2 2.Outlook---------------------------------------------------------------------------------------------------------------------2 2.1 Front Panel-------------------------------------------------------------------------------------------------------------2 2.
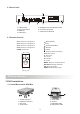
DVR Features 1.DVR Features 4 Channels - BNC Camera Inputs 2 Channels - BNC Monitor/VCR Outputs NTSC / PAL Video Loss Alarm Motion Detection With Area Setting PTZ Control With RS485 Port. Connect PC With USB 2.0 Port 4 Sets NO/NC Sensor Input 1 Alarm Output (2A 28VDC / 2A 125 VAC) One ATA-100 Hard Disk Interface, Support Over 200G Byte Time Schedule record / Sensor Triggered Record / Motion Triggered Record IR Remote Controller Outlook 2.Outlook(Picture is for reference only) 2.
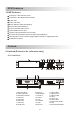
2.2 Rear Panel POWER CAUTION RISK OF ELECTRIC SHOCK DO NOT OPEN CH1 CH3 CH2 CH4 1 3 4 CAUTION: TO REDUCE THE RISK OF ELECTRICAL SHOCK. DO NOT OPEN COVERS. NO USER SERVICEABLE PARTS INSIDE. REFER SERVICING TO QUALIFIED SERVICE PERSONNEL.......................................... WARING: TO PREVENT FIRE OR SHOCK HAZARD. DONOT EXPOSE UNITS NOT SPECIFICALLY DESIGNED FOR OUTDOOR USE TO RAIN OR MOISTURE..... VIDEO INPUT VIDEO OUTPUT DC 12V RS485 1. 2. 3. 4.
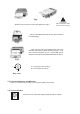
Fig1 Slide the carrier body out of the cartridge frame (Fig1) CAUTION ........ DON'T take out HDD when DVR running! Connect the HDD data cable and the power cable to the HDD (Fig2) Fig2 Push the tray into the cartridge frame until fully inserted and handle pushed downward (Fig3). Lock tray in place and power up unit. A New HDD should always be formatted (see HARD DISK SETUP Menu). Fig3 A A: Locked Non-removable B: Unlocked(Removeable) B Key Lock 3.
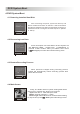
DVR System Boot 4.DVR System Boot 4.1 Detecting Installed Hard Disk After connecting the power, system will boot-up and detect installed hard disk. On Monitor it will show Master and Slave hard-disk information.Please make reference to hard disk manual to configure hard disk sequence. (Master or Slave)....................................................................... Checking HDD MASTER ExcelStor.
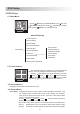
DVR Setup 5.DVR Setup 5.1 Main Menu Press[ MENU] to enter MAIN MENU, use [ UP] and [ DOWN] to select item, press [ SEL/EDIT] to modify setting and [ MENU] to confirm and exit......................
and again, DVR will not change its state until user press any key.......... Quad Mode Compress and record all 4 channel video into one file, therefore user can not enlarge single channel to full screen. User can't use the each mode record in this mode. Record frame rate will affect the movement of object in recorded video. More frames means more smooth movement and cost more hard disk space. System default value is 25 fps, that means system will record 25 frame per second.
All keys can be used as password key except [ MENU] key, which is used for confirming and exit......................... Monitor Digital video Recoder Monitor UP DATA+ POWRE MENU 4 Dual PAL NTSC DOWN DATA 5.
5.14Hard Disk Setup OVERWRITE ENABLED: If you choose YES, recording continues and overwrite previous recording when hard disk drive space is full............................................................ If you choose NO, the recording session stops when all hard disk drive is full for recording. ..................................
Installation example diagram: POWER CAUTION RISK OF ELECTRIC SHOCK DO NOT OPEN CH1 CH3 CH2 CH4 1 2 3 4 CAUTION: TO REDUCE THE RISK OF ELECTRICAL SHOCK. DO NOT OPEN COVERS. NO USER SERVICEABLE PARTS INSIDE. REFER SERVICING TO QUALIFIED SERVICE PERSONNEL.......................................... WARING: TO PREVENT FIRE OR SHOCK HAZARD. DONOT EXPOSE UNITS NOT SPECIFICALLY DESIGNED FOR OUTDOOR USE TO RAIN OR MOISTURE.....
5.17 Restore Factory Default Press [ ALL SETTING DATA IS INITIAL IZED EDIT] Button to make the system load factory default. Monitor Digital video Recoder Monitor UP DATA+ POWRE MENU Dual PAL NTSC 4 DOWN DATA Record 6.Record 6.1 Start Recording Press [ REW] to start recording. System will display some information on Screen.
User can calculate and estimate record hours by below formula120G Byte @ 7 frames per second @ Normal quality 120 (G byte) x 1024 (M byte) x 1024 (K byte) 15 (Kbyte/frame) x 7 (frame/sec) x 60 (sec) x 60 (min) Estimate hours is 332 Hours Playback 7.Playback ................................................................ Press [ PLAY] then system will list all recorded video clip from HD.
8.2 Program Interface To run the program( Double click icon on your desktop)............................... System will detect the HDD automatically when you connect the USB cable to your PC. .......................................................................................................................
Press Press to configue the DVR play/record system. to play video . Specification 9. Specification ITEM Video Format Operation System Camera Input Channel DESCRIPTION NTSC / PAL STAND ALONE 4 channel Composite BNC 2 channel Composite BNC USB 2.
Over 200G Byte HDD Support Estimated Record Length Method Search Full Screen ATA -100 Interface 120G Hard disk @ 7 fames per second @ Normal Quality (120 1024 1024 K byte) ( 7 15 60 60 ) = 332 Hours Time, Date, Event YES 4 Inputs (Normally Open / Normally Closed) 1 Output (Relay 2A 28VDC / 2A 125VAC) Camera Signal Loss Alarm Sensor, Alarm YES YES Length 15.7 in PTZ USB Dimensions PELCO-D PELCO-P USB2.0 Port for playback Width 10.8 in Height 2.7 in Appendix 10.Appendix 10.
Affix Proper Postage Here Q-See Product Line By Digital Peripheral Solutions, Inc. 8015 E. Crystal Drive Anaheim, CA 92807 Q-SEE PRODUCT LINE WARRANTY PURCHASER'S SALE REMEDY UNDER THE ABOVE WARRANTIES SHALL BE REPAIR OR REPLACEMENT AS STATED ABOVE. DPS INC'S SALE AND EXCLUSIVE LIABILITY FOR ANY AND ALL LOSSES AND DAMAGES ARISING OUT OF ANY CAUSE WHATSOEVER SHALL IN NO EVENT EXCEED THE A C T U A L P R I C E P AI D F O R T H E PRODUCT. IN NO EVENT SHALL DPS INC.
Register Your Q-SEE Product Online Now YOU MUST REGISTER YOUR Q-SEE PRODUCT TO RECEIVE TECHNICAL SUPPORT! Just fill out this card and fax to 714-998-3509, mail to us or register online at www.q-see.com. Mr. Ms. Name: Title: Street Address: City: ) Phone: ( Product Model: Serial Number: Purchased From: Name: Company: State/Province: Email: Suite or Apt.
Digital Peripheral Solutions Inc 8015 E Crystal Drive Anaheim, CA 92807 877-998-3440 Q-SEE Tech Support IN USA MONITOR:9am-5pm PST Email: ts@dpsi-usa.com Website: www.q-see.