QSC13212D Hi-Resolution CCD Color Camera With 2.
Thank you for purchasing our products. Please read the manual carefully before using and keep it for future reference. WAR N I N G To reduce the danger of electric shock, and avoid lightning strikes, do not tamper with the wiring or connections to the camera’s circuit board, and make sure the unit is properly grounded. Unit should only be serviced by authorized repairmen. Contact Q-See for any needed repairs.
Notes 1. Avoid strong impact and stay away from strong electromagnetic interference and vibration. 2. There are some sophisticated parts inside the camera, therefore, during transportation and installation, please avoid damage caused by stress or severe vibration. For the sake of safety, please do not switch on power before completing all installation. 3.
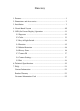
Directory 1. Features ·································································································· 1 2. Dimensions and Accessories ······························································ 2 3. Installation ················································································· 3 4. Circuit Board Layout ········································································10 5. OSD (On Screen Display) Operation ··············································· 11 5.
1. Features 1. New Generation SONY CCD Adopting the latest Second-generation high-sensitive CCD, it can receive clear and lucid images even with very low illumination. 2. Hi-resolution Video Resolution Color horizontal resolution can reach 550TVL, B/W horizontal resolution can reach 600TVL. 3. Day & Night Switch Day & Night cameras can switch automatically into color or B/W according to available light. 4.
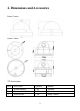
2. Dimensions and Accessories Dome Camera Dome Camera 2.
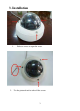
3. Installation 1. 2.
3. Open the cover 4.
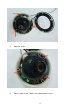
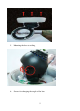
5. Mounting the base to ceiling 6.
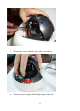
7. Loosen the screws on both sides with a screwdriver 8.
9. 10. Top screw adjusts focus, bottom screw adjusts lens size.
11. You can remove the cover with a coin 12.
. Place cable in channel and through side hole 14.
15. Connector for portable video tester if needed by the installer, the black button is for operating OSD (On Screen Display). 4.
4.2 On Screen Display Switch ENTER Press to Enter or Exit the menu UP/DOWN Tilt toward UP and DOWN to move up and down in menu LEFT/RIGHT Tilt toward LEFT, RIGHT for modifying the menu parameters, press RIGHT to move to the next menu and modify the parameter. 5. OSD (On Screen Display) Operation Press the "OK" to enter main menu, if the button is not pressed for 90 seconds, the main menu will disappear automatically from the screen.
5.1 Exposure When the cursor stops on "exposure", press “Ok” button to enter "exposure" to set the parameters. Lens There are two kinds of options, automatic or manual; depending on the specific type of the lens. Lens Brightness User can adjust image brightness from 0 to 100, depending on the lightness of surroundings. The default value is 35.
5.2 Color Move the cursor to "RGB" icon, click "OK" to enter the White Balance menu to set relevant parameters. White Balance This is used to restore the authenticity of the color, affected by the change of color temperature. Users can choose white balance mode according to the actual situation: Auto White Balance / Auto-tracking White Balance / Lock White Balance / Manual White Balance respectively. Manual - Red Manual white balance can be adjusted, the default value is 100.
5.3 Day & Night Switch Day & Night Switch is specially designed for different occasions. There are four kinds of modes as follows: automatic mode, color mode, B/W mode, and external switch. The user can set different modes according to the surroundings. Color Signal Set menu to display color or not Color to B/W Settings When the mode is "external control", user can’t adjust it.
CDS Control The filter switch will be controlled by the photocell, and it can work only in external control mode. 5.4 Function Mirror Left or Right Mirror can be set when turning on the mirror switch. Sharpness adjustment Adjust the image sharpness from 0-50. Peripheral Brightness Compensation If you need to compensate brightness, set switch to ON and move the cursor down to "Peripheral Brightness Compensation" and adjust the value from"0-50".
Wide Dynamic Compensation This is digital wide dynamic function, you can adjust its value in order to achieve the best results, the values are: 60DB, 80DB, 100DB. 5.5 Motion Detection (This camera does not have this feature) Mainly used for setting the image motion detection and alarm linkage function. 5.6 Privacy Zone "Privacy Zone" is mainly used for special places or special surroundings, for this camera there are four zones set for privacy.
5.7 Camera ID (This camera does not use this feature) Used for setting the camera's address, communication protocol and baud rate. 5.8 Camera Settings Title Display The title can be set ON or OFF. Title Edit Move the cursor to "Title Edit", Click "OK" to enter the title setting. Up to16 letters, numbers & symbols can be used as "Title".
Move the cursor to the input column, press "OK"-the cursor will be moved to the above input character column, after selecting characters, press "OK", the cursor will be moved to the next input position. If you need additional settings, please refer to the above operation. After finished inputting, move cursor to "RETURN" click "OK" to return to the previous menu. Title Reset Restore the title setting, which is used to clear the previous title.
6. Technical Specifications Function QSC13212D Dome Camera Imaging Sensor Sensor Area Lens Size Pixels Signal System Syn. System Shutter speed S/N Ratio Video Output Horizontal resolution Mini. Illumination General Functions IR Distance IR Leds 1 / 3" SUPER HAD ‖ hi-sensitivity CCD & DSP 4.9mm x 3.7mm 2.8mm to 12mm Manual Varifocal PAL: 752(H)×582(V);NTSC: 768(H)×494 (V) PAL or NTSC Power Synchronization / Internal Synchronization PAL:1/50~1/100000s; NTSC:1/60~1/100000s More than 58dB(AGC OFF) 1.
Power & Other Parameters Wide dynamic compensation AWB Mirror Sharpness adjustment Gamma Correction CCD white Point Auto-detection Auto-completion point Menu Background Power Supply Power Consumption Operation Temperature Operation Humidity Storage Temperature Storage Humidity Weight (kg) 60dB, 80dB, 100dB optional Manual / Auto / Auto Tracking On/Off 0~50 adjustable 0.3~1.0 adjustable Not supported white and black points automatically added On/Off DC12V 300mA/AC24V(optional) 2.
7. FAQs 1. Q: No image after installation? A: a. Check the power supply connections, try plugging into different surge protector and a different power outlet. and whether the indicating led is always on or not; b. Check the video cable, make sure it is ok. c. Make sure the monitor is on. 2. Q: Image interference after installation? A: a. Check the output from the power supply, try plugging into different surge protector and a different power outlet. b.
Please contact us using the following methods with questions about your Q-See product. Q-See Products 8015 E. Crystal Dr. Anaheim, CA 92807 Email: Customer Service cs@dpsi-usa.com Technical Support ts@dpsi-usa.com Online Live Web Chat Visit: www.q-see.com Telephone: Customer Service 1.877.998.3440 x 538 Technical Support 1.877.998.3440 x 539 Fax: 1.714.998.
Q-See Product Warranty Thank you for choosing our products. All of our products users have a conditional free warranty repair service for hardware within 12 months starting from purchase date, and a free exchange service within one month (valid for manufacturing defects). Permanent upgrading service is provided for the software. Liability Exclusions: Any product malfunction, abnormalities in operation or damage caused by following reasons are not within the free service scope of our company.
The material in this document is the intellectual property of our company. No part of this manual may be reproduced, copied, translated, transmitted, or published in any form or by any means without our company’s prior written permission. 1. Our products are under continual improvement and we reserve the right to make changes without notice. But no guarantee is given as to the correctness of its contents. 2. We do not accept any responsibility for any harm caused by using our product. 3.
Customer Information Card User’s Name Mr./Mrs.